
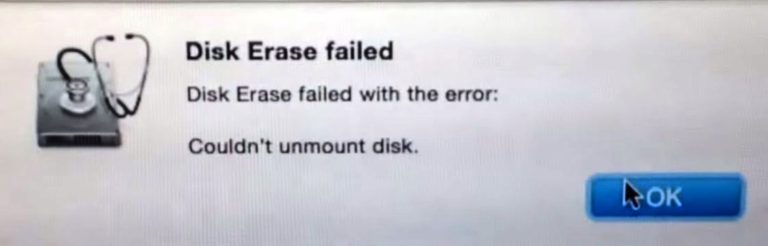
Couldn’t Unmount Disk Error Mac
If you are regular Mac users and facing Couldn’t Unmount Disk issue on your Mac PC, then you are in right place. This article will help you to fix this error with several recommended methods and trying to know what problem will you face if System has this disk error.
Reasons behind Couldn’t Unmount Disk Error on Mac
- When a device cannot erase or partition the drive, users are delivered Couldn’t Unmount Disk error or related messages.
- When the device is not allowed to repair specific permissions or directories in Disk utility, then might popup this error message on your Mac screen.
- It might possible to get this error if boot drive of your System has modified or corrupted.
- The alert message might popup on your Mac when the driver is being used by other apps or process.
Impact of Couldn’t Unmount Disk Error
As we know that, Disk Utility is important feature that helps to solve any problems related to disk or storage on your System. In case you have this issue on your PC, you might face several issues including sudden elimination of the running application, lost or corrupted files on hard drive, unable to open particular files or programs and unable to partition Mac HFS as well. Let’s take have a look at solution to fix this issue.
Ways to Fix Couldn’t Unmount Disk Mac: Tips & Tricks
Procedure 1: fix couldn’t Unmount Disk error by using command line
Step 1: At first, access Terminal application
Step 2: Now, input Diskutil list line
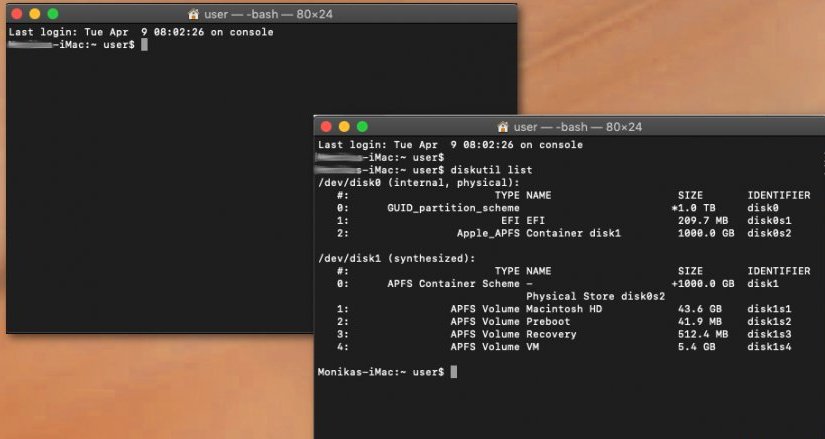
Step 3: Once list of all disks appears, you need to found the disk that you want to unmount
Step 4: Now, type sudo diskutil unmountDisk force /dev/diskx command in command line
Step 5: After that, replace /dev/diskx with the correct disk number
Step 6: Follow the steps if you want to unmount further the disk on your Mac
Procedure 2: You can use Recovery Partition
Step 1: At first, restart your Mac and press & hold option key
Step 2: Now, choose Recovery Partition option from the appeared menu
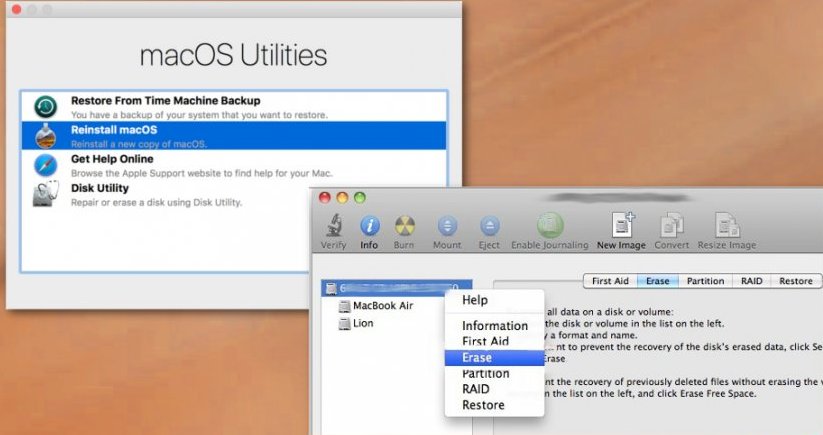
Step 3: Choose Disk Utility in appeared boot menu
Step 4: Finally, go to First Aid if you want to verify and repair the disk. Or go to Erase if you want to format the disk. Please check if the error is resolved.
Procedure 3: To fix couldn’t Unmount Disk error Mac, you can check USB Boot Drive
Step 1: At first, attach USB boot drive to your drive
Step 2: Restarts your Mac and press & hold the option key
Step 3: Now, select the attached boot drive from the appeared menu
Step 4: Choose Disk Utility from the Boot menu
Step 5: After that, go to First Aid to verify the disk and repair if it is necessary. Once done, please check if the problem is resolved.
Conclusion
I hope this article helped you to fix Couldn’t Unmount Disk Mac with several easy methods. You can choose either one or all procedure to fix the issue as per System requirement. You should protect your device and drive from damages. If your System has malware or spyware related issue, then you can scan your computer with very powerful antimalware tool Reimage that is able to detect/delete all junk files or viruses on your PC. So, try it.
Is Your PC Behaving Abnormal & Needs Instant Optimzation?
We recommend you to choose Reimage PC Repair Suite which is dedicated to offer complete options to optimize a PC, fix any Windows error, and remove malware threats in easy. The software is award winning and suggested as the best malware fix application supporting all Windows versions including XP/Vista/7/8/8.1/10. Just 3 steps to avail error free PC.
- Download Reimage PC Repair’ and install on your PC. (Follow all on screen instructions when installer is executed)
- Click “Scan Your PC” button to scan all present issues, errors, junk files, and malware threats.
- Finally, click “Start Repair” to fix all detected problems in next few minutes.
