
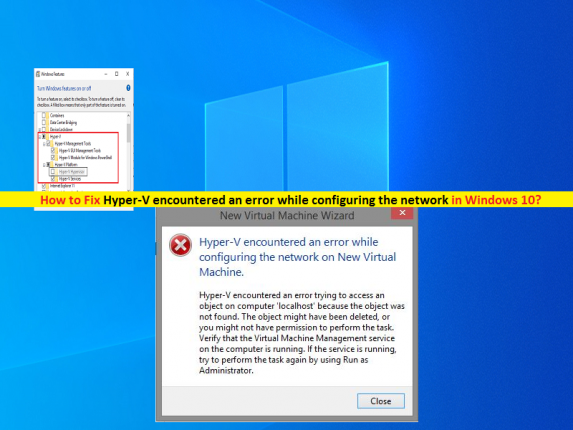
What is ‘Hyper-V encountered an error while configuring the network’ error in Windows 10?
If you are experiencing ‘Hyper-V encountered an error while configuring the network’ error in Windows 10 computer while trying to create a new Hyper-V Virtual Machine, then you are in right place for the solution. Here, you will be guided with easy steps/methods to resolve the issue. Let’s starts the discussion.
‘Hyper-V’: Microsoft Hyper-V is native hypervisor. It can create virtual machines on x86-64 systems running Windows. Hyper-V superseded Windows Virtual PCs as hardware virtualization component of client editions of Windows NT, starting with Windows 8 OS. A Standalone Windows Hyper-V Server is free but with command-line interface only.
However, several users reported that they faced ‘Hyper-V encountered an error while configuring the network’ error while they tried to import a virtual machine on Hyper-V in Windows 10 computer. This error indicates the operation is unable to finish because a virtual machine with same identifier already exists, and urges to select a new identifier in order to resolve the issue. Let’s take a look at error message.
“Hyper-V encountered an error while loading the virtual machine configuration from [a-location]
Failed to create virtual machine.
The operating failed because a virtual machine with the same identifier already exists. Select a new identifier and try the operating again”
This issue prevents you from importing the same virtual machine on your Windows 10 computer because the error states you already have the original one. The possible reason behind this issue can be incorrect option you have selected while importing a virtual machine to Hyper-V. Usually, this issue is occurred when you select ‘Register the virtual machine in-place’ or ‘Restore the virtual machine’ option while importing a VM (virtual machine).
Also, you need to create new identifier (ID) for Hyper-V if you see the error that states the identifier is already exists which you are using while importing. You can also delete old virtual machine and create new identifier for Hyper-V in order to fix the issue. Let’s go for the solution.
How to fix Hyper-V encountered an error while configuring the network error in Windows 10?
Method 1: Fix ‘Hyper-V encountered an error…’ with ‘PC Repair Tool’
If this error is occurred due to some problems in your Windows computer, then you can try to fix the issue with ‘PC Repair Tool’. This software offers you to find and fix BSOD errors, DLL errors, EXE errors, problems with programs/applications, malware or viruses issues, system files or registry issues, and other system issues with just few clicks.
⇓ Get PC Repair Tool⇓
Method 2: Check if Hyper-V Manager services are running in Windows 10
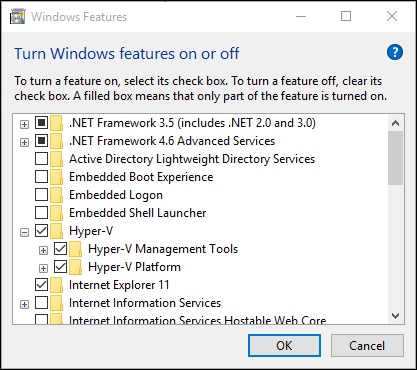
Before troubleshooting the issue, you should check if Hyper-V Manager Services are running in your Windows 10 computer.
Step 1: Open ‘Control Panel’ in Windows 10 and go to ‘Uninstall a Program > Turn Windows Features ON or OFF’
Step 2: In ‘Windows Features’ window, find and expand ‘Hyper-V’ folder, check ‘Hyper-V Hypervisor’ checkbox if not checked and hit ‘OK’ to save the changes. After checking this option in Windows Features, if you getting the same issue, it means Hyper-V Manager is not working properly. In such case, you to enable this feature through BIOS settings or fix your motherboard issue.
Method 3: Delete old virtual machine
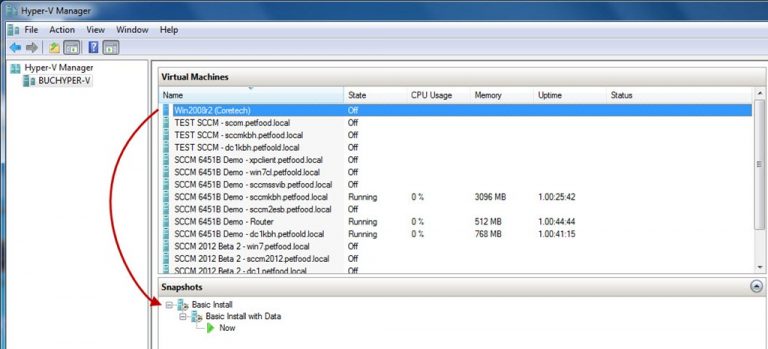
This issue can be occurred if the unique identifier for Hyper-V is already exists in computer and causing conflict issue if you are using same identifier while importing VM (virtual machine). In such case, you can delete the old/original virtual machine in computer in order to remove unique identifier (ID).
Step 1: Open ‘Hyper-V Manager’ in Windows 10 and right-click on virtual machine, and select ‘Delete’ option to delete the virtual machine
Step 2: In the confirmation dialog box, click ‘Delete’ to confirm delete. It will delete all files of your selected virtual machine within moments
Method 4: Create a new Unique Identifier (ID)
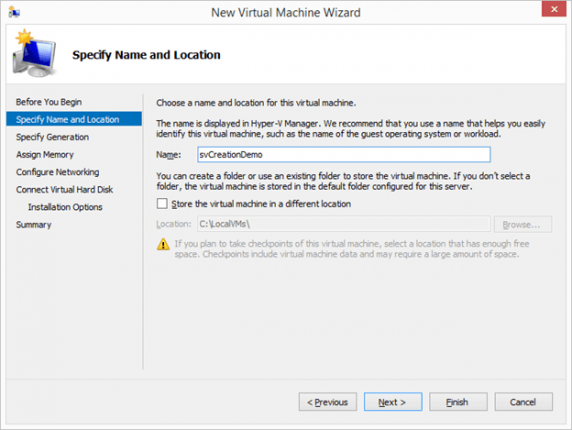
If you don’t want to delete virtual machine to import another one, then you can create new unique ID/Identifier.
Step 1: Open ‘Hyper-V Manager’ in Windows 10 and click on ‘Import Virtual Machine’ option
Step 2: Select the VM (Virtual Machine) folder by clicking ‘Browse’ button
Step 3: Choose ‘Copy the Virtual machine (Create a new unique ID)’ option in ‘Choose Import Type’ tab
Step 4: Click on ‘Next’ and run your virtual machine. This will create a new unique ID for your virtual machine and now you can import a virtual machine in Hyper-V.
Conclusion
I am sure this post helped you on How to fix Hyper-V encountered an error while configuring the network in Windows 10 with several easy steps/methods. You can read & follow our instructions to do so. That’s all. For any suggestions or queries, please write on comment box below.

