
Many users have reported about the file explorer not responding Windows 10 issue in recent times. They also stated that they had no such threats when they were using earlier versions of the Windows but the moment they upgraded their OS to the latest one, they suddenly started to deal with various annoying problems. In this circumstance, the file explorer no longer processing any more or loading forever; displaying the error message “File Explorer (Not Responding)”. This annoying issue avoids users from accessing the doc files, computer apps, photos etc. unless they search them in the start menu bar by entering their names.
Possible Causes Behind Windows 10 file explorer not responding Problem:
Although, it is still unclear what is the proper reason behind the occurrence of this issue but it supposedly happens because of malevolent software, corrupt Windows registry, malware or virus and so on. A hazardous parasite silently infiltrates the Windows PCs by stealth without users’ approval through several illusive tactics. After that, it conducts a serious of malicious activities inside and wreaks havoc onto the machine. It keeps performing unethical acts in the background and causes too many pernicious issues in the device including file explorer not responding Windows 10.
How To Solve Windows 10 file explorer not responding Problem?
According to the reports, the issue normally occurs when user right-clicks something displaying such messages: File Explorer hangs, File Explorer crashes or File Explorer not responding. If you are among those users who are dealing with this irritating threat, you don’t need to be panic. We have provided some genuine methods that you have to apply one at a time and then see if the problem still exists.
Solution 1- Hide hidden files and folders
To get rid of the threat, you should try hiding the hidden files and folders. And to do this, just follow the below steps:
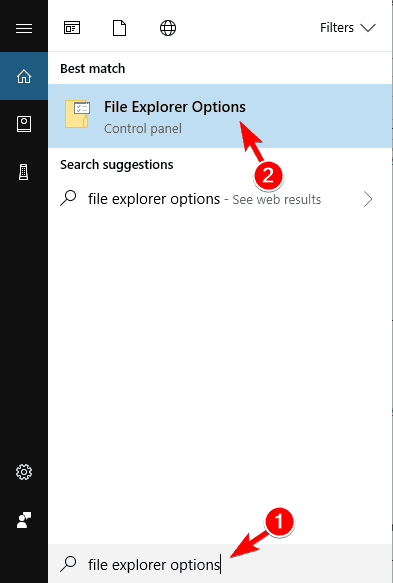
- Hold ‘Windows’ key and press ‘S’ at the same time and type in ‘file explorer options’ and click on it.
- Once the Window appears, click on the ‘View’ tab and tick on the ‘Don’t show hidden files, folders or drives’ option.
- Tap on ‘Apply’ and ‘OK’ to save modifications.
- Once done, check if the issue still occurs.
Solution 2- Execute a clean boot
Sometimes, the file explorer not responding Windows 10 issue can happen due to the interference of some specific startup applications with the PC. So, you need to perform a clean boot to find the problematic app by simply following the below steps:
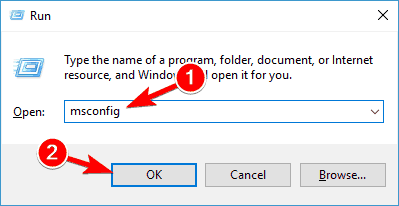
- Open the ‘Run’ dialog box by pressing the ‘Win + R’.
- Type in ‘msconfig’ and hit the ‘Enter’ button.
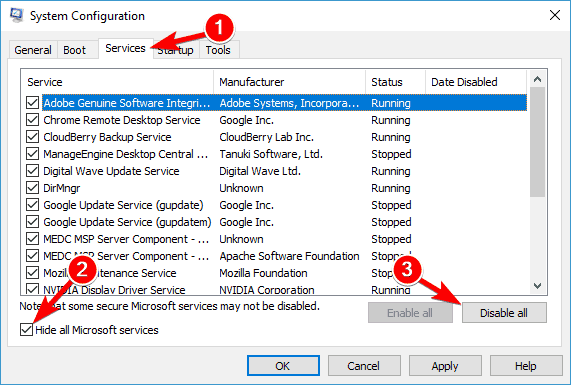
- Once the ‘System Configuration’ Window appears, go to the ‘Services’ tab and tick ‘Hide all Microsoft services’ option.
- After that, tap on ‘Disable all’ button.
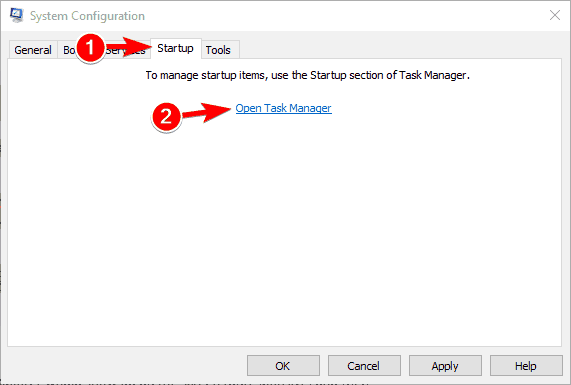
- Now, navigate to the ‘Startup’ tab and click on ‘Open Task Manager’.
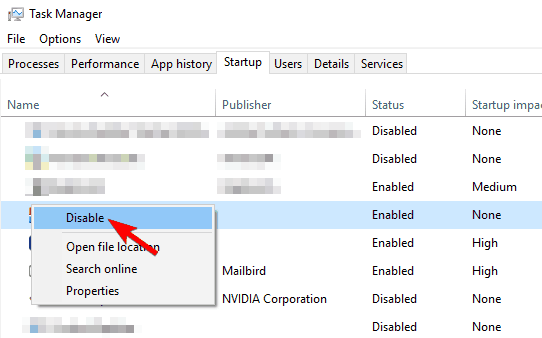
- As soon as the startup applications list appears, right-click on the first name on the list and opt for ‘Disable’ from the menu. You have to repeat this step for all items on the list.
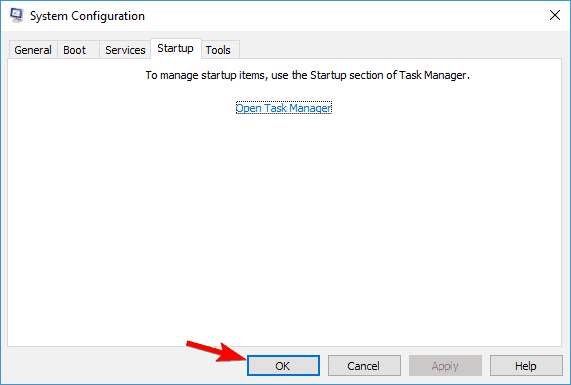
- After disabling all the startup applications, again go to the ‘System Configuration’ Window.
- Tap on ‘Apply’ and ‘OK’ to save the modifications.
- Restart the computer if asked to restart and then check if the issue still exists.
In case the problem is resolved, then that means one of the disabled program was causing the threat. To find the culprit application, you have to repeat the above steps and enable programs and services one by one in the list. Remember, to apply them, you need to save modifications and reboot your device and keep enabling programs and services until you get the culprit one. And after finding that problematic application, you can uninstall it, disable it or even update it.
Solution 3- Disable Quick Access and File Preview features
Try to fix file explorer not responding Windows 10 problem, by simply disabling Quick Access and File Preview features. And to do this, just go through the following steps:
- Open ‘File Explorer Options’ by following the steps stated in Solution 1.
- Go to the ‘General’ tab, set Open File Explorer to‘This PC’.
- Uncheck ‘Show recently used files in Quick access’ and ‘Show frequently used folders in Quick access’ options.
- You can also click on the ‘Clear’ button to clear the history however, it’s not compulsory.
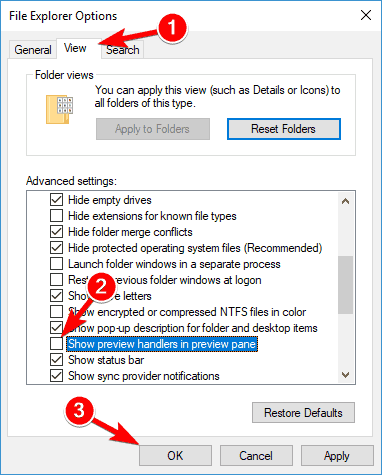
- Now, navigate to the ‘View’ tab and uncheck ‘Show preview handlers in preview pane’.
- Tap on ‘Apply’ and ‘OK’ to save modifications.
- You have to keep the preview pane disabled. To disable it, press ‘Alt + P’ once you open the ‘File Explorer’.
- One done, check if the problem still occurs.
Solution 4- Run netsh and winsock reset
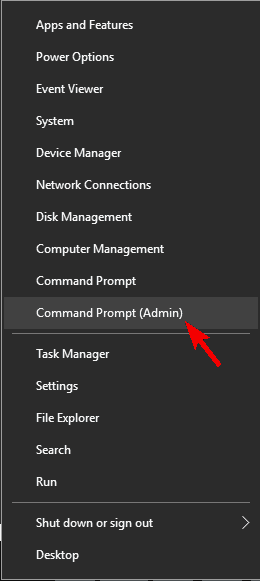
- Type ‘cmd’ in the ‘Search’ bar and right click the ‘Command Prompt’ and opt for ‘Run as administrator’.
- Type in ‘netsh’ and then hit the ‘Enter’ button.
- Now, type ‘winsock reset’ and press ‘Enter’.
- After that, you will get a notification and to save changes, you just need to restart the PC.
- Check if file explorer not responding Windows 10 problem still occurs.
Solution 5- Enable Launch folder windows in a separate process
To get rid of the threat, you should try enabling Launch folder Windows in a separate process option. To do the process, just follow the below steps:
- First of all, open ‘File Explorer Options’ as we stated in Solution 1.
- Go to the ‘View’ tab and tick ‘Launch folder windows in a separate process’.
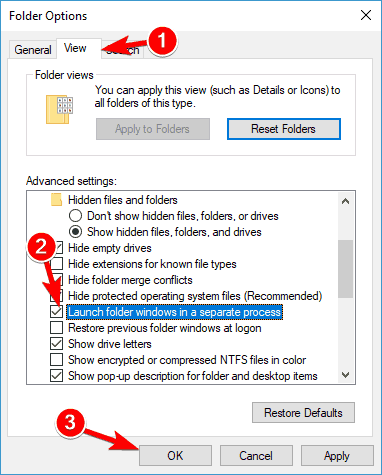
- Tap on ‘Apply’ and ‘OK’ to save modifications.
Many users have claimed that this method worked for them. You should also try this to get rid of the problem.
Solution 6- Perform a complete scan of the device
As we mentioned earlier, the “file explorer not responding Windows 10” might occur due to the presence of malware or virus in the infected PC. So, you need to scan the complete machine to remove all the pernicious infections from the device. You can do this both manually as well as automatically. The “Manual” process requires much attention and you need to be highly skilled in computer or technology. So, we highly recommend using “Automatic” procedure and for this purpose, you can use Reimage anti-malware program.
Is Your PC Behaving Abnormal & Needs Instant Optimzation?
We recommend you to choose Reimage PC Repair Suite which is dedicated to offer complete options to optimize a PC, fix any Windows error, and remove malware threats in easy. The software is award winning and suggested as the best malware fix application supporting all Windows versions including XP/Vista/7/8/8.1/10. Just 3 steps to avail error free PC.
- Download Reimage PC Repair and install on your PC. (Follow all on screen instructions when installer is executed)
- Click “Scan Your PC” button to scan all present issues, errors, junk files, and malware threats.
- Finally, click “Start Repair” to fix all detected problems in next few minutes.
Hopefully, one of these methods helped you in getting rid of the problem. If you have any other solution or want say something regarding this tutorial, you can write us in the comment below.
