
If you are facing “How to Fix FTDI Driver not working on Windows 10” issue and searching for the solution to fix, then you are in right place. One possible solution to fix FTDI Drivers problem is to “Update or Reinstall FTDI Driver Windows 10”. Let’s starts the discussion.
About FTDI Drivers
FTDI stands for “Future Technology Devices International” that is Scottish privately held “Semiconductor Device Company”. This company is specializing in “USB (Universal Serial Bus) Technology”. FTDI provides consultancy services for product designs specifically in realm of electronic devices.
FTDI Company develops & manufactures the related driver software for converting RS-232 or TLL serial Transmissions to USB signals. Since, Windows Combined Driver Model (CDM) installed on Windows OS based devices allows the applications to access FTDI devices via either D2XX DLL or COM Port without having change driver type.
CDM Driver comes in two parts including Bus Layer (FTDIBUS.sys) and serial COM Port Layer (FTSER2k.sys) which provides D2XX style functionality while COM port can be disabled and EEPROM settings avoided by changing the driver INF files.
[Tips & Tricks] How to fix FTDI Driver not working on Windows 10?
Procedure 1: Download and install FTDI Driver Windows 10
Step 1: At first, you need to go to “FTDI website” and download Windows 10 CDM Driver
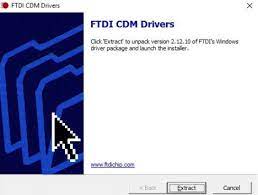
Step 2: Once downloaded, right-click on “setup.exe” and select “Run as Administrator” to install
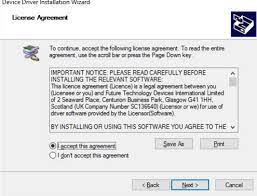
Step 3: Click on Next and accept the license terms agreement and then click on “Next”
Step 4: Follow the on-screen instructions to finish the installation. Once done, click on “finish” button to complete the installation process
Procedure 2: Update or reinstall FTDI Driver Windows 10
Step 1: Press “Windows + X” keys together from keyboard and select “Device Manager”
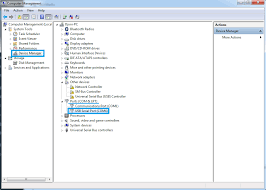
Step 2: Locate “Other Devices” and expand it
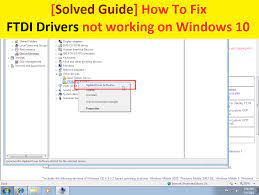
Step 3: Right-click on “USB Serial Cable” and select “Update Driver Software….”
Step 4: In the next window, select “Browse my computer for driver software”
Step 5: In the address box, put the exact location where the drivers have been saved and click on “Next”
Step 6: Wait to complete the process. Once done, restart your computer and please check if the FTDI Driver not working Windows 10 problem is resolved.
Procedure 3: Uninstall FTDI devices
Step 1: Open “Device Manger” and look for “FTDI Devices” in the list
Step 2: Right—click on it and select “Uninstall” and follow on-screen instructions to finish uninstall process.
Step 3: Once done, restart your computer.
Step 4: After restart, open “Device Manager” again and click on “Action > Scan for hardware changes”. This process will automatically download/install the suitable FTDI drivers on your computer.
Procedure 4: Check for Windows 10 update
Step 1: Press “Windows + I” keys from keyboard to open “Settings” App
Step 2: Now, go to “Update & Security > Windows Update”
Step 3: Click on “Check for updates” under “Windows Update” section
Step 4: This process will automatically download/install the available Windows update on your Windows 10. Once updated, restart your computer to save the changes.
Conclusion
I am sure this article helped you to “How to Fix FTDI Driver not working on Windows 10“ or “Reinstall FTDI Driver Windows 10” with easy steps. You can read & follow the steps/methods mentioned above to do this. If you have suggestions or queries regarding this, please write on comment box given below.
If you are unable to Fix FTDI Driver not working on Windows 10 with the solutions mentioned above, then it might possible that your System has infected with malware or viruses. According to security researchers, malware or viruses cause several damages in your computer.
In this case, you can scan your computer with powerful antivirus software that has the ability to delete all types of malware or viruses from System.
You can also try another possible solution to fix this issue. We recommended you to Repair your PCs/laptops with powerful PC Repair Tools/Software that has the ability to remove all the faculty software, clean System registry, remove all types of malware or viruses, fix all types of bugs or errors and improves System performance as well. You can download powerful PC Repair Tool/Software via “Download” link below.
Is Your PC Behaving Abnormal & Needs Instant Optimzation?
We recommend you to choose Advanced System Repair Suite which is dedicated to offer complete options to optimize a PC, fix any Windows error, and remove malware threats in easy. The software is award winning and suggested as the best malware fix application supporting all Windows versions including XP/Vista/7/8/8.1/10. Just 3 steps to avail error free PC.
- Download Advanced System Repair and install on your PC. (Follow all on screen instructions when installer is executed)
- Click “Scan Your PC” button to scan all present issues, errors, junk files, and malware threats.
- Finally, click “Start Repair” to fix all detected problems in next few minutes.
