
What is ‘Hamachi cannot get adapter config’ issue in Windows 10?
If you are facing ‘Hamachi cannot get adapter config Windows 10’ error while trying to connect to Hamachi VPN service, then you are in right place for the solution. Here, you will be guided with easy steps/methods to resolve the issue. Let’s starts the discussion.
LogMeIn Hamachi VPN: Hamachi is VPN (Virtual Private Network) application designed & developed by Alex Pankratov. This VPN application is capable of establishing direct links between computers that are behind NAT (Network Address Translation) without requiring re-configuration.
This VPN application establishes the connection over the internet that emulates the connection that would exists if the computers were connected over LAN. In 2009, Hamachi was acquired by LogMeIn. This VPN application/service is available for Microsoft Windows OS, MacOS, Linux, Android and iOS based devices.
However, several users reported that they faced ‘Hamachi cannot get adapter config’ error while they tried to access or connect to Hamachi VPN service in Windows 10 computer. The error message is appeared with ‘Failed to connect to the Hamachi servers. Would you like Hamachi to automatically monitor server availability and establish a connection as soon as becomes possible?’
The possible reason behind this error can be Admin permissions that is required to in order to connect to Hamachi VPN service. You should make sure Hamachi VPN service application is running with Administrative permissions. Also, this error usually occurs if your third-party antivirus or Windows Firewall is blocking the VPN service due to over security. In such case, you can disable your third-party antivirus and Firewall temporarily in order to resolve the issue.
Another possible reason behind Hamachi cannot get adapter config error can be outdated or corrupted drivers. Updating drivers in Windows 10 can fix the issue, also you can install Hamachi VPN as Legacy Hardware in order to fix the issue. Let’s go for the solution.
How to fix Hamachi cannot get adapter config Windows 10?
Method 1: Fix ‘Hamachi cannot get adapter config’ error with ‘PC Repair Tool’
You can fix your Windows PC problems with ‘PC Repair Tool’ in order to fix this error. This software offers you to find and fix BSOD errors, EXE errors, DLL errors, problems with programs, malware or viruses issues, system files or registry issues, and other system issues with just few clicks. You can get this tool through button/link below.
⇓ Get PC Repair Tool
Method 2: Run Hamachi VPN with Admin Permission
Step 1: Find and right-click on ‘Hamachi VPN Application’ icon and select ‘Run as Administrator’. Also, you can try to grant Hamachi VPN application admin permission with next steps.
Step 2: Right-click on ‘Hamachi’ icon and select ‘Properties’
Step 3: In ‘Properties’ window, click on ‘Compatibility’ tab and tick ‘Run this program as Administrator’
Step 4: Finally, click on ‘Apply’ and ‘Ok’ to save the changes, and restart Hamachi VPN application with Admin right.
Method 3: Disable third-party antivirus and Firewall
You can also try to fix the issue by disabling your third-party antivirus and Windows Firewall temporarily.
To disable antivirus: Right-click on your antivirus and select ‘Stop’, ‘Disable’ or similar options to disable it.
To disable Firewall, follow the steps below:
Step 1: Type ‘Firewall’ in ‘Windows Search Box’ and open it from result appears
Step 2: In the opened window, find and click on ‘Advanced Settings’ and select ‘Windows Defender Firewall Properties’
Step 3: Click on ‘Domain Profile’ from top, and select ‘Customize’ in front of ‘Protected Network Connections’ button’
Step 4: Deselect ‘Hamachi’ option and then hit ‘Apply’ and ‘Ok’ button to save the changes. Once done, please restart your computer and check if the error is resolved.
Method 4: Re-enable the Hamachi Connection
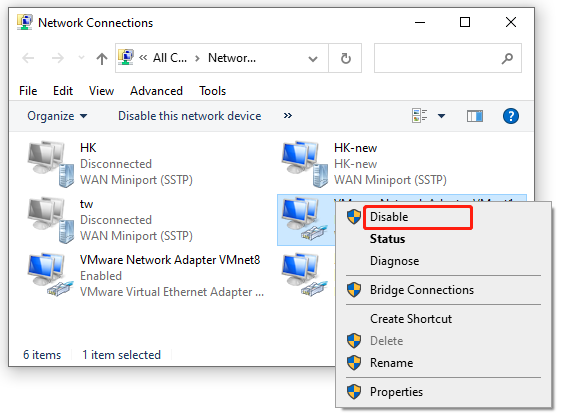
Step 1: Press ‘Windows + R’ keys on keyboard, type ‘ncpa.cpl’ in ‘Run’ dialog box and hit ‘Ok’ button to open ‘Internet Connection Settings’
Step 2: Find and right-click on ‘Hamachi’ and select ‘Disable’. Wait for a minutes, and then right-click on it again and select ‘Enable’. Once done, please check if the error is resolved.
Method 5: Update Hamachi Adapter drivers in Windows 10
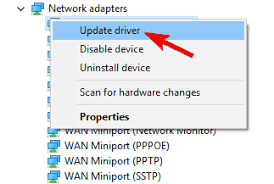
Step 1: Press ‘Windows + X’ keys on keyboard and select ‘Device Manager’
Step 2: Locate and expand ‘Network Adapters’, right-click on ‘LogMeIn Hamachi Virtual Ethernet Adapter Entry’ and select ‘Update Drivers’
Step 3: Follow on-screen instructions to finish update process. Once done, restart your computer and check if error is resolved.
Update Hamachi drivers [Automatically]
You can also try to update Hamachi drivers and all other Windows drivers with ‘Automatic Driver Update Tool’. This software will automatically find the latest updates for all Windows drivers and then install them into computer.
⇓ Get Automatic Driver Update Tool
Method 6: Disable ‘Microsoft Network Adapter Mulitplexor Protocol’
Step 1: Open ‘Control Panel’ in Windows 10 and go to ‘Network and Internet > Network and Sharing Center’
Step 2: Click on ‘Change Adapter Settings’ in left pane, and find and double-click on ‘Hamachi’ to open its ‘Properties’
Step 3: In ‘Properties’, navigate to ‘Microsoft Network Adapter Multiplexor Protocol’, and untick the checkbox to disable it.
Step 4: Save the changes and restart Hamachi VPN application, and check if the issue is resolved.
Method 7: Install Hamachi as Legacy Hardware
Step 1: Open ‘Device Manager’ and go to ‘Network Adapters’, right-click on ‘LogMeIn Hamachi Virtual Ethernet Adapter Entry’ and select ‘Uninstall’
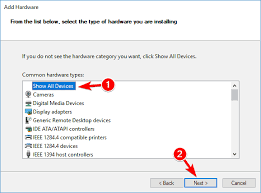
Step 2: Once uninstalled, click on ‘Action’ from top menu and select ‘Add Legacy Hardware’
Step 3: In the opened window, click on ‘Next > Install the hardware that I manually select from a list (Advanced)’ and then hit ‘Next’
Step 4: Click on ‘Show All Devices > Next > Have Disk…’. Now, browse the folder where you have installed Hamachi‘ and select ‘.inf’ driver file from the folder
Step 5: Once done, please check if the issue is resolved.
Method 8: Restart ‘LogMeIN Hamachi Tunneling Engine’ service
Step 1: Press ‘Windows + R’ keys on keyboard, type ‘services.msc’ in the opened ‘Run’ dialog box and hit ‘Ok’ button to open ‘Services’ window
Step 2: Find and right-click on ‘LogMeIN Hamachi Tunneling Engine’ service, and select ‘Restart’ option
Step 3: Now, right-click on it and select ‘Properties’, in ‘General’ tab, select ‘Automatic’ from ‘Startup Type’ dropdown, and hit ‘Apply’ and ‘Ok’ to save the changes.
Step 4: Restart your computer once finished, and check if the problem is resolved.
Method 9: Change your Network Adapter’s priority
Step 1: Open ‘Control Panel’ and go to ‘Network and Internet > Network and Sharing Center > Change Adapter Settings’
Step 2: Double-click on ‘Hamachi’ to open ‘Properties’, find and untick ‘Microsoft Network Adapter Multiplexor Protocol’ checkbox.
Step 3: Now, click on ‘Properties’ and click on ‘Advanced > IP Settings’
Step 4: Uncheck ‘Automatic Metric’, type ‘9000’ in ‘Interface Metric’, and then hit ‘Ok’ to save the changes. Once done, please check if the issue is resolved.
Conclusion
I am sure this article helped you on How to fix Hamachi cannot get adapter config Windows 10 with several easy steps/methods. You can read & follow our instructions to do so. If the article helped you, then you can share the article with others to help them. That’s all. For any suggestions or queries, please write on comment box below.

