
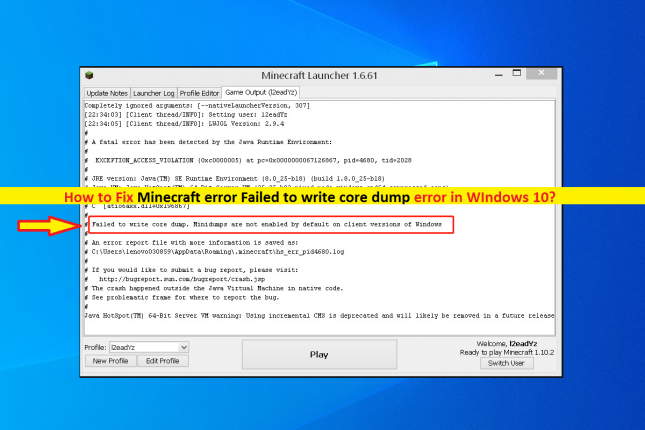
What is ‘Minecraft error Failed to write core dump’ error in Windows 10?
If you are facing ‘Minecraft error Failed to write core dump’ issue while trying to join or create a server in Minecraft game in your Windows 10 computer, then you are in right place for the solution. Here, you will be guided with easy steps/methods to resolve the error. Let’s starts the discussion.
‘Minecraft’ game: Minecraft is sandbox video game designed & developed by Mojang Studios. The game is writing in Java programming language. In this game, players explore a blocky, procedurally-generated 3D world with virtually infinite terrain, and may discover and extract raw materials, craft tools and items, and built structures or earthworks.
Players can fight computer-controlled mobs, and cooperate with or compete against other players in the same game world depending on game mode. Minecraft game is available for Microsoft Windows OS, MacOS and Linux OS based devices.
However, several users reported that they faced ‘Minecraft error Failed to write core dump’ issue while they tried to join or create a server in Minecraft game in Windows 10 computer. This error is occurred on various different Minecraft builds. This error is usually occurred in computer with integrated Intel Graphics Card due to Dynamic Link Library file ‘ig9icd64.dll’. It means ig9icd64.dll file missing or corrupted in your PC with Integrated Intel graphics card can cause ‘Minecraft – Failed to write core dump’ error.
Corruption in graphics card driver could be one possible reason behind this issue. You can update the graphics card driver to latest version in order to fix the issue. For your Integrated Intel graphics card, you can use Intel Update Assistant Tool (offered by Intel) to install latest Intel graphics card drivers in your computer. If you are using high-end NVIDIA graphics card, you might need to force Vsync and Triple buffering directly on javaw.exe in order to make the game run in stable manner.
If you are using AMD graphics card in your computer, then you can fix ‘Minecraft – Failed to write core dump’ error by uninstalling and reinstalling Catalyst or AMD software in computer. It is possible to resolve this error with our instructions. Let’s go for the solution.
How to fix Minecraft error Failed to write core dump in Windows 10?
Method 1: Fix ‘Minecraft – Failed to write core dump’ error with ‘PC Repair Tool’
If this error is occurred due to some problems in your Windows computer, then you can try to fix the issue with ‘PC Repair Tool’. This software offers you to find and fix BSOD errors, DLL errors, EXE errors, problems with programs/applications, malware or viruses issues, system files or registry issues and other system issues with just few clicks. You can get this tool through button/link below.
⇓ Get PC Repair Tool
Method 2: Update Intel Graphics Card Driver in Windows 10

This method for the PC with Intel graphics card integrated/attached. ‘Minecraft – Failed to write core dump’ error is occurred possibly due to issue with Intel graphics card driver installed in your computer. You can try to update graphics card driver to latest update version in order to fix the issue.
Step 1: Open your browser and visit ‘Intel Download Center’ page or visit ‘https://downloadcenter.intel.com/’ page
Step 2: On the opened page, click on ‘Get Started’ button under ‘Automatically update your drivers’ section
Step 3: Wait until the initial scan is complete. Once completed, click ‘Download All’ button and wait to download to complete.
Step 4: Once downloaded, locate the folder where downloaded driver files are saved, double-click on driver installation setup and follow on-screen instructions to finish installation.
Step 5: Once done, restart your computer and check if the error is resolved.
Method 3: Force Vsync and triple buffering on Minecraft (NVIDIA only)
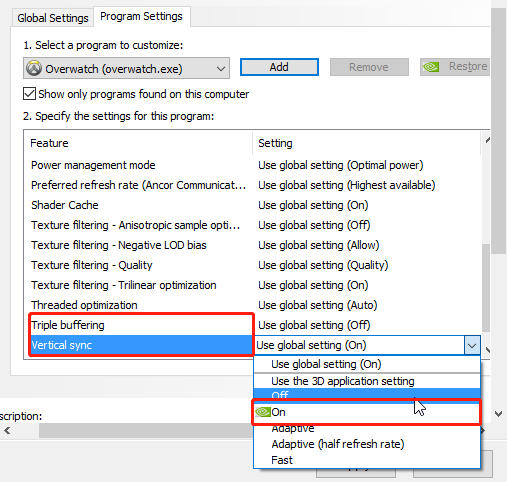
This method is for computer with NVIDIA graphics card integrated/attached. ‘Minecraft – Failed to write core dump’ error is occurred possibly when your current graphics card settings are not enforcing Vsync when you are playing Minecraft. You can fix the issue by forcing Vsync and triple buffering in NVIDIA Control Panel in Windows 10.
Step 1: Type ‘NVIDIA Control Panel’ in Windows Search Box and open it from results appear. Or you can right-click on empty area in desktop and select ‘NVIDIA Control Panel’ to open it
Step 2: In the opened ‘NVIDIA Control Panel’ window, click on ‘3D Settings > Manage 3D Settings’ in left pane
Step 3: Now, in right pane, click on ‘Program Settings’ tab, click on ‘Add > Browse’ and navigate to location of your Java Installation, select ‘javaw.exe’ file and click ‘Open’ option. You can navigate the default location of Java from the list of available location
Java 7
– C:/Program Files/Java/jre7/bin/
OR
– C:/Program Files (x86)/Java/jre7/bin/
Java 6
– C:/Program Files/Java/jre6/bin/
OR
– C:/Program Files (x86)/Java/jre6/bin/
Step 4: Once Javaw.exe file is loaded, scroll down through the list of program settings and find Vertical Sync and Triple Buffering. Once you see them, use the dropdown menu relating to Vertical Sync and Triple Buffering and change them to ‘ON’ for both.
Step 5: Once done, click on ‘Apply’ and ‘OK’ button to save the changes and then retry joining or creaing Minecraft server, and check if the error is resolved.
Method 4: Reinstall AMD Catalyst Software
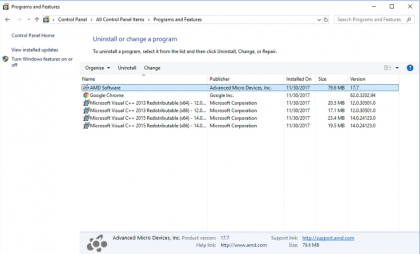
This method is for computer with AMD graphics card integrated/attached. ‘Minecraft – Failed to write core dump’ error is usually occurred due to partially corrupted AMD Software installation. In such case, you can uninstall the current AMD Software or AMD Catalyst software in computer and then reinstall the latest version of AMD Catalyst Software from official site in order to fix the issue.
Step 1: Press ‘Windows + R’ keys on keyboard, type ‘Control’ in the opened ‘Run’ window and hit ‘OK’ button to open ‘Control Panel’
Step 2: In ‘Control Panel’ window, click on ‘Uninstall a Program > Programs & Features’, find and select ‘AMD Software’ or ‘AMD Catalyst Software’ in the list of programs, and click on ‘Uninstall’ option.
Step 3: Follow on-screen instructions to finish uninstall process and after that, restart your computer
Step 4: After restart, open your browser and visit ‘https://www.amd.com/en/support/kb/release-notes/rn-rad-win-15-7-1’ page or visit ‘AMD Support page (Official)’ and download latest version of AMD Catalyst Software according to your Windows version like Windows 32-bit or 64-bit.
Step 5: Once downloaded, double-click on downloaded setup file and follow on-screen instructions to finish installation
Step 6: Once installed, restart your computer and check if the issue is resolved.
Method 5: Try making Dump file manually in Minecraft in Windows 10
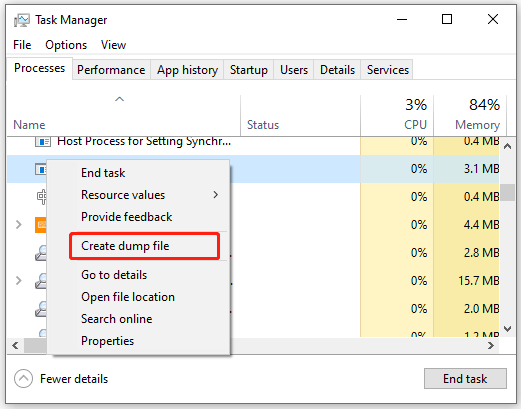
If the issue is still persist, then you can try to fix the issue by making dump file manually.
Step 1: Launch Minecraft game or open Minecraft Launcher app in Windows 10
Step 2: Now, press ‘CTRL + SHIFT + ESC’ keys on keyboard to open ‘Task Manager’ in Windows 10
Step 3: In ‘Task Manager’ window, find and right-click on ‘Java (TM) Platform SE Binary’ process or on ‘Minecraft Launcher’ process
Step 4: Select ‘Create Dump File’ option
Step 5: Wait till Windows is creating the Dump file for selected process
Step 6: Once done, restart your computer to see the changes and check if the error is resolved.
Download or reinstall graphics card drivers in Windows 10 [Automatically]
You can also try to update all Windows drivers including graphics card drivers to latest update version with ‘Automatic Driver Update Tool’. This software will automatically find and download the latest updates for all Windows drivers and then install them into computer.
⇓ Get Automatic Driver Update Tool
Conclusion
I am sure this post helped you on How to fix Minecraft error Failed to write core dump in Windows 10 with several easy steps/methods. You can read & follow our instructions to do so. That’s all. For any suggestions or queries, please write on comment box below.

