
 What is ‘Minecraft Forge not installing’ issue in Windows 10?
In this post, we are going to discuss on “How to fix Minecraft Forge not installing issue in Windows 10”. You will be guided with easy steps/methods to do so. Let’s starts the discussion.
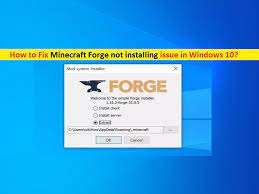
‘Minecraft Forge’: Minecraft Mod is an independent, user-made modifications to Mojag video game Minecraft. There are tens of thousands of these Minecraft mods are available and these mods can easily be downloaded from the internet for the free. ‘Minecraft Forge’ is open-source modding API and loader designed to simplify compatibility across community-created games on Minecraft Java Edition.
It is quite simple to download and install Minecraft Forge- Minecraft Mod in your game. To do so, you need to download Minecraft Forge program from official site, and then install it but make sure the installation files are pasted into .minecraft/mods folder.
However, several users reported that they faced ‘Minecraft Forge not installing’ or ‘Minecraft Forge installation problem’ while they tried to install Minecraft Forge mod in their Minecraft Game in Windows 10 computer. The error is appeared with message saying ‘Processor failed, invalid outputs’. Let’s go for the solution.
Table of Contents
How to fix Minecraft Forge not installing issue in Windows 10?
Method 1: Fix ‘Minecraft Forge installation problem’ with ‘PC Repair Tool’
If this issue is occurred due to some problem in your Windows 10 computer, then you can fix your Windows 10 problems with ‘PC Repair Tool’ in order to resolve Minecraft Forge Mod installation problem. This software offers you to find and fix BSOD errors, DLL errors, EXE errors, problems with programs, malware or viruses issues, system files or registry issues, and other system issues with just few clicks.
⇓ Get PC Repair Tool
Method 2: Update Java Software in Windows 10
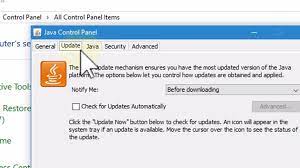
Outdated Java Software can cause this type of issue. You can update your Java Software in Windows 10 in order to resolve the issue.
Step 1: Type ‘Java’ in ‘Windows Search Box’ and click on ‘Configure Java’ to open its ‘Settings’
Step 2: In ‘Settings’ window, click on ‘Update’ tab and click on ‘Update Now’ button
Step 3: Wait to complete the process. Once done, try installing Minecraft Forge and please check if the issue is resolved.
Method 3: Disable Firewall and third-party antivirus software temporarily
Sometimes, this issue is occurred if your third-party antivirus or Firewall is blocking ‘Minecraft Forge’ app for over security reason. In such case, you can disable your third-party antivirus or firewall in order to fix the issue. To disable antivirus, right-click on antivirus and select ‘Disable’, ‘Stop’ or other similar options to disable your antivirus. To disable Firewall, follow the steps below.
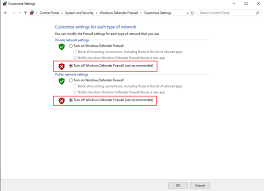
Step 1: Type ‘Firewall’ in ‘Windows Search Box’ and open ‘Windows Defender Firewall’ from results appears
Step 2: In the opened window, click on ‘Turn Windows Defender Firewall ON or OFF’ option in left pane
Step 3: Tick ‘Turn OFF Windows Defender Firewall’ option in ‘Private’ and ‘Public’ network settings both and then hit ‘Ok’ button to save the changes.
Method 4: Uninstall and then reinstall Java
Corrupted Java Software in computer can cause this issue. You can fix the issue by uninstalling the Java Software and then reinstall it.
Step 1: Open ‘Control Panel’ in Windows 10 and go to ‘Uninstall a Programs > Programs > Features’
Step 2: Find and right-click on ‘Java’ Software, and select ‘Uninstall’. Follow on-screen instructions to finish uninstall process and after that, restart your computer
Step 3: Now, open your browser and download and install the latest version of Java Software from official site. Once done, please check if the issue is resolved.
Method 5: Install Minecraft Forge Mods program using Command Prompt
You can also try to install Minecraft Forge program using Command Prompt if Minecraft Forge not installing issue is still persist.
Step 1: Open ‘File Explorer’ and locate the ‘Minecraft Forge installation file’
Step 2: Rename the ‘forge-installer.JAR’ file to ‘forge.JAR’
Step 3: Now, press & hold ‘SHIFT’ key on keyboard and right-click ‘Start Menu’ and select ‘Open Windows PowerShell Window here’
Step 4: Type the following command and hit ‘Enter’ key to execute
java -Xnx2G -jar forge.jar?
Step 5: Wait to complete the process. Once done, reboot your computer and check if the issue is resolved.
Method 6: Check your internet connection

You should make sure that there is no issue with your internet connection and internet speed. Make sure you have stable internet speed connection to download and install Minecraft Forge program in your game. To verify this, you can try doing a speed test to check if you are getting the correct speed bandwidth from your ISPs (Internet Service Providers). You can access third-party website like ‘Fast.com’ to analyse your upload and download internet speed to verify if there is an underlying issue.
Conclusion
I am sure this article helped you on How to fix Minecraft Forge not installing issue in Windows 10 with several easy steps/methods. You can read & follow our instructions to do so. If the article really helped you, then you can share the post with others to help them. That’s all. For any suggestions or queries, please write on comment box below.

