
What is ‘Premiere Project keeps crashing’ issue – Adobe Premier Pro issue in Windows 10?
In this post, we are going to discuss on “How to fix My Premiere Project keeps crashing issue in Windows 10”. You will be guided here with easy steps/methods to fix Adobe Premiere Project keeps crashing issue. Let’s starts the discussion.
‘Adobe Premiere Pro’: Adobe Premiere Pro is successor of Adobe Premiere software. Premiere Pro is timeline-based video editing software developed by Adobe Inc. and published as part of Adobe Creative Cloud licensing program. It is available for Microsoft Windows OS and MacOS based computer. This software features high resolution video editing up to 10,240 X 8192 resolution, at up to 32-bits per channel color, in both RGB and YUV. This application can be used for all common video editing tasks necessary for producing broadcast-quality, high-definition video.
However, several users reported that they faced ‘Premiere Project keeps crashing’ or ‘My Premiere Project keeps crashing’, or ‘Premiere Pro Project keeps crashing’ issue while they tried to use Adobe Premiere/Adobe Premiere Pro software on their Windows 10 computer. This issue is occurred usually when they start or open Adobe Premiere/Adobe Premiere Pro software, while some users reported the issue is started occurring in the middle of their Premiere project while they are working on it.
There could be several reasons behind this issue including some accelerations relating to Adobe Premiere software not working, outdated Adobe Premiere Pro/ Adobe Premiere software, overheating computer, overloaded CPU, required admin permission not given to Adobe Premiere Pro/ Adobe Premiere software, media cache files sometimes accumulate to huge heaps, nesting sequences, outdated graphics drivers, project files corruption, corrupted Adobe Premiere Pro/ Adobe Premiere application, corrupted fonts and corrupted temporary configurations.
The possible reason behind this error can be type of acceleration you have selected that is required to use Adobe Premiere Pro application. It might possible some accelerations might not work as expected and cause this type of error. This issue can also be occurred due to outdated or corrupted Adobe Premiere Pro/ Adobe Premiere software itself. In such case, you can uninstall and then reinstall Adobe Premiere Pro app, or update Adobe Premiere Pro app to latest version in order to fix the issue.
Another reason behind this issue can be overheating CPU caused by Adobe Premiere Pro program that is consuming lots of resources on your computer. Also, if you are running several different processes while using Adobe Premiere Pro software, CPU will become overloaded and application will crash. You can reduce the amount of head or load in order to fix the issue. Let’s go for the solution.
How to fix My Premiere Project keeps crashing issue in Windows 10?
Method 1: Fix Adobe Premiere Pro crashes issue with ‘PC Repair Tool’
‘PC Repair Tool’ is easy & quick way to find and fix BSOD errors, DLL errors, EXE errors, problems with programs/applications, malware or viruses issues, system files or registry issues, and other system issues with just few clicks. You can get this tool through button/link below.
⇓ Get PC Repair Tool
Method 2: Change Acceleration of Adobe Premiere Pro software in Windows 10
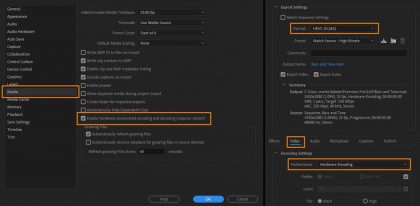
Before troubleshooting the issue, you can attempt some basic changes to configuration in Adobe Premiere Pro software in order to resolve the issue. As mentioned, you can change acceleration of Adobe Premiere Pro/ Adobe Premiere Pro software in your order to fix the issue. Let’s try.
Step 1: Open ‘Adobe Premiere Pro’ or ‘Adobe Premiere’ software in Windows 10 via Windows Search
Step 2: In the opened window, click on ‘File > Project Settings > General’
Step 3: In the opened window, under ‘General’ tab and under ‘Video Rendering Playback’, you will see ‘Renderer’ for whom several different options will be present
Step 4: Change the renderer to something else and then re-launch ‘Adobe Premiere Pro’ app and check if it works for you.
Method 3: Update Adobe Premiere Pro software
Updating Adobe Premiere Pro software to latest available version can resolve the issue. Let’s try.
Step 1: Open ‘Creative Cloud’ app in Windows 10 and go to ‘Apps’, find ‘Adobe Premiere Pro’ app and click ‘Update’ button.
Step 2: This will automatically install the available update in computer. Once done, restart your computer and check if the error is resolved.
Method 4: Check for computer overheating
This issue can be occurred due to overheating computer. When you are running lots of applications and services at same time including Adobe Premiere Pro app, then it may cause computer to overheat and cause Adobe Premiere Pro crashes issue as well. In such case, you can try to fix overheating issue by cooling down the temperature of your computer and to check temperate of your computer in order to check if your CPU is overheated or not, you can download temperature checking tools and run the application to check.
Method 5: Disable or uninstall conflicting software
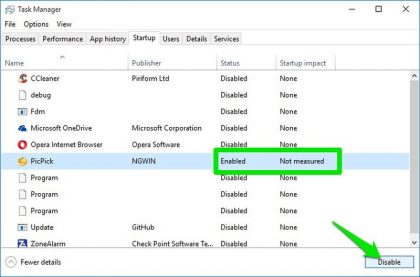
This issue can also be occurred due to some third-party applications installed in computer that are causing conflict issue with Adobe Premiere Pro software. These applications can be browsers, games, antivirus, background services, and other. It might possible these applications are consuming lots of CPU resources and causing Adobe Premiere Pro crashes issue. You can disable conflicting software like antivirus software and check if it works for you.
Step 1: Press ‘CTRL + SHIFT + ESC’ keys on keyboard to open ‘Task Manager’
Step 2: Under ‘Processes’ tab, search for any processes which you think are conflicting, right-click on it and select ‘End Task’. Repeat the same steps to disable other conflicting processes
Step 3: Once done, please check if you can use Adobe Premiere Pro software and run Adobe Premiere Pro projects without any issue.
Method 6: Run Adobe Premiere Pro as Administrator
This error can be occurred if required administrator permission not given to Adobe Premiere Pro software in computer. You can grant administrator permission to Adobe Premiere Pro software in computer in order to fix the issue.
Step 1: Type ‘Adobe Premiere’ or ‘Adobe Premiere Pro’ in Windows Search Box, right-click on ‘Adobe Premiere Pro/ Adobe Premiere’ from results appear and select ‘Properties’
Step 2: In ‘Properties’ window, click on ‘Compatibility’ tab, select ‘Run this program as an administrator’ checkbox to check and then hit ‘Apply’ and ‘OK’ button to save the changes. Once done, restart your computer and re-launch Adobe Premiere Pro and check if the error is resolved.
Method 7: Delete Adobe Premiere Pro’s media cache
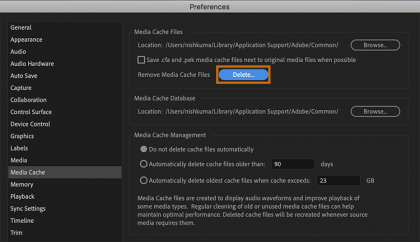
Corrupted or outdated media cache of Adobe Premiere Pro software stored in your computer could be another reason behind this error. You can delete media cache in order to fix the issue.
Step 1: Open ‘Adobe Premiere Pro/ Adobe Premiere’ software and click on ‘Edit > Preferences > Media Cache’
Step 2: In the opened window, click ‘Clean Unused’ button under ‘Media Cache Database’ section. This will now start cleaning and removing excessive data.
Step 3: Once done, re-launch Adobe Premiere Pro software and check if it works without any issue. If it works, you can try some solution to make sure that the issue doesn’t happen again. Go to ‘Cache Settings’ page and select ‘Automatically delete cache files older than’ and set it for ‘2’ or ‘3’ days
Step 4: You can also go to location where the cache file is stored. To do so, open ‘File Explorer’ and go to cache folder of Adobe Premiere Pro app, and delete the cache files in folder.
Step 5: Once done, restart your computer and check if the error is resolved.
Method 8: Nesting different layers
Nesting is Nifty feature in Adobe Premiere which places one sequences inside another sequence. It is applied to bunch together some clips and organizes them effectively. Nesting also helps reduce the load of your CPU. It removes the clutter on your dashboard and lets you see single clips instead of small edits which you performed. So, start making use of Nesting and check if this changes anything.
Method 9: Importing as new project in Adobe Premiere Pro
If you are directly opening your work into Adobe Premiere Pro, you can try importing your work as new project altogether. This will help in initializing all default configuration and remove those which were corrupt. If importing your work as new projects work for you, then you can try importing every work until you want to add something to existing work.
Method 10: Check Thermal Management Drivers
Before updating drivers and reinstalling applications, check whether the thermal management drivers on your computer is not causing the issue. Whenever your computer heats up due to computation, the thermal management drivers come into action and kill the applications which might be causing the heat surge. In such case, you should check your computer yourself for potential Thermal Management drivers like one intel install, uninstall them and retry launching application.
Method 11: Use Default font in Adobe Premiere Pro
One possible way to fix the issue is to change and customize font settings to default in Adobe Premiere Pro. Sometimes, enabling default font in Adobe Premiere Pro might cause conflict issue so in such case, you can try some other font rather than the default one and check if it works for you.
Method 12: Delete Configuration JSON file
Before updating graphics card drivers, try deleting configuration JSON file that save preferences and configuration.
Step 1: Open ‘File Explorer’ and navigate the following path
users\name\APPDATA\ROAMING\ADOBE\Common\Essential Sound\SharedTags.json
Step 2: Delete JSON file and restart your computer. Once done, re-launch Adobe Premiere Pro and check if it works for you.
Method 13: Update graphics card drivers in Windows 10
Updating graphics card driver to latest update version can resolve the issue. Let’s try.
Step 1: Open your browser and download the latest graphics card driver for your graphics card model according to your operating system version like Windows 32-bit or 64-bit
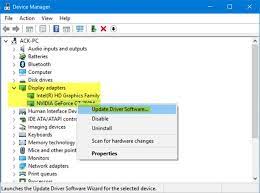
Step 2: Once downloaded, open ‘Device Manager’ via Windows Search and expand ‘Display Adapters’ category, right-click on your graphics card driver and select ‘Update Driver’. Follow on-screen instructions to install downloaded driver. Once done, restart your computer and check if the error is resolved.
Download or reinstall graphics card driver update in Windows 10 [Automatically]
You can also try to update graphics card driver update with ‘Automatic Driver Update Tool’. You can get this tool through button/link below.
⇓ Get Automatic Driver Update Tool
Method 14: Reinstall Adobe Premiere Pro
If the issue is still persist, then you can try to fix the issue by uninstalling and then reinstalling Adobe Premiere Pro software in computer.
Step 1: Open ‘Control Panel’ via Windows Search and go to ‘Uninstall a Program > Programs and Features’
Step 2: Find and select ‘Adobe Premiere Pro’ software, and select ‘Uninstall’ and after that, restart your computer
Step 3: After restart, download and install the latest version of Adobe Premiere Pro software from Adobe official site and once installed, re-launch Adobe Premiere Pro and check if the error is resolved.
Conclusion
I am sure this post helped you on How to fix My Premiere Project keeps crashing issue in Windows 10 with several easy steps/methods. You can read & follow our instructions to do so. That’s all. For any suggestions or queries, please write on comment box below.
