

If you are facing “OpenVPN TLS handshake failed” Error on computer while attempting to setting up “OpenVPN”, then you are in right place. Here, we are discussing about this problem in details and providing some recommended methods/procedures to fix this error. Let’s take have a look at error message and then starts the discussion.
“Sun May 13 19:39:51 2018 TLS Error: TLS key negotiation failed to occur within 60 seconds (check your network connectivity) Sun May 13 19:39:51 2018 TLS Error: TLS handshake failed”
About OpenVPN
“OpenVPN” is open-source commercial software that implements virtual private network techniques to create secure point-to-point or site-to-site connections in routed or bridged configurations and remote access faculties. It is available in free for charge. With the digital privacy and online security continuing to be major concerns, more people are interested in “VPNs (Virtual Private Networks)” than ever before.
Pros:
- Free, open-source VPN
- Booted Privacy and Secure browsing
- Supported by developer community
Cons:
- Can lead to poor speeds when is use
- Too technical and complex for first use-timers
- Can be blocked by business proxies
However, it is important to remember that “OpenVPN” is not VPN Provide and it doesn’t add a piece of software to your desktop or simple plug-in to your browser that you click once to connect. “OpenVPN” is encryption protocol that can connect your VPN which means you will need to know exactly how to configure it to your specific server.
What is “OpenVPN TLS handshake failed” Error?
It is common TLS error that is appears while trying to connect to OpenVPN. This error message usually appears on Android, iOS, Windows, Mac and Linux OS based device. “HandShake” word refers to negotiation between two ends just like meeting between two different people for any propose, then shake hands at first, then go ahead with anything else. In this case, “handShake” refers to negotiations between two servers.
On other hand, “TLS (Transport Layer Security)” is used every time when you access a website or application over HTTPS, access emails, messages, and VOIP (Voice over Internet Protocol). In simple word, we can say that HTTPs is implementation of TLS encryption.
Now comes to matter “OpenVPN TLS handshake Failed” Error, it is one of the most common problems in setting up OpenVPN that is occurs due to several reasons. Some user reported that this error appears usually on Windows/Mac/iOS/Linux/Android OS based devices when Windows Firewall is blocking access for the “openvpn.exe”.
“TLS Error: TLS key negotiation failed to occur within 60 seconds (check your network connectivity)”
Reasons behind OpenVPN TLS handshake failed issues
- Incorrect Client Configuration: The “OpenVPN” client config does not have the correct server address in its config file. The remote directive in the client config must point to either the server itself or the public IP address of the server network’s gateway.
- OpenVPN packets: A perimeter Firewall on server’s network is filtering out incoming OpenVPN packets. By Default OpenVPN uses UDP or TCP port number 1194.
- NAT/PAT: A NAT Gateway on the server’s network does not have a port forward rule for TCP/UDP 1194 to internal address of OpenVPN server machine.
- Firewall/routing blocking port: Windows Firewall is blocking access for the “openvpn.exe” binary.
- OSes block incoming connections: A software firewall running on the OpenVPN server machine itself is filtering incoming connections on port 1194. Be aware that many OSes will block incoming connections by default unless configured otherwise.
[Tips & Tricks] How to Fix OpenVPN TLS handshake failed error on Windows 10?
Procedure 1: Change “TLS” protocol in Windows
Windows 10 and earlier versions of Windows centralize the protocol settings in the System. To fix “OpenVPN TLS handshake failed” Error, you can change TLS version via the steps below:
Step 1: Press “Windows + R” key from keyboard to open “Run Dialog Box”
Step 2: In the opened “Run Dialog Box”, type “inetcpl.cpl” and hit “Ok” button
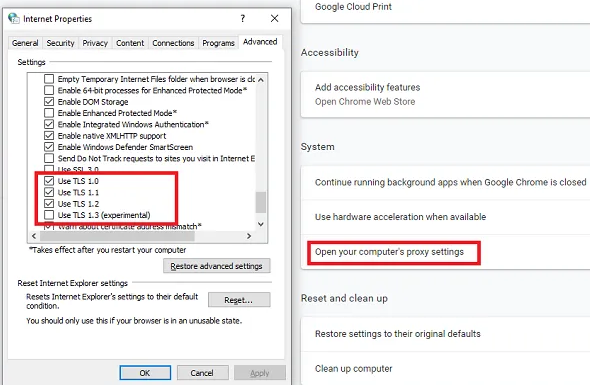
Step 3: In the opened “Internet Properties” window, click on “Advanced” tab
Step 4: Find “Security” section and here, you can add or remove TLS
Step 5: If the website is looking for TLS 1.2 and it is not checked, you need to check it. Similarly, if someone is experimenting with TLS 1.3, you need to check it
Step 6: Finally, click on “Apply” and “Ok” to save the changes. Once done, try opening the same website again
Procedure 2: Change TLS protocol in Firefox

Step 1: Open “Firefox” browser and type “about:config” in address bar and then hit “Enter” key
Step 2: Now, type “TLS” in search box and locate “security.tls.version.min”
Step 3: You can change it to “1 and 2 to force TLS 1 and 1.1”, “3 to force TLS 1.2”, “4 to force maximum protocol of TLS 1.3”
Procedure 3: Delete Browser profile or certificate database
Every browser maintains a database for certificates. For example, every Firefox profile has Cert8.db file. In case if delete that file, and restart fixes it, then the problem is related to the local certificate database.
In Windows 10 or other Windows OS based device, when you are using Internet Explorer or Edge browser, the Certificate Manager is responsible, or you can go to the edge://settings/privacy and click on Manage HTTPS/SSL certificates and settings. Delete the certificates and try again.
Procedure 4: Reset web browser
To reset Google Chrome settings, follow the steps below:
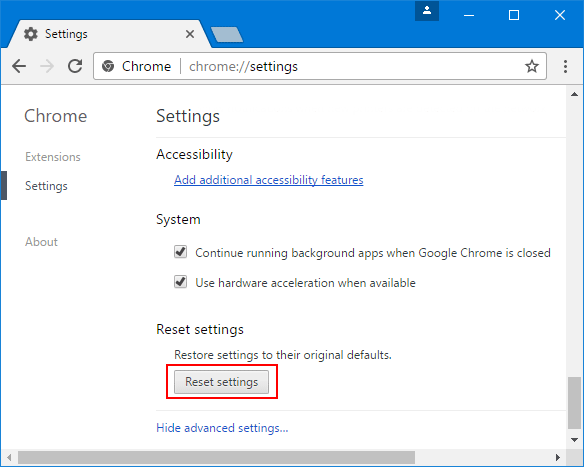
Step 1: Open Google Chrome browser and type “Chrome://Settings” in address bar and then hit “Enter” key
Step 2: Scroll towards end and click on “Advance settings”
Step 3: You will see the “Reset Browser Settings” button
Step 4: When you use this option, it will reset your profile to the post-fresh-install state
Step 5: This process will reset search engine, homepage, new tab page and pinned tabs to default. Extensions, add-ons and themes will be disabled and Content Settings will be reset. Cookies, Cache and Site data will be deleted.
Step 6: Once done, restart your browser and please check if “OpenVPN TLS handshake failed” Error is resolved.
To reset Microsoft Edge Chromium browser, follow the steps below:
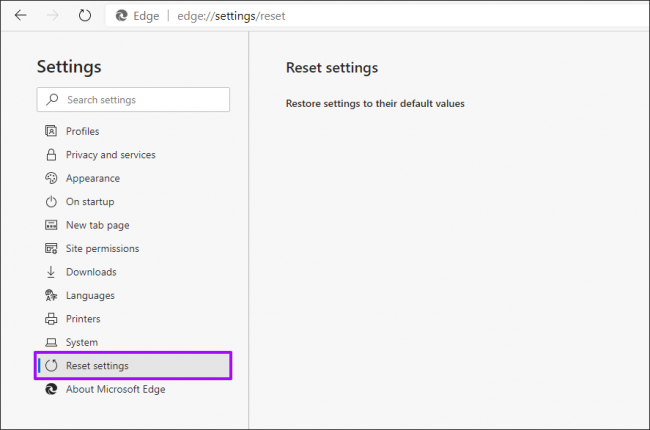
Step 1: Open Microsoft Edge browser
Step 2: Click on Open Settings
Step 3: Navigate to “Reset Settings”
Step 4: Click on “Restore Settings” to their default values.
Step 5: This process will reset your Startup page, new tab page, search engine and pinned tabs, disable all extensions and clear temporary data like cookies, and favourites, history and saved passwords will not be cleared.
Step 6: Once done, restart your browser and please check if the error is resolved.
To reset Firefox settings, follow the steps below:
Step 1: Open “Firefox browser”
Step 2: Go to “Settings > Help > Troubleshooting information”
Step 3: Click on “Reset Firefox” button.
Step 4: This process will reset search engine and homepage to default. Your extensions, sync settings, open tabs, tab groups, themes and toolbars will be removed. However, your passwords, from data, browsing history, favourites or bookmarks, cookies and plug-ins will not be removed. They will instead be moved to new profile.
Procedure 5: Ensuring the correct System time

Step 1: Press “Windows + I” keys together from keyboard to open “Settings App”
Step 2: In the “Settings App”, select “Time & Language”
Step 3: Go to the right pane, then toggle the switch under “Set Time Automatically” to “ON”
Step 4: After that, restart your computer and try visiting the website again to see if TLS handshake error is gone.
Conclusion
I am sure this article helped you to “Fix OpenVPN TLS handshake failed on Windows 10” with several easy methods/procedures. You can choose/follow either one or all procedures to fix this issue.
If you are unable to fix OpenVPN TLS handshake failed problem with the solutions mentioned above, then it might possible that your System has infected with malware or viruses. According to security researchers, malware or viruses cause several damages in your computer.
In this case, you can scan your computer with powerful antivirus software that has the ability to delete all types of malware or viruses from System.
You can also try another possible solution to fix this issue. We recommended you to Repair your PCs/laptops with powerful PC Repair Tools/Software that has the ability to remove all the faculty software, clean System registry, remove all types of malware or viruses, fix all types of bugs or errors and improves System performance as well. You can download powerful PC Repair Tool/Software via “Download” link below.
Is Your PC Behaving Abnormal & Needs Instant Optimization?
We recommend you to choose Advanced System Repair Suite which is dedicated to offer complete options to optimize a PC, fix any Windows error, and remove malware threats in easy. The software is award winning and suggested as the best malware fix application supporting all Windows versions including XP/Vista/7/8/8.1/10. Just 3 steps to avail error free PC.
![]()
- Download Advanced System Repair and install on your PC. (Follow all on screen instructions when installer is executed)
- Click “Scan Your PC” button to scan all present issues, errors, junk files, and malware threats.
- Finally, click “Start Repair” to fix all detected problems in next few minutes.
