
re you getting stuck while opening a specific app on your PC and getting prompted with This App Does Not Support the Contract Specified Error? Then you have selected the right platform to troubleshoot the issue. So without any further delay let’s get started with the discussion.
Description of the Error!
Well as we have earlier discussed that the user encounters the above mention error when they try to run a specific app but fails to do so. We consider it as one of the most nerve wrecking issues because it prevents the users from running the app which eventually hampers the user’s agenda.
And when we talk about the reasons that provoke the error then there are several culprits that play a vital role in prompting the error on the users screen. We have enlisted some potential reasons you can check:
Reason 1: Outdated Microsoft Store Apps
Reason 2: Lack of Storage Space
Reason 3: Interference of Security Software/VPN
Reason 4: Corrupted App
Reason 5: Corrupted Microsoft Store Cache
Reason 6: Corrupted/Missing System Files
How to Resolve This App Does Not Support the Contract Specified Error
Method 1: Run Windows Store Troubleshooter
In the very first method we suggest you to run the Windows Store Troubleshooter as several users have claimed success after running this tool.
To do so follow the below mention guidelines:
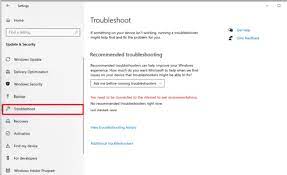
Step 1: On your keyboard press Windows + I keys together to open Settings > click on Update & Security settings> then click on Troubleshoot menu in the left pane
Step 2: Then scroll down and select Windows Store Apps troubleshooter and tap on Run the troubleshooter option
Lastly reboot your PC
Method 2: Update Microsoft Store Apps
You are likely to face the above mention error because of updated Microsoft Store Apps and to do the same follow the below mention instructions:
Step 1: Press Windows keys and type in Microsoft Store and click on Open > tap on the Profile icon, and click on App Settings
Step 2: Then turn on the toggle for App Update, and this will allow Microsoft Store to automatically update the apps
Method 3: Clear Microsoft Store Cache
As we have earlier mentioned that you are likely to face the above mention error because of corrupted Microsoft Store cache, so we suggest you to clear the corrupted cache by following the below mention instructions:
Step 1: To open Run dialog box by pressing Windows + R keys together> then type in WSReset.exe and press Enter key to reset Microsoft Store
Step 2: You will be prompted with an empty command prompt on the screen you need to wait for it to disappear.
Finally wait for the Windows Store to run by itself.
Method 4: Reinstall the App
Try to uninstall and then reinstall the problematic app by following the below mention steps:
Step 1: First of all press Windows keys and type in Control Panel and click on Open > Now Set view by> Category and then click on Uninstall a Program option in the Programs section
Step 2: Locate & right-click on the problematic program and tap on Uninstall> then follow the instructions and uninstall the program
Step 3: Now open the Microsoft Store and search for the program in the Store and install it
Method 5: Show Hidden Files and Folders
Several users have claimed that showing the hidden files and folders worked for them so you can also give a try to this method.
Step 1: Under the Start Menu type in File Explorer options and press the Enter key > Go to the View tab
Step 2: Under the Advance Settings option, locate Hidden files and folders and select the Show hidden files, folders and drives option
Step 3: Tap on Apply and then OK to save the changes> then open the File Explorer
Step 4: And then click on This PC > double-click on C:Drive and open the Program Files > Under the Program Files folder locate the WindowsApps folder
Step 5: Now right-click on the WindowsApps folder and click Properties
Step 6: Go to the Security tab> click on the Advanced button to open the Advanced Settings> then tap on Continue tab for Administrative Permissions
Step 7: Now change the Permissions for the WindowsApp folder to Administrative Group and then finally Apply ad then OK and restart your PC.
Method 6: Turn Off Windows Defender Firewall
Sometimes it happens when the Windows Defender Firewall blocks the 3rd party apps for security purpose so in order to tackle this situation you need to disable the Windows Defender Firewall.
Here’s how:
Step 1: In the Start Menu type in Control Panel and select Best Match> then click the View by drop-down menu and then select Large Icons
Step 2: Now select Windows Defender Firewall from the options> then tap Turn Windows Defender Firewall On or Off option >then check Turn Windows Defender Firewall boxes on the Private, Domain and Public Network Settings and finally press OK to save the changes.
Once your issue resolved then don’t forget to enable the Firewall again.
Method 7: Update your Widows Device
You can also try to update your Windows to the latest version and to do so follow the below mention steps:
Step 1: In the Start Menu type in Windows Update Settings and select Best Match> then press the Check for Updates button and follow the on-screen instructions
Method 8: Free Up Hard Disk Space
You are likely to face the above mention error if you have insufficient space on your hard disk, so in such case you can clean up the Disk.
To do so follow the below mention guidelines:
Use Disk Cleanup
Step 1: First of all double-click on This PC on your desktop and then right-click on the main partition and choose Properties
Step 2: Under the Properties Window, tap on the Disk Cleanup> and wait till the tool calculates how much space it could clean up
Step 3: Once you are prompted with new Window, tap on the files and folders you want to delete> then click on OK and wait till the process gets completed.
Method 9: Disable VPN
As we have earlier discussed that VPNs are one of the common reasons for facing the above mention error, so we suggest you to the disable VPN.
Here’s how:
Step 1: On your Taskbar click the Search Icon and type “vpn” in the search box> and then you can see the VPN Settings under Best Match. Then tap on Open on right panel to open it
Step 2: In the VPN Window you need to toggle off the following VPN options under Advanced option
Allow VPN over metered networks
Allow VPN while roaming
Step 3: Once done you can disable the VPN successfully
Method 10: Repair System Files
Another major reason for facing the This App Does Not Support the Contract Specified Error is corrupted system files, so we suggest you to Run SFC and DISM commands to repair the corrupted system files:
Step 1: First of all open Command Prompt in Administrator Mode. Then type in cmd in the Windows Search and hold Ctrl + Shift and press Enter> A user Account Control pop up will appear you need to click on Yes
Step 2: Then execute the following commands once by one and then Copy the below mention commands and paste it in the command prompt and press Enter
DISM.exe /Online /Cleanup-image /Scanhealth
DISM.exe /Online /Cleanup-image /StartComponentCleanup
DISM.exe /Online /Cleanup-image /Restorehealth
Step 3: Once the execution is done the copy the below scan command and paste it in the Command Prompt and press Enter
sfc /scannow
Step 4: Wait till the process gets completed and then Restart your PC
Alternatively you can also use a PC Repair Tool to scan your repositories to repair the corrupted system file because sometimes it happens when the above mention commands fails to scan the repositories properly. So in order to tackle the situation you can use our recommended PC Repair Tool.
⇑Get PC Repair Tool⇓
Method 11: Reset the PC
You can also try to reset the PC and to do so follow the below mention guidelines:
Step 1: Press Windows + I keys to open Windows Settings> tap on Update & Security
Step 2: Now from the left side click on Recovery> and then tap on Get Started button at the right
Step 3: A window will be appeared having two options Keep My Files or Remove Everything > then select the one which meets all the requirements and then follow the on -screen instructions to reset the PC.
That’s all folks! We assume that you liked the blog.

