
What is ‘VGA No Signal problem’ in Windows 10?
In this post, we are going to discuss on “How to Fix VGA No Signal problem in Windows 10”. You will be guided here with easy steps/methods to do so. Let’s starts the discussion.
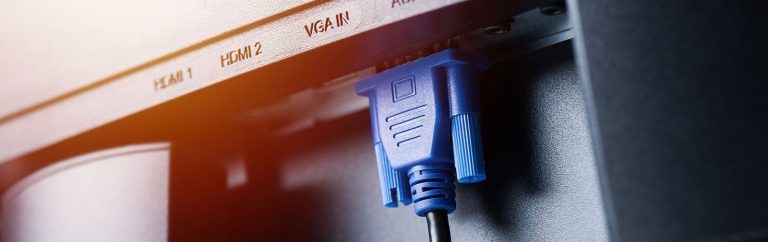
‘VGA (Video Graphics Array)’: VGA is standard connector used for computer video output. VGA connector is three-row, 15-pin D-subminiature connector referred to variously as DE-15,[2] HD-15[4] or DB-15, in which DE-15 is the most accurate common nomenclature under D-sub specifications with 15 pins in three rows. VGA connector is basically used for video devices like projects and monitor.
‘VGA No Signal’ error: ‘VGA No Signal’ error is common problem usually appeared on monitor screen when your monitor is unable to read the signal of your computer or the device you connected to monitor. This issue is also common on Microsoft Windows OS based PC where VGA No Signal error is appeared means your PC’s monitor has started working but it doesn’t see the PC is ON. In sort, this issue indicates that VGA monitor is unable to fetch or read any signal from your PC that’s why you are receiving ‘VGA No Signal’ error instead of display.
The possible reason behind VGA No Signal problem in Windows 10 computer can be faculty VGA monitor cable connection, VGA cable is not properly plugged into VGA port of computer, if your Windows computer is in Hibernate Mode/Sleep Mode, outdated or missing graphics card drivers, and other reasons. Let’s go for the solution.
How to fix VGA No Signal problem in Windows 10 PC?
Method 1: Check and fix hardware problem
One possible reason behind this issue can be issue with monitor connection, faculty VGA cable, and improper connection of monitor cable. You should make sure your VGA connector is properly connected to correct port of your CPU and monitor means one end of VGA cable must be connected to monitor properly and another end of VGA cable should plugged into CPU in correct port.
Also, you should make sure there is no issue with VGA cable and check if all pins inside VGA cable are proper and cable is transmitting the signal. If there is issue with VGA cable, change VGA cable with new one and reconnect it to computer and check if it works for you.
Method 2: Restart your computer and reconnect VGA cable to monitor and computer
One possible way to fix the issue is to restart your computer and monitor completely and re-establish the connection.
Step 1: Turn OFF your monitor and computer completely and unplug the power cables
Step 2: After few minutes, reconnect the VGA cable to monitor and computer, and plug the power cables
Step 3: Now, turn ON your monitor and computer and check if it works for you.
Method 3: Wake up your computer from Sleep Mode/Hibernate Mode/Power-saving mode [Windows PC]
Sometimes, ‘VGA No Signal’ error is appeared on your PC’s monitor usually when the computer entered into power-saving mode, sleep mode or hibernate mode. In such case, you can try to wake up your Windows computer by pressing any keys like ‘Enter’ key on keyboard. Check if this method works for you.
Method 4: Update graphics card driver in Windows 10
This issue can also be occurred due to outdated or corrupted graphics card driver in your Windows computer. You can update graphics card driver in order to fix the issue. You can try to connect your computer using HDMI cable if VGA connection is not working at the moment in order to update driver.
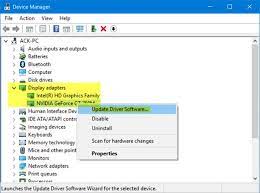
Step 1: Open ‘Device Manager’ via Windows Search and expand ‘Display Adapters’ category
Step 2: Right-click on your graphics card and select ‘Update Driver Software…’. Follow on-screen instructions to update driver. Once done, turn OFF your computer and try connecting computer using VGA connection and check if it works for you.
Download or reinstall Graphics card driver update in Windows 10 [Automatically]
You can also try to update your graphics card driver and all other Windows drivers with ‘Automatic Driver Update Tool’. You can get this tool through button/link below.
⇓ Get Automatic Driver Update Tool
Method 5: Run ‘Hardware and Devices’ troubleshooter in Windows 10
Windows 10 build-in ‘Hardware and Devices’ troubleshooter can resolve this problem. If VGA connection is not working, you can try HDMI or other alternative solution for the connection in order to run troubleshooter. Let’s try.
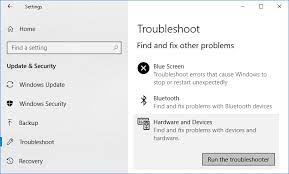
Step 1: Open ‘Settings’ App in Windows 10 and go to ‘Update & Security > Troubleshoot’
Step 2: Find and select ‘Hardware and Devices’ troubleshooter, and click ‘Run the troubleshooter’ button. Follow on-screen instructions to finish troubleshooting. Once done, turn OFF your computer, connect VGA cable for connection and then turn ON your computer and check if it works for you.
Method 6: Boot Windows 10 PC in Safe Mode
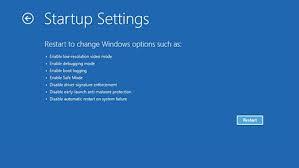
If the issue is still persist, then you can try to fix the issue by booting your Windows 10 computer in Safe Mode. This will start your computer with limited drivers/services or applications.
Step 1: Open ‘Settings’ App in Windows 10 and go to ‘Update and Security > Recovery > Advanced Startup > Restart Now’
Step 2: Once Advanced Startup option window appeared, choose ‘Troubleshoot > Advanced Options > Startup settings > Restart’
Step 3: Now, in the appeared window, press ‘F4’ or ‘4’ keys on keyboard to select ‘Safe Mode’ or ‘Enable Safe Mode’ option. This will boot your computer in Safe Mode and check if the error is resolved.
Fix Windows PC issues with ‘PC Repair Tool’
‘PC Repair Tool’ is easy & quick way to find and fix BSOD errors, DLL errors, EXE errors, problems with programs/applications, malware or viruses issues, system files or registry issues, and other system issues with just few clicks. You can get this tool through button/link below.
⇓ Get PC Repair Tool
Conclusion
I am sure this post helped you on How to fix VGA No Signal problem in Windows 10 with several easy steps/methods. You can read & follow our instructions to do so. That’s all. For any suggestions or queries, please write on comment box below.

