
 What is ‘VRChat not loading error’ in Windows 10?
If you are experiencing ‘VRChat not loading error’ problem while trying to launch VRChat game on Windows 10 computer, then you are in right place for the solution. Here, you will be guided with easy steps/methods to resolve the issue. Let’s starts the discussion.
‘VRChat’: VRChat is free-to-play massively multiplayer online virtual reality social platform designed & developed by Graham Gaylor and Jesse Joudrey. VRChat game offers players to interact with others as 3D character models. This service is available for Microsoft Windows OS, and Oculus Quest, and you can access this program via Steam service. In VRChat, players can create their own instanced worlds in which they can interact with each other through virtual avatars. VRChat is capable of running in desktop mode without VR headset, which is controlled using mouse/keyboard, or gamepad.
However, several users reported that they faced ‘VRChat not loading error’ problem while they tried to load/launch VRChat game on their Windows 10 computer. This issue indicates that you (VRChat game’s player) are unable to enter the VRChat’s gameplay and noticing VRChat won’t load problem in Windows computer. There could be several reason behind this issue including the interference of your antivirus/firewall program, corrupted or outdated cache/temp data of VRChat game, misconfigured DNS or IP settings, outdated/corrupted Graphics card driver and others.
Sometimes, this issue can be occurred due to some temporary issue in your Windows computer. You can fix the issue just by restarting your computer and check if you can play VRChat without any issue. Also, upgrading graphics card driver to latest available update version in Windows computer can improve graphics and gaming performances, and resolves related issues. So, graphics card driver update is necessary in this case. Let’s go for the solution.
How to fix VRChat not loading error in Windows 10?
Method 1: Fix ‘VRChat not loading’ issue with ‘PC Repair Tool’
If this issue is occurred due to some issues in your Windows computer, then you can try to fix the issue with ‘PC Repair Tool’. This software offers you to find and fix BSOD errors, DLL errors, EXE errors, problems with programs/applications, malware or viruses issues, system files or registry issues, and other system issues with just few clicks.
⇓ Get PC Repair Tool
Method 2: Update graphics card driver in Windows 10
Updating graphics card driver to latest update version can resolve the issue. Let’s try.
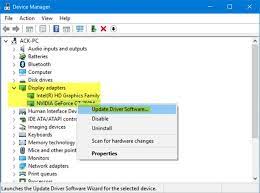
Step 1: Press ‘Windows + X’ keys on keyboard and select ‘Device Manager’
Step 2: In ‘Device Manager’, find and expand ‘Display Adapters’ category, right-click on your graphics card and select ‘Update Driver’. Follow on-screen instructions to update the driver.
Step 3: You can also download and install the latest graphics card driver from your graphics card manufacturer official site. Once done, restart your computer
Download or reinstall graphics card driver update in Windows 10 [Automatically]
You can also try to find and download the updates for all Windows 10 drivers including graphics card driver using ‘Automatic Driver Update Tool’. You can get this tool through button/link below.
⇓ Get Automatic Driver Update Tool
Method 3: Clear VRChat temporary (Temp) files in Windows 10
One possible way to fix the issue is to clear your VRChat Temp (temporary) files in computer.
Step 1: Press ‘Windows + R’ on keyboard and type ‘%Username%\AppData\Local\Temp\VRChat’
Step 2: In the opened folder, select all files inside ‘VRChat’ folder, and delete them. Once done, restart VRChat and check if the issue is resolved.
Method 4: Try some special launch options
This issue can be occurred if you are using wrong way to launch the VRChat or the way you are using not working at all. You can try some special launch options in such case.
Step 1: Open ‘Steam Client’ in Windows 10 and go to ‘Library’, find and right-click on ‘VRChat’ and select ‘Properties’
Step 2: Click ‘Set Launch Options’ and add one of the following line
vrchat://launch?id=wrld_1a6f881b-fdd0-4551-af2c-6ef8e16577f6
(This will load you into Zarniwoop’s Avatar Dungeon)
vrchat://launch?id=wrld_d0b62423-fd59-48f7-9e4b-e6fece81b7ed
(Hyperdimension of OziCom)
vrchat://launch?id=wrld_69ab9cdf-5436-46bd-98b5-714837a53b4f
(X1 Seisoken City)
Step 3: To enter the different world, just change the world ID accordingly and check if it works for you.
Method 5: Disable IPv6 in Windows 10
This issue can be occurred if your router or computer has poor support IPv6. You can disable IPv6 in computer in order to fix the issue.
Step 1: Right-click on ‘WiFi/Network’ icon in taskbar or in System Tray, and select ‘Open Network and Sharing Center’
Step 2: In the opened window, click on ‘Change Adapter Settings’ link, right-click on active internet connection you are using, and select ‘Properties’
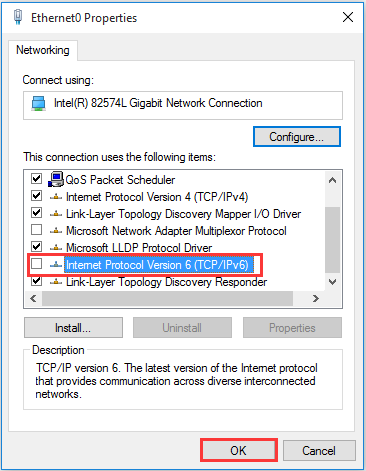
Step 3: In the opened ‘Properties’ window, under ‘Networking’ tab, deselect ‘Internet Protocol Version 6 (IPv6)’ option and make sure ‘IPv4’ is checked
Step 4: Finally, click ‘Ok’ button to save the changes and retry launching VRChat game and check if the issue is resolved.
Method 6: Delete VRChat registry settings in Registry Editor
Another possible way to fix the issue is to delete VRChat entry in Registry Editor.
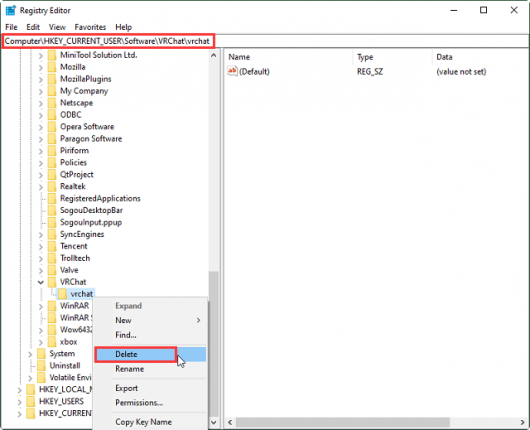
Step 1: Press ‘Windows + R’ keys on keyboard, type ‘regedit’ in the opened ‘Run’ window and hit ‘Ok’ button to open ‘Registry Editor’
Step 2: Navigate to ‘Computer\HKEY_CURRENT_USER\Software\VRChat\vrchat’ path in left pane, find and right-click on VRChat folder, and select ‘Delete’ option to delete the key. Once done, re-launch VRChat and check if the issue is resolved.
Method 7: Add VRChat to ‘Exception List’ of your antivirus
This issue can be occurred due to interference of your antivirus program installed in your computer. You can add VRChat to ‘Exception List’ of your antivirus in order to fix the issue.
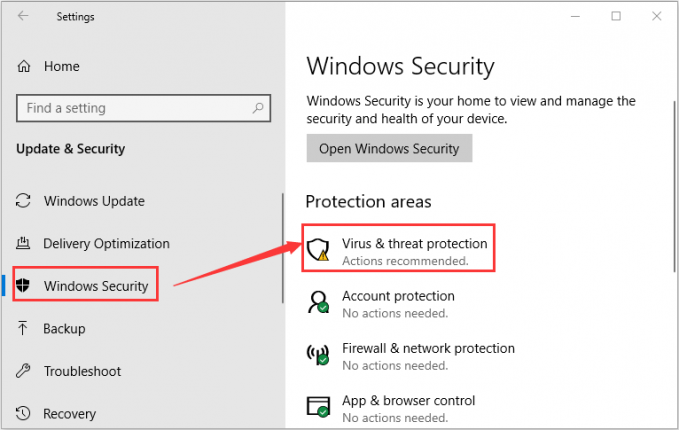
Step 1: Open ‘Settings’ App in Windows 10 via Windows Search
Step 2: Go to ‘Update & Security > Windows Security > Virus & Threat Protection > Manage Settings’, scroll down to ‘Exclusion’ section and click ‘Add or remove exclusions’
Step 3: Click ‘Add an exclusion’ and choose the ‘Folder’ from dropdown and select the installation folder of VRChat and hit ‘Select’ to add it to exception list. Once done, retry launching VRChat and check if the issue is resolved.
Conclusion
I am sure this post helped you on How to fix VRChat not loading error in Windows 10 with several easy steps/methods. You can read & follow our instructions to do so. That’s all. For any suggestions or queries, please write on comment box below,

