
Sfc/Scannow command fails to execute with some errors: How to fix
In this article, we are going to discuss on How to Windows Resource Protection did not find any Integrity Violations error in Windows 11/10. You are provided here with easy steps/methods to resolve the issue. Let’s starts the discussion.
What is System File Checker (SFC) command?
SFC stands for System File Checker, is a build-in program/tool in Microsoft Windows Operating system versions including Windows 7, 8.1/8/10 and Windows 11. The purpose of this tool is to allow you to scan your computer for corrupted Windows System files and then this tool repair it and then restore into your computer. This tool is located in ‘C:\Windows\System32’ folder in Windows computer. You can use this tool to find and repair corrupted system files and registry keys in Windows computer with ease.
In Windows 10, SFC/scannow or SFC scan tool is integrated with WRP (Windows Resources Protection), which is provide security for registry keys and folders together with critical system files. TrustedInstaller.exe or Windows Modules Installer Service has full permission to Windows Resource Protection files and registry keys, which offer you can alter WRP-protected resources. This process is required to be running when you restore missing/corrupted WRP resources.
What is Windows Resource Protection did not find any Integrity Violations Windows 11/10?
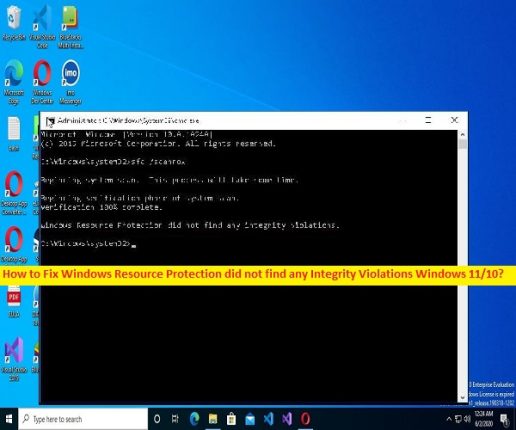
It is quite simple & easy to run SFC/Scannow command in your Windows 10/11 computer via Command Prompt window. So, there is no need of additional applications or third-party applications to find and repair corrupted system files & registry keys in Windows computer as SFC scan tool is enough to perform this. However, several users reported they faced ‘Windows Resource Protection did not find any Integrity Violations’ message as result on Command Prompt screen when they execute SFC/Scannow command.
When you run SFC scan in Command Prompt and see this message, means you don’t need do anything. You computer doesn’t have any missing or corrupted system files. Sometimes, SFC scan tool executes with some other error messages including:
- Windows Resource Protection did not find any Integrity Violations Windows 11/10
- Windows Resource Protection could not perform the requested operation.
- Windows Resource Protection found corrupted files but was unable to fix some of them.
These error messages are appeared when you execute SFC scan in Command Prompt. These issues indicate SFC scan process fails to finsih execution for some reasons. The possible reasons behind these error can be the Windows Module Installer service is not running in your computer, corrupted in hard disk drive or bad hard disk sector, corruption in system image, and other issues in computer. One possible way to fix the issue is to run CHKDSK scan in computer to find and fix bad hard disk sector or corrupted hard disk drives. Let’s go for the solution.
How to Windows Resource Protection did not find any Integrity Violations fix in Windows 10/11?
Method 1: Fix SFC Scan Tool issue in Windows PC with ‘PC Repair Tool’
‘PC Repair Tool’ is quick & easy ways to find and fix BSOD errors, DLL errors, EXE errors, problems with programs/applications, malware or viruses infections in computer, system files or registry issues, and other system issues with just few clicks. You can get this tool through button/link below.
⇓ Get PC Repair Tool
Method 2: Start/Restart Windows Module Installer Service (TrustedInstaller.exe)
You can try to fix the issue by enabling or restarting Windows Modules Installer service in computer.
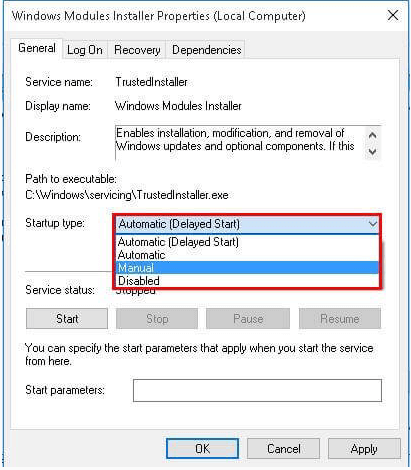
Step 1: Open ‘Services’ app in Windows PC via Windows Search Box
Step 2: Find and double-click ‘Windows Modules Installer’ service to open its Properties.
Step 3: Select ‘Manual’ from ‘Startup Type’ dropdown, and hit ‘Apply > Ok’ button to save the changes, and check if it works for you toward resolving the issue.
Method 3: Enable Windows Modules Installer Service or TrustedInstaller.exe via command prompt
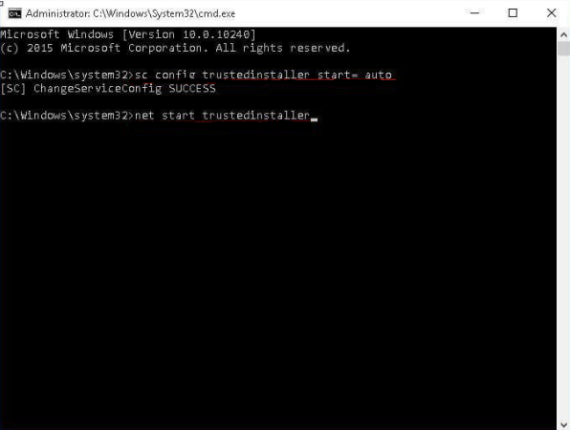
Step 1: Press ‘Windows + R’ keys on keyboard, type ‘cmd’ in ‘Run’ window and press ‘CTRL + SHIFT + ENTER’ keys on keyboard to open ‘Command Prompt as Admisntrator’
Step 2: Type the following commands and hit ‘Enter’ key after each to execute.
sc config trustedinstaller start= auto
net start trustedinstaller
Step 3: Once executed, retry running sfc/scannow command and check if the issue is resolved.
Method 4: Run CHKDSK scan
You can fix the issue by running CHKDSK scan in computer in order to repair corruption in hard disk drive or bad hard disk sector.
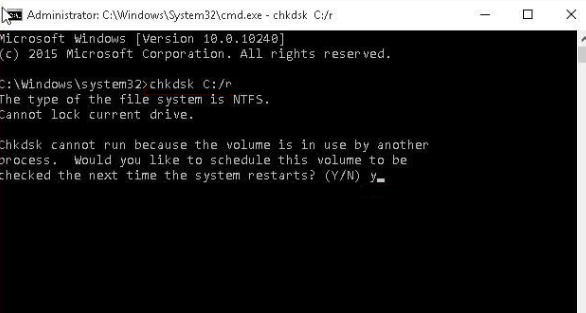
Step 1: Open ‘Command Prompt as Administrator’ using above method
Step 2: Type ‘chkdsk c: /r’ command and hit ‘Enter’ key to execute, and type ‘Y’ and hit ‘Enter’ key to confirm to execute this command. Wait to finish and once done, restart your computer and check if the issue is resolved.
Method 5: Run SFC scan in Safe Mode
If you are facing issue while running SFC scan in normal mode in computer, you can run this command in safe mode to fix the issue.
Step 1: Press & hold ‘SHIFT’ keys on keyboard and restart your computer to enter into Windows Recovery Environment screen.
Step 2: Now, go to ‘Troubleshoot > Advanced Boot Options > Restart’, and press ‘F4’ or ‘4’ key on keyboard to enter into Safe mode
Step 3: Once you are in safe mode in computer, ensure ‘PendingDeletes’ and ‘PendingRenames’ folder on computer, and then retry executing SFC scan command and check if the issue is resolved.
Method 6: Change Security Description
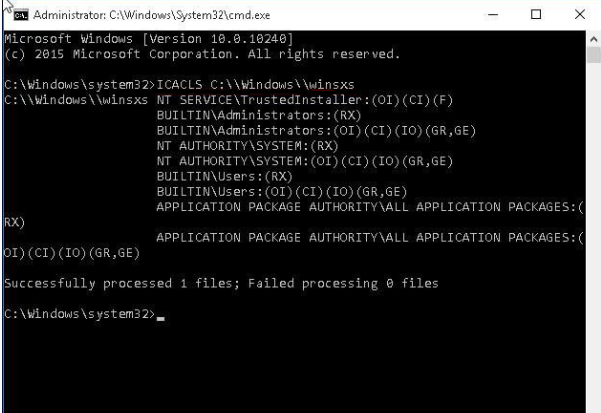
You can also try to fix the issue by changing security description.
Step 1: Open ‘Command Prompt as Administrator’ using above method
Step 2: Type ‘ICACLS C:\\Windows\\winsxs’ command and hit ‘Enter’ key to execute and once executed, restart your computer and check if the issue is resolved.
Method 7: Run DISM scan
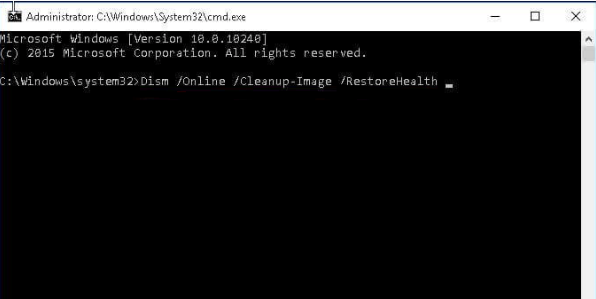
You can DISM Scan command in computer to repair corruption in system image in order to fix this issue.
Step 1: Open ‘Command Prompt as Administrator’ using above method
Step 2: Type ‘Dism /Online /Cleanup-Image /RestoreHealth’ command and hit ‘Enter’ key to execute and once executed, restart your computer and check if the issue is resolved.
Method 8: Delete registry keys for pending system repair
You can also try to fix the issue by deleting registry keys for pending system repair in computer.
Step 1: Open ‘Registry Editor’ app in Windows PC via Windows Search Box, and go to following path in left pane
HKEY_LOCAL_MACHINE\SOFTWARE\Microsoft\Windows\CurrentVersion\RebootPending
Step 2: Find and right-click ‘RebootPending’ key, and select ‘Delete’ to delete it. Once done, retry executing SFC scan in computer and check if the issue is resolved.
Conclusion
I am sure this post helped you on How to fix Windows Resource Protection did not find any Integrity Violations Windows 11/10 with easy ways. You can read & follow our instructions to do so. That’s all. For any suggestions or queries, please write on comment box below.

