Here, we are discussing on “How to Activate Teamviewer Black Screen feature” in details and providing some recommended steps to do so. Let’s starts the discussion.
What is Teamviewer Black Screen?
“TeamViewer” is proprietary software for remote control, desktop sharing, online meetings, web conferencing and file transfer between the computers. This application is available for Windows OS, Chrome OS, BlackBerry OS, lInux, Android, MacOS, iOS, Windows RT. It is also possible to access a machine running TeamViewer with web browser.
“TeamViewer Remote screen black” feature allows you to hide the remote screen connections to a Windows OS or MacOS based devices into “Full-screen security Image”. With this feature, you can make sure to protect your privacy at work by hiding the content of remote screen. Once “TeamViewer remote screen black” feature is enabled or activated, the input on the remote computer gets also disabled while the remote computer’s screen gets hidden immediately by TeamViewer Security Image.
It is possible to turn the remote screen black in connections from any Desktop Operating System version including Windows, MacOS and Linux with TeamViewer version 15.8 and higher. This feature is available for MacOS with TeamViewer version 15.8 while turning remote screen black of Linux devices is currently not supported.
“Start TeamViewer with System” is required to select in order to activate the black screen. It is because of technical restrictions. Additionally, “Accessibly Permissions” is also needed to be granted for TeamViewer software. This permission is also applicable to MacOS 10.13 users.
[Tips & Tricks] How to Activate TeamViewer Black Screen during Remote Control Session?

You can activate or enable Remote Black Screen during remote control session. To do so, follow the steps below.
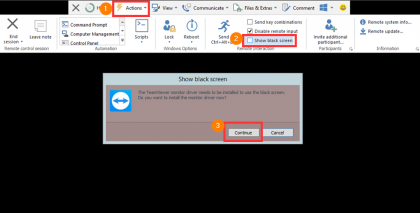
Step: During remote control session on the remote device, click on “Action” tab in “Remote control Toolbar” and choose “Show Black Screen”
How to setup TeamViewer Black Screen?

You can set up the TeamViewer remote screen black as default in every connection to specific device like your computer.
Step 1: Open “TeamViewer” application in your computer
Step 2: Click on “Extras” tab and select “Options”
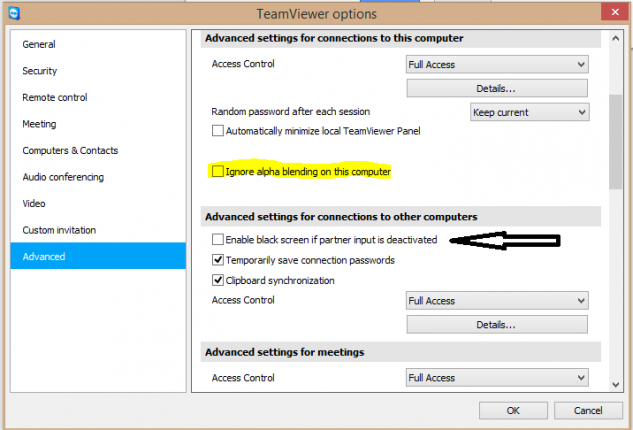
Step 3: In the “TeamViewer Options” window, click on “Advanced” tab in left pane
Step 4: Scroll down to “Advanced Setting for connections to this computer”
Step 5: Check the “Disable local input” and “Enable Local blackscreen” checkbox
Note: “TeamViewer remote screen black” feature will be enabled automatically and remote input will be deactivated
How to activate TeamViewer Remote Screen Black feature via computers & Contact lists?

Step 1: Open “TeamViewer” application in your computer and select “Computers & Contacts” in left pane
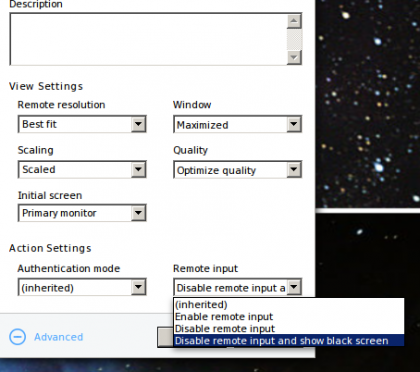
Step 2: Select the device and then click on “TeamViewer Menu” or “Grey Gear” and select “Properties”
Step 3: In the opened “Properties” window, Click on “Advanced” link at bottom
Step 4: Choose “Disable remote input and show black screen” option under the “Remote Input” section
Step 5: Finally, click on “OK” to save the changes
How to activate TeamViewer Black Screen feature on Windows 7?

If you want to use “TeamViewer remote screen black” feature on Windows 7 and then you need to install “TeamViewer Monitor Driver” on the remote device. If driver not installed, you will see the popup message that states “The TeamViewer monitor driver needs to be installed to use black screen. Do you want to install monitor driver now?”
Step: On the prompt message, click on “Continue” button to install the driver
Or
Step: Click on “Extras > Options > Advanced > Show Advanced options > Advanced network settings > Install Monitor driver > Install”
How to Deactivate TeamViewer Remote screen black on Windows/Mac?
To disable or deactivate “Remote screen black” feature on TeamViewer, you need to press the following key combination to do so.
Step: Press “CTRL + ALT + DEL” for Windows
Step: For macOS, “CMD + Option + ESC”
Note: This key combination is used on remote computer to remove black screen, lock remote user’s session and enable remote input
You may also read: Fix Teamviewer Audio Not Working Windows 10 Issue
Conclusion
I am sure this article helped you to “How to Activate TeamViewer Remote screen black Feature on Windows/Mac” with several easy steps. You can read & follow our instructions to do so. If you have any suggestions or queries regarding this, please write on comment box given below.
Is Your PC Behaving Abnormal & Needs Instant Optimization?
We recommend you to choose Advanced System Repair Suite which is dedicated to offer complete options to optimize a PC, fix any Windows error, and remove malware threats in easy. The software is award winning and suggested as the best malware fix application supporting all Windows versions including XP/Vista/7/8/8.1/10. Just 3 steps to avail error free PC.
- Download Advanced System Repair and install on your PC. (Follow all on screen instructions when installer is executed)
- Click “Scan Your PC” button to scan all present issues, errors, junk files, and malware threats.
- Finally, click “Start Repair” to fix all detected problems in next few minutes.

