
What is ‘DHCP Lookup Failed’ issue in ChromeBook?
If you are facing ‘DHCP Lookup Failed in ChromeBook’ issue while trying to connect to network/internet, then you are in right place for the solution. Here, you will be guided with easy steps/methods to resolve the issue. Let’s starts the discussion.
ChromeBook Vs Laptop: Both ChromeBooks and Laptops look just same with same designed element and build, but ChromeBooks are whole new breed that is very different from your regular laptops and it’s all Google. ChromeBooks run on Linux-based Chrome OS which is designed to be used with Internet connection. On other hand, Laptops run on Windows OS and MacOS.
‘DHCP Lookup Failed’ error on ChromeBook: It is common ChromeBook problem usually occurred when you try to connect to network. This error is appeared with title ‘Network Connection Error’ and says Failed to connect to network ‘Disco’ DHCP Lookup Failed. This error prevents you from accessing network/internet for some reasons. There could be several reasons behind this issue including outdated Chrome OS, corrupted firmware of your router can cause DHCP error, or if your network frequency that is not supported by your device.
Before troubleshooting the issue, you can try checking Chromebook hardware issue and for this, you can try connecting your device to another network and if the problem is same even when you are connected to different network, then issue in your Chromebook could be reason behind problem. Also, you should check if other devices can connect to problematic network. Also, if you are using your device managed by school or company or other restriction area, then you can contact IT administrator of organization to allow your device to access the network.
You should make sure there is no issue with your internet connection and you have stable internet connection and speed. Also, make sure there is no device or electro-magneto interference like Bluetooth device and another router in vicinity and if exists, you can remove them in order to fix the issue. Also, you should disable VPN and remove Wi-Fi extender if you are using that could help you to resolve the issue. Let’s go for the solution.
How to fix DHCP Lookup Failed in ChromeBook?
Method 1: Restart your Chromebook and networking equipments like router
This issue can also be occurred due to temporary glitch in communication between your device and networking equipments. You can restart both devices in order to fix temporary glitch.
Step 1: Turn OFF your Chromebook and networking equipment (router/modem) and unplug the power source
Step 2: Wait for 30 seconds and then plug the power source again to networking equipment like router
Step 3: Turn ON your router and wait for router light to be stabilized
Step 4: Now, turn ON Chromebook, and try connecting your device to WiFi network and check if the error is resolved.
Method 2: Change some sleep settings of Chromebook
This issue can be occurred if your Chromebook goes to sleep while trying to connecting to network. You can change some sleep settings of ChromeBook in order to fix the issue.
Step 1: Open ‘Settings’ app in Chromebook and click on ‘Device > Power’
Step 2: Under ‘When idle’, select ‘Turn OFF Display but Stay Awake’ from dropdown
Step 3: Under ‘When Lid is closed’, select ‘Stay Awake’ from dropdown
Step 4: Once done, save the changes and exit ‘Settings’, and restart Chromebook. After restart, try connecting your Chromebook to internet and check if it works for you.
Method 3: Try reconnecting to WiFi network
One possible way to fix the issue is to forget the WiFi network that causing the problem and then reconnect to same WiFi network.
Step 1: In the bottom-right corner of window, click on ‘WiFi’ icon and click on name of WiFi network
Step 2: Now, click on ‘Gear’ icon to bring out ‘Network Settings’ window and click on ‘WiFi’
Step 3: Disconnect from network if connected and click on right Arrow of network that you want to forget and click on ‘Forget’ button
Step 4: Once done, restart your Chromebook and check if the issue is resolved.
Method 4: Use Google Name Servers for the network
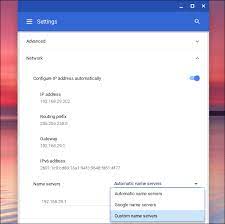
This issue can be occurred due to issue with DNS server in your device. You can change DNS server to Google Name Servers for your network in order to fix the issue.
Step 1: Open ‘Settings’ in Chromebook
Step 2: Go to ‘Network > WiFi’ and click on ‘Right-Arrow’ of problematic network
Step 3: Scroll down to ‘Name Servers’ and select ‘Google Name Servers’ from dropdown
Step 4: Now, connect to network and check if the issue is resolved
Step 5: If not, restart your Chromebook and repeat the ‘step 1 to step 3’ but this time select ‘Automatic Name Servers’ from dropdown. Once done, again connect to network and check if the issue is resolved.
Step 6: If not, open ‘Network Settings’ of your connection and find and disable ‘Configure IP address Automatically’ option
Step 7: Set a manual IP address of your device as per IP scheme and restart your ChromeBook. After restart, try connecting to network and check if the error is resolved.
Method 5: Extend DHCP Range of addresses of network
This error can be occurred if there is fixed number of devices that can connect to DHCP server. If you have configure to 10 device limit and your device is 11th one, then you can’t connect to DHCP server and can cause error. In such case, you can try removing some devices from network and make sure your device is allowed to connect DHCP server. Also, you can increase or extend the DHCP server Range so that your device can connect to DHCP server without any issue.
Step 1: Open your browser and visit your router’s web portal (Official)
Step 2: Login to your page by entering correct login details. You can check login credentials of router on back of router.
Step 3: Once you are logged into account, go to ‘DHCP’ tab of settings and increase DHCP IP range. If upper range is 192.168.1.200, then increase it to 192.168.1.253. You can also specify the number of DHCP IP Range and you can increase it to more than 10 or enough so that your device can access DHCP server.
Step 4: Save the changes and exit the portal. Once done, try connecting to network again and check if the error is resolved.
Method 6: Change frequency band of your WiFI network
You can fix WiFi network speed by changing frequency band of WiFi network in order to resolve this issue.
Step 1: Open web portal of router and login into your account using above method
Step 2: Now, go to ‘Wireless’ settings tab and change the Band to ‘5GHz’ if 2.4GHz is selected and if ‘5GHz’ is selected, change it to ‘2.4GHz’. Save the changes and exit the portal.
Step 3: Restart your device and check if the problem is resolved.
Method 7: Update Chrome OS of your ChomeBook
Updating Chrome OS of ChromeBook can resolve any issue in Chromebook. Let’s try.
Step 1: Connect your device to internet through Ethernet cable or WiFi if possible. Make sure your device is connected to internet.
Step 2: Open ‘Settings’ of Chromebook and click on ‘About Chrome OS’ in left pane window and click on ‘Check for updates’ option
Step 3: Install the available update and once done, restart your device and check if the error is resolved.
Method 8: Reset your networking equipment like router/modem to default settings
If the problem is still persist, then corruption in firmware of your router/modem could be root cause of DHCP issue. You can perform router/modem reset to factory default in order to fix the issue.
Step 1: Power ON your router if it is turned OFF
Step 2: Click on ‘Reset’ button on router using small or pointy objects for about 30 seconds. Keep holding the Reset button for 30 seconds
Step 3: After 30 seconds, release ‘Reset’ button and wait for router to reset and power ON fully. Once done, check if the issue is resolved.
Step 4: If there is no button on your router, click on ‘Power’ button on router to reset the device
Perform Router reset using router web portal:
Step 1: Open your browser and visit your router web portal and login into your router page by entering correct credentials
Step 2: Now, find and go to ‘Reset’ option under ‘General’ or ‘System’ tab. Find and click on ‘Reset Settings’ or ‘Restore Defaults’ and confirm to reset
Step 3: Wait for the completion. Once done, restart your computer and networking equipment using ‘method 1’ and then try connecting to network and check if the issue is resolved.
Conclusion
I am sure this post helped you on How to fix DHCP Lookup Failed in ChromeBook with several easy steps/methods. You can read & follow our instructions to do so. That’s all. For any suggestions or queries, please write on comment box below.

