
What is ‘He’s dead jim error’ in Google Chrome in Windows 10?
If you are experiencing ‘He’s dead jim error Google Chrome’ issue while trying to start Google Chrome browser in Windows 10, then you are in right place for the solution. Here, you will be guided with easy steps/methods to resolve the error. Let’s starts the discussion.
‘He’s dead jim’ error: It is common error usually occurred on Google Chrome browser when you try to access certain WebPages or while browsing internet in Google Chrome. It is appeared typically on Windows 10 computer or Chromebook. He’s dead jim error includes some troubleshooting suggestions and message that aren’t really effective in resolving the issue in most cases. Let’s take a look at message displayed with He’s dead jim error.
The text/message displayed with He’s dead jim error on Google Chrome:
- The web page was terminated unexpectedly. To continue, reload or go to another page.
- Something caused this web page to be killed, either because the operating system ran out of memory, or for some other reason. To continue, reload or go to another page.
- Either Chrome ran out of memory or the process for the web page was terminated for some. other reason. To continue, reload or go to another page.
- Something went wrong while displaying this web page. To continue, reload or go to another page.
There could be several reasons behind He’s dead jim error Google Chrome including misconfigured DNS or corrupted DNS cache, problem with Google Chrome app itself, malware or viruses attack in computer, interference of your antivirus/firewall program, and other reasons. But before troubleshooting the issue, you should check your internet connection at first and make sure there is no issue with internet connection and its speed.
Also, you can just refresh/reload the webpage in Google Chrome that is causing ‘He’s dead jim’ error and check if it works for you. If refreshing webpage didn’t work for you, then you can follow our instructions to troubleshoot the issue. Let’s go for the solution.
How to fix He’s dead jim error Google Chrome in Windows 10?
Method 1: Fix ‘He’s dead jim’ error with ‘PC Repair Tool’
If this error is occurred due to some issue in Windows computer, then you can try to fix the issue with ‘PC Repair Tool’. This software offers you to find and fix BSOD errors, DLL errors, problems with programs/applications, malware or viruses issues, system files or registry issues, and other system issues with just few clicks.
⇓ Get PC Repair Tool
Method 2: Refresh the webpage
One possible way to fix the issue is to retry accessing the same webpage that was causing ‘He’s dead jim’ error. To do so, you can press ‘F5’ key on keyboard while you are on webpage in browser and check if refreshing webpage resolves the issue.
Method 3: Run Google Chrome Cleanup tool in Windows 10
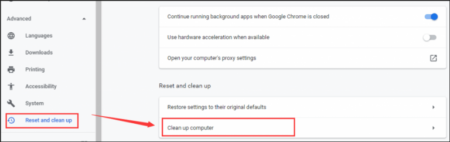
You can use Google Chrome Cleanup Tool to perform scan and remove software that may cause the problem with chrome like crashes, unusual startup pages or toolbars, unexpected ads.
Step 1: Open ‘Google Chrome’ browser and click on ‘Three-Dots’ icon at top-right corner and select ‘Settings’
Step 2: In ‘Settings’ tab page, click on ‘Advanced’ in left pane and under ‘Reset and Cleanup’, click on ‘Clean up computer’
Step 3: Click ‘Find’. If you are asked to remove unwanted software, click ‘Remove’
Step 4: Once done, restart your computer and restart Google Chrome, and check if the error is resolved.
Method 4: Reset Google Chrome
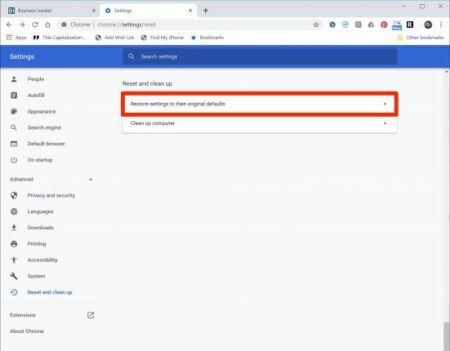
Another possible way to fix He’s dead jim error is to perform Google Chrome reset to reset Chrome settings.
Step 1: Open ‘Google Chrome’ and click on ‘Three-Dots’ icon at top-right corner and select ‘Settings’
Step 2: In ‘Settings’ page, click on ‘Advanced’ option in left pane and scroll down to ‘Reset’ option and click ‘Restore settings to their original defaults’ option. Confirm the reset operation and wait to finish. Once done, restart your browser and check if the error is resolved.
Method 5: Disable antivirus/firewall in Windows 10
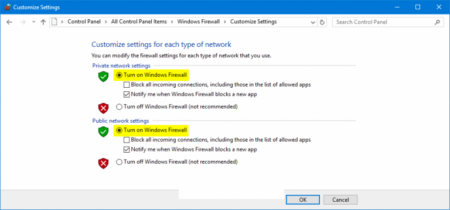
This error can occurred due to interference of your antivirus/firewall program installed in computer. You can disable your antivirus/firewall temporarily in order to fix the issue.
Disable antivirus:
Step 1: Right-click on your antivirus icon in taskbar or in System Tray, and select ‘Disable’, ‘Stop’ or similar option to disable antivirus
Step 2: Depending on antivirus software like Norton installed in computer, you can set the time frame for which antivirus will remain disabled.
Disable Firewall:
Step 1: Open ‘Control Panel’ in Windows 10 via Windows Search and go to ‘System and Security > Windows Firewall > Turn Windows Firewall ON or OFF’
Step 2: Now, Check ‘Turn OFF Windows Firewall’ checkbox in ‘Private’ and ‘Public’ network settings and then save the changes. Once done, retry opening Google Chrome and accessing the webpage, and check if the error is resolved.
Method 6: Flush DNS cache in Windows 10
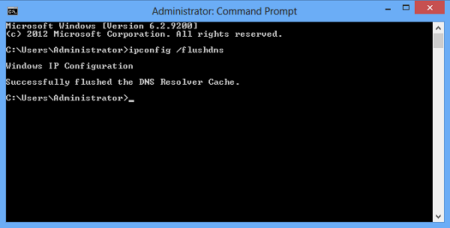
Step 1: Press ‘Windows + X’ keys on keyboard and select ‘Command Prompt as Administrator’
Step 2: Type the following commands one-by-one and hit ‘Enter’ key after each to execute
ipconfig /release
ipconfig /flushdns
ipconfig /renew
ipconfig /flushdns
nbtstat –r
netsh int ip reset
netsh winsock reset
Step 3: Once executed, restart your computer and restart Chrome browser, and check if the error is resolved.
Method 7: Uninstall and then reinstall Google Chrome
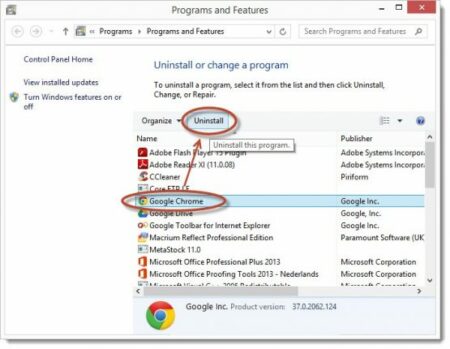
Problematic Google Chrome application could be reason behind the error. You can uninstall Google Chrome and then reinstall it in order to resolve the issue.
Step 1: Press ‘Windows + R’ keys on keyboard, type ‘%LOCALAPPDATA%\Google\Chrome\User Data\’ in the opened ‘Run’ window and hit ‘Ok’ button to open Chrome/user data folder
Step 2: In the opened folder, right-click on ‘Default’ folder and select ‘Rename’ and rename the folder to something else like ‘default.old’ or select ‘Delete’ option if you are comfortable losing all your preferences in Chrome.
Step 3: Now, open ‘Control Panel’ in Windows 10 via Windows Search and go to ‘Uninstall a Program > Programs & Features’, find and select ‘Google Chrome’ and uninstall it, and after that, restart your computer
Step 4: After restart, reinstall Google Chrome browser and then check if the error is resolved.
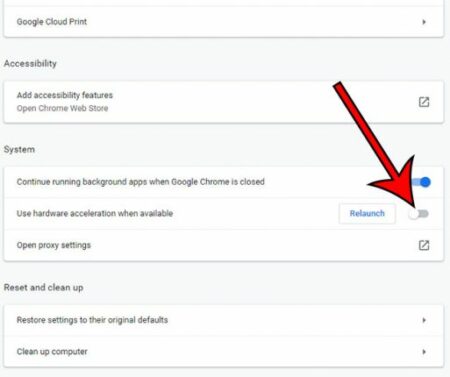
Method 8: Disable ‘Hardware Acceleration’ feature in Google Chrome
Step 1: Open ‘Google Chrome’ browser and click on ‘Three-Dots’ icon at top-right corner and select ‘Settings’
Step 2: In ‘Settings’ page, click on ‘Advanced’ option in left pane or at bottom and go to ‘System Settings’ section
Step 3: Find and disable the option ‘Use hardware acceleration when available’
Step 4: Once done, restart Chrome browser and check if the error is resolved.
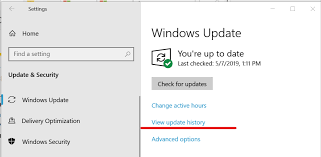
Method 9: Update Windows 10 OS
Updating Windows 10 OS to latest update version can resolve any issue in Windows computer. Let’s try.
Step 1: Press ‘Windows + I’ keys on keyboard to open ‘Settings’ App in Windows 10
Step 2: Go to ‘Update & Security > Windows Update’ and click on ‘Check for updates’ button
Step 3: Download and install the available update in computer and once done, restart your computer to see the changes.
Method 10: Perform Windows 10 System Restore
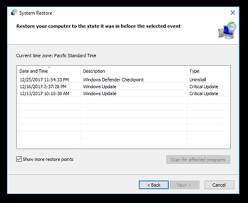
If the issue is still persists, then you can try to fix the issue by performing System Restore operation in Windows 10.
Step 1: Type ‘System Restore’ in Windows Search and open it from results appear
Step 2: In ‘System Restore’ window, click on ‘Next’, select a restore point according to date & time when there was no issue at all, and click ‘Next > Finish’ to start restoring process
Step 3: Once done, restart your computer and check if the error is resolved.
Method 11: Download Chrome Canary version
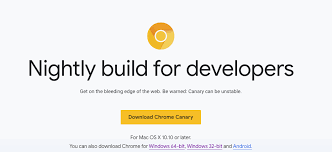
You can try Chrome Canary – a future version of Chrome and check if the error is resolved.
Method 12: Perform Network Setting reset
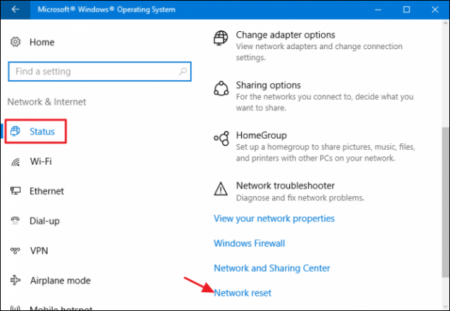
Step 1: Open ‘Settings’ App in Windows 10 and go to ‘Network & Internet > Status’ and click on ‘Network Reset’ option in right pane
Step 2: In the ‘Network Reset’ window, click ‘Reset Now’ button and click ‘Yes’ to confirm resetting
Step 3: Once done, restart your computer and check if the error is resolved.
Method 13: Perform Clean Boot in Windows 10
If the error is still persist, then you can perform Clean Boot operation in Windows 10 in order to fix the issue.
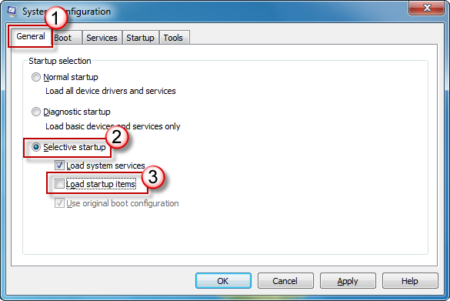
Step 1: Press ‘Windows + R’ keys on keyboard, type ‘msconfig’ in the opened ‘Run’ window and hit ‘OK’ button to open ‘System Configuration’ window
Step 2: In the opened window, click on ‘Selective Startup’ radio button, select ‘Load System services’ and ‘Use original boot configuration’ checkboxes, and deselect ‘Load Startup items’
Step 3: Now, click on ‘Services’ tab, select ‘Hide all Microsoft Services’ checkbox and hit ‘Disable All’ button
Step 4: Finally, click on ‘Apply’ and ‘Ok’ button to save the changes and restart your computer. After restart, open Google Chrome and retry accessing the webpage that was causing the error, and check if the error is resolved.
Conclusion
I am sure this post helped you on How to fix He’s dead jim error Google Chrome in Windows 10 with several easy steps/methods. You can read & follow our instructions to do so. That’s all. For any suggestions or queries, please write on comment box below.

