
What is ‘Java error 1603’ in Windows 10?
If you are experiencing ‘Java error 1603 Windows 10’ while trying to install Java in your Windows 10 computer, then you are in right place for the solution. Here, you will be guided with easy steps/methods to resolve the error. Let’s starts the discussion.
‘Java error 1603’: Java is programming language and is a very popular choice for developers. Users need to have Java installed on their Windows, Mac or other system in order to be able to run the applications based on Java. It means if you want to run application based on Java or developed in Java programming language, then Java must be installed in your computer.
However, several users reported that they faced ‘Java error 1603 Windows 10’ while they tried to install Java on their Windows 10 computer. This error is similar to Java update did not complete error code 1618 in Windows 10. The same error is also appeared usually when you try to update Java. Updating Java program in computer is necessary in order to fix any bugs or issues in Java, and if you are experiencing ‘Java error 1603’ while updating Java, then it is necessary to fix the error because bugs in Java can be exploited by malware programmers. Let’s take a look at error message.
“Java update did not complete
Error Code: 1603
Please refer to Java Help Center for troubleshooting information or contact your system administrator.”
There could be several reasons behind this error including interference of your third-party antivirus, web browser and/or other programs that are running Java. This issue can also be occurred if Java Installation file is corrupt or you are installing incorrect Java version in your computer. Another possible reason behind this error can be required permission like administrator permission is to not given to Java Installation setup. You can try to fix the issue by running Java installation/update setup with administrator permission. Let’s go for the solution.
How to fix Java error 1603 Windows 10?
Method 1: Fix ‘Java error 1603’ with ‘PC Repair Tool’
If this error is occurred due to some problems in your Windows computer, then you can try to fix the issue with ‘PC Repair Tool’. This software offers you to find and fix BSOD errors, DLL errors, EXE errors, problems with programs/applications, malware or viruses issue, system files or registry issues, and other system issues with just few clicks.
⇓ Get PC Repair Tool
Method 2: Check your System version type and try install Java accordingly
Step 1: Press ‘Windows + I’ keys on keyboard to open ‘Settings’ App in Windows 10
Step 2: Go to ‘System > About your PC’ and in right pane, check your system type whether it is 32-bit or 64-bit
Step 3: Now, check your Java installation setup version and check if it is for your system version type. For example, you need to download & install Java for Windows 10 64-bit if your system type is Windows 10 64-bit. If you have download some different version, then you need to re-download Java of your system type version.
Method 3: Install Java as Administrator
Some applications like java requires an administrator permission to install in your computer. You can grant administrator permission to Java in order to fix the issue.
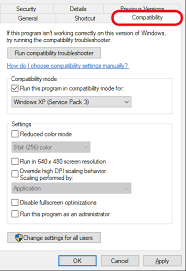
Step 1: Find and right-click on ‘Java Installer executable file’, and select ‘Properties’
Step 2: In ‘Properties’, click on ‘Compatibility’ tab, check ‘Run this program as an administrator’ checkbox and hit ‘Apply’ and ‘OK’ button to save the changes
Step 3: Once done, double-click on ‘Java Installer setup’ and follow on-screen instructions to finish installation. Check if it works without any issue.
Method 4: Uninstall the previous version of Java and then try reinstalling the latest Java version
This issue can also be occurred if previous version of Java installed in your computer is causing conflict with latest version you are trying to install. You can try to fix the issue by uninstalling previous Java version and then reinstall the latest one.
Step 1: Open ‘Control Panel’ in Windows 10 and go to ‘Uninstall a Program > Programs & Features’
Step 2: Find and click ‘Java’ application from list of apps, and select ‘Uninstall’. Follow on-screen instructions to finish uninstall and after that, restart your computer
Step 3: After restart, download and install the latest Java version with your system type version like 32-bit or 64-bit – Windows offline installer, and check if it works.
Method 5: Disable your third-party antivirus software
Sometimes, this error can be occurred due to interference of your third-party antivirus software installed in your computer. You can disable your third-party antivirus software in order to fix the issue.
Step 1: Press ‘CTRL + SHIFT + ESC’ keys on keyboard to open ‘Task Manager’
Step 2: In ‘Task Manager’, click on ‘Startup’ tab, find and select your antivirus software, and select ‘Disable’ to disable your antivirus.
Step 3: After that, try installing Java and check if it works without any issue.
Method 6: Close browser and other application running Java
This error can also be occurred if your browser and other applications running Java in your computer. This can cause conflict issue while installing latest version of Java. You can fix the issue by close all such applications that running java, and then try install Java latest version.
Method 7: Disable Java content
Step 1: Open ‘Control Panel’ in Windows 10 and select ‘Large Icons’ option from ‘View By:’ dropdown
Step 2: Find and click on ‘Java’ to open its ‘Control Panel’
Step 3: In ‘Java Control Panel’, click on ‘Security’ tab, uncheck ‘Enable Java content in the browser’ checkbox and then hit ‘Apply’ and ‘Ok’ button to save the changes
Step 4: After that, try installing or updating Java and check if it works. Once resolved, check ‘Enable Java content in browser’ checkbox in ‘Java Control Panel’ again.
Method 8: Run ‘Program Install and Uninstall’ troubleshooter
One possible way to find and fix issue with programs/applications like Java is to run Microsoft’s Programs Install and uninstall troubleshooter.
Step 1: Open your browser and visit ‘Microsoft official’ site, and download ‘Programs Install and Uninstall troubleshooter’, or visit ‘https://support.microsoft.com/en-us/topic/fix-problems-that-block-programs-from-being-installed-or-removed-cca7d1b6-65a9-3d98-426b-e9f927e1eb4d’ page to download the troubleshooter
Step 2: Once downloaded, find and open the troubleshooter and follow on-screen instructions to finish troubleshooting. Once done, please check if the error is resolved.
Method 9: Uninstall Windows update ‘KB2918614’
Some users reported that this error is occurred after installing Windows update KB2918614 in Windows 10 computer. You can try to fix the issue by uninstalling this KB number update in computer.
Step 1: Open ‘Settings’ App in Windows computer and go to ‘Update & Security > Windows Update > View Update History > Uninstall Updates’
Step 2: Find and right-click on update with ‘KB2918614’ KB number, and select ‘Uninstall’.
Step 3: Once uninstalled, restart your computer to see the changes and check if the issue is resolved.
Conclusion
I am sure this post helped you on How to fix Java error 1603 Windows 10 with several easy steps/methods. You can read & follow our instructions to do so. That’s all. For any suggestions or queries, please write on comment box below.

