
Custom Resolution is a small freeware utility which can be used to tweak your NVIDIA and AMD graphics cards to create higher resolutions and you can easily set your custom resolution using the NVIDIA Control Panel screen. But some users faced difficulties while altering these settings using the NVIDIA Control Panel as they have reported NVIDIA Custom resolution is greyed out in NVIDIA Control Panel. And this obstacle is eventually preventing them from enhancing their resolution while performing graphic intensive tasks. So here in this article we are going to share some effective tips to get past the situation. If you are also one of those thousands of users keep scrolling the blog till you manage to get the trouble.
Table of Contents
How to Resolve NVIDIA Custom resolution is greyed out in NVIDIA Control Panel
Well this is not such a big issue to deal you can easily resolve the issue by following the below mention suggestions.
Method 1: Turn off the Snap to feature
The report says that the Snap to feature is not very favourable to Dynamic Super Resolution. So we suggest you to disable the Snap to feature.
Here’s how:
Step 1: On your keyboard, press Windows + R keys together to open the Run dialog box> then type in main.cpl in the box and press Enter key
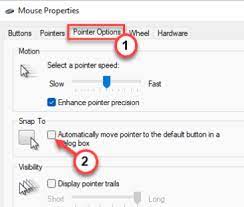
step 2: Once you reach the Mouse Properties, go to the “Pointer Options” > Then go to the “Snap to” feature and then Uncheck the “Automatically move pointer to the default button in a dialog box“
Step 3: Lastly tap “Apply” and “OK” to save the changes in the mouse settings
Now just go back to NVIDIA Control Panel and then try to toggle custom resolution settings
Method 2: Use the Display Properties
Several users have claimed that using the display adapters resolved their issue so we suggest you to use this to help yourself.
Here’s how:
Step 1: First of all open Settings on your Computer by pressing Windows + I keys together
Step 2: Once it appears, go to the “System” Settings> then click on the “Display” option on the right-hand pane
Step 3: Now on the Display Settings on your right-hand pane, then click “Advanced Display”> tap the “Display adapter properties for Display 1” to edit the settings on your own
Step 4: Go to the “Adapter” tab> then click “List All Models” option to explore all the possible display modes
Step 5: Here you will see all the display formats that your graphics card supports in a list> Select the display format you want & click OK
Step 6: Note that the display resolution wont’ take effect unless you tap “Apply” & “OK”
Method 3: Not available over a limit
If you are already using the system at the highest resolution supported by your system, you can’t use the Dynamic Resolution feature on your computer. And it will appear as greyed out.
For instance: In case your screen supports 4k resolution at most or 3480*2160. So, if you have already set the monitor to 3480*2160, custom resolution settings will be greyed out.
That’s all about NVIDIA Custom resolution is greyed out in NVIDIA Control Panel. If you liked the blog then keep visiting the site for more useful articles.
