
What is ‘Recipient address rejected access denied’ – Outlook error in Windows 10?
If you are experiencing ‘Recipient address rejected access denied Outlook’ error in Windows 10 computer while trying to send Outbound email in Outlook application, then you are in right place for the solution. Here, you will be guided with easy steps/methods to resolve the error. Let’s starts the discussion.
Outlook: Outlook or Outlook.com is personal information manager web app from Microsoft consisting of webmail, calendaring, contacts and task services. Outlook.com supports later versions of Internet Explorer, Firefox, Safari, and Google Chrome browser. It features auto-completion contact addresses when composing, contact grouping, importing & exporting of contacts with CSV files, rich text formatting, support for multiple addressees and different language versions. Outlook as Microsoft Outlook app is part of Microsoft Office Suite.
However, several users reported they faced ‘Recipient address rejected access denied Outlook’ error while they tried to send an outbound email in Outlook or after the use Outlook or different email client to send an email that bounces back with ‘Message not delivered’ error. This error message is commonly associated with status errors 541 and 551.
The possible reason behind this issue can be the non-existent email address, issue with DNS server like corrupted/outdated DNS cache in your computer, emails gets rejected by anti-spam filter, DBEB is blocking external emails and others. ‘Recipient address rejected access denied’ error is usually appeared when you try to send outbound email to an email address that doesn’t exist actually. You should make sure you are entering correct email address of recipient and if not, you can modify recipient email address in order to fix the issue.
This issue can also be occurred due to outdated or corrupted DNS cache in your computer. In such case, you can clear DNS cache and check if it works for you. Another possible reason behind this error can be enabled ‘Anti-Spam Filter’ feature in your mail service that is labeling your email as spam. In such case, you can try to fix the issue by asking recipient to whitelist you so that your emails get through.
Sometimes, this error is appeared if you previously configured Exclaimer Cloud through Microsoft 365 while sending emails to public folders possibly due to DBEB. In such case, you can try to fix the issue by ensuring the public folders are stored on-premise. Let’s go for the solution.
Table of Contents
How to Fix Recipient address rejected access denied Outlook in Windows 10?
Method 1: Check if you are inserting correct email address of recipient
Before troubleshooting the error, you should make sure you are entering the correct email address of the recipient while trying to send an outbound email in Outlook. This error is usually appeared when you try to send email to non-existent users/recipient email address.
Method 2: Flush DNS cache and clear Temp TCP/IP data in Windows 10
This issue can also be occurred due to corrupted/outdated DNS cache or bad configured IP address settings in Windows computer. You can clear DNS cache and reset TCP/IP data in order to fix the issue.
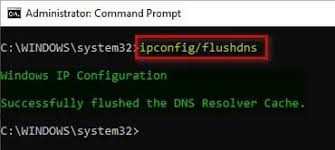
Step 1: Press ‘Windows + X’ keys on keyboard and select ‘Command Prompt as Admin’
Step 2: Type the following commands one-by-one and hit ‘Enter’ key after each line to execute
ipconfig /flushdns
nbtstat -R
nbtstat -RR
netsh int reset all
netsh int ip reset
netsh winsock reset
Step 3: Once executed, restart your computer and restart Outlook App, try sending the exact same email to same recipient that was causing error, and check if it works for you.
Method 3: Contact Recipient to Whitelist you
This error can also be appeared due to enabled ‘Anti-Spam Filter’ feature in mail service used by recipients’ domain, and block you from sending email for some security reasons or labeled your email as Spam. In such, you can ask the recipient to whitelist you so that you can send email to them without any error. However, if you are unable to establish the contact with recipient in order to convince them to whitelist your email address, then you can try alternative email address and this way, you can ask them to whitelist the email address that was triggering error while sending email.
Method 4: Make Exchange Mail folders Public
If you are facing this error when you are trying to send email after configuring it with Exclaimer Cloud via Microsoft 365, then DBEB (Directory-Based Edge Blocking) could be reason behind this error. DBEB is enabled by default in Microsoft 365 and its configured to reject external emails with addresses that are not found inside Azure Active Directory. In such case, you can try below steps to resolve the issue.
Step 1: Make sure all public servers are hosted on-premise

- Open ‘Microsoft Azure Active Directory Connect’ screen
- In the opened window, click on ‘Optional Features’ in left pane, and in right pane, check ‘Exchange Mail Public Folder’ checkbox and hit ‘Next’ to save the changes.
- Once done, retry sending the email that was causing error while sending, and check if the error is resolved.
Step 2: Disable DBEB (Directory Based Edge Blocking) feature
- Open your browser and sign-in into Exchange Online with your account
- On the opened page, go to your ‘Mail Flow’ and click on ‘Accepted Domains’ tab
- Select the root domain of public folder and click ‘Edit’
- Under ‘This accepted domain is’, select ‘Internal relay’ and hit ‘Save’ to disable DBEB, and then retry sending email and check if it works for you.
Step 3: Make sure your public servers are hosted in Exchange Online
- At first, login into Exchange Online with your account
- Now, go to ‘Mail Flow’ and select ‘Rules’ tab
- From the list of available rules, select ‘Identify Messages to send to Exclaimer Cloud’ and click ‘Edit’
- In the Edit Menu, scroll down to bottom of the section, and click ‘Add Exception’ and select ‘Recipient… Is this person’ option
- In the Select Member’s dialog box, select all Public folder mailboxes that you are currently using, and hit ‘Add’ to enforce the change, and then hit ‘OK’ button to save the changes. Once done, retry sending email and check if it works for you.
Fix Windows PC Issues with ‘PC Repair Tool’
‘PC Repair Tool’ is easy & quick way to find and fix BSOD errors, DLL errors, EXE errors, problems with programs/applications, malware or viruses issues, system files or registry issues, and other system issues with just few clicks. You can get this tool through button/link below.
⇓ Get PC Repair Tool
Conclusion
I am sure this post helped you on How to fix Recipient address rejected access denied Outlook in Windows 10 with several easy steps/methods. You can read & follow our instructions to do so. That’s all. For any suggestions or queries, please write on comment box below.

