
Have you ever seen “the site can’t be reached” message your browser while you tried to visit your favorite websites or any other websites? And have you faced this problem after your device is being connected with strong Internet connection? Don’t be panics, please read this article carefully.
This article will help you to fix site can’t be reached problem from your Windows 10/8.1/8/7/XP OS based PCs. You can read this article for learning or educational purpose and follow the instruction in your computer as per System requirements. Now comes to issue, this error might occurs on your main browser like Google Chrome and other browsers.
Why you are facing “the site can’t be reached” troubles?
- It might possible to get “this site can’t be reached err_connection_timed_out” error when the DNS lookup failed which is responsible to translates a websites’ name to its Internet address
- “this site can’t be reached dns_probe_finished_nxdomain” issue occurs in your PCs due to when the Firewall preventing Google Chrome and other browsers from accessing the network. When DNS server can’t translate Domain name to IP address in TCP/IP network, then you might get “this site can t be reached the connection was reset” or DNS failure error.
- It might possible to get DNS failure error due to malware infection i.e., your System has infected from malware or spyware that has blocked Firewall and antivirus of your computer and leading major damages.
Various ways to fix the site can’t be reached troubles in Google Chrome browser
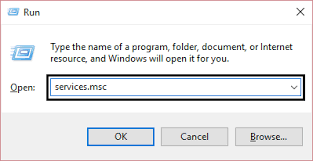
Procedure 1: You need to restart DNS client
Step 1: Press “Windows + R” key from keyboard and type “services.msc” and then press enter key
Step 2: Services Windows appears, find “DNS client”
Step 3: Now, right click on “DNS client” and select “Restart”
Step 4: Wait for complete the process. After that, please check if the problem is resolved.
Procedure 2: You need to try to reset TCP/IP
Step 1: Press “Windows + X” key from keyboard and select “Command Prompt as Administrator”
Step 2: Now, type or copy & paste the following command in command line and executes each command one-by-one by pressing enter key
ipconfig /release
ipconfig /all
ipconfig /flushdns
ipconfig /renew
netsh int ip set dns
netsh winsock reset

Step 3: After complete the process, restarts your computer to apply or save changes. Please check if the trouble is resolved.
Procedure 3: You need to change IPv4 DNS address
Step 1: Click on “Start” button and search or go for “Open Network and Sharing Center”
Step 2: Now, click on your active Network Connation and then click on “Properties”
Step 3: Inside “Properties” Windows, select “Internet Protocol Version 4 (TCP/IP)” and click on
“properties”
Step 4: Now, check the “US the following DNS server address”
Step 5: After that, type “8.8.8.8” in preferred DNS server and “8.8.4.4” in Alternative DNS server
Step 6: Finally, check the “Validate settings upon exit” and then click on “OK” and “close”
Procedure 4: You need to run Network Troubleshooter
Step 1: Press “Windows + R” key from keyboard and type “ncpa.cpl” and then press enter key
Step 2: Network Connections Windows appears, right click on your Wi-Fi connection and select “Diagnose”
Step 3: Suppose the Network Troubleshooter will give following error message “DSCP is not enabled for Wireless Network connection”
Step 4: After that, click on “Next” in order to fix the issues and also click on “Try This Repairs as an Administrator”
Step 5: On next prompt, click on “Apply this fix”
Step 6: After complete the process, restarts your computer to apply or save changes and check if the problem is resolved.
Procedure 5: You need to Re-install your Network Driver
Step 1: Press “Windows + R” key from keyboard and type “devmgmt.msc” and then press enter key
Step 2: Device Network Windows appears, expand Network adapter and right click on Wi-Fi adapter and select “Uninstall”
Step 3: Once again click on “Uninstall” in order to confirm
Step 4: Now, right click on “Network adapters” and select “scan for hardware changes”
Step 5: Wait for complete the process. After that, restarts your computer and please check if the problem is resolved.
Procedure 6: You need to reset Google Chrome settings
Step 1: At first, open Google Chrome browser and type “Chrome://flags/” without quotes in address bar and then press enter key
Step 2: In the next Window proceed with caution and click on “Reset all to default”
Step 3: Wait to complete the process. After that, reboots your computer to apply or save changes
Procedure 7: You need to update Wireless Adapter drivers
Step 1: Press “Windows + R” key from keyboard and type “devmgmt.msc” and then press enter key
Step 2: Now, right click on “Wireless Adapter” under “Network Adapter” and select “Update Driver”
Step 3: Select “Browse my computer for driver software”
Step 4: After that click on “Let me pick from a list of available drivers on my computers”
Step 5: Now, select the latest available driver from the list and click on Next“
Step 6: Wait for complete the process. After that, reboots your System to apply or save changes. Please check if the trouble is resolved.
You may also read: Know How to Fix Internal Power Error BSOD (Solved)
Conclusion
I hope this article helped you to fix the site can’t be reached issues from System. You can use or apply either one or all the procedures to fix this issue as per System requirements. If you are unable to solve this problem, then it might possible that your System has infected from malicious harmful malware or spyware. So, you can scan your System with powerful antivirus software “Advanced System Repair” which is capable to delete all junk files from System.
Is Your PC Behaving Abnormal & Needs Instant Optimization?
We recommend you to choose Advanced System Repair Suite which is dedicated to offer complete options to optimize a PC, fix any Windows error, and remove malware threats in easy. The software is award winning and suggested as the best malware fix application supporting all Windows versions including XP/Vista/7/8/8.1/10. Just 3 steps to avail error free PC.
![]()
- Download Advanced System Repair Tool and install on your PC. (Follow all on screen instructions when installer is executed)
- Click “Scan Your PC” button to scan all present issues, errors, junk files, and malware threats.
- Finally, click “Start Repair” to fix all detected problems in next few minutes.
