With the release of new Windows 11, the successor of Windows 10, the new operating system now comes with all new File Explorer. And with this new file explorer tool you may find it not similar to that one in Windows 10. Since many of the files stored on Windows operating system is marked as hidden files, and it’s doesn’t actually bother most of the people.
In Windows 10, it was pretty easy to view hidden files and folders, all it required just to toggle the option to show hidden objects. But, when it comes to new explorer in
Windows 11, it’s not that similar and this guide will let you learn how to view hidden files and folders in the new OS.
Steps To Show Hidden Files & Folders in Windows 11
- Launch File Explorer from Start Menu or from Taskbar.
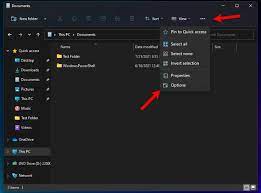
- Click on the 3-dot icon and click Options as indicated in the image below.Img

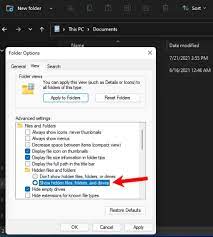
- Now, navigate to View > Hidden files and folders under Files and Folders.
- Once done, just check the checkbox beside the option that reads Show Hidden files, folders, and drives.Img

- Finally, click on the OK button and close the opened window.
The above guidelines will help you to show hidden files which are regular or stored on your machine. But the OS or system related hidden files still won’t be displayed. In order to view those system hidden files, get through the guidelines mentioned here:
- Open File Explorer from the Start Menu
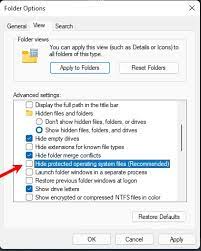
- As mentioned in the above guidelines, navigate to Hidden files and folders under Files and Folders.
- Under the opened tab, uncheck the option that reads Hide protected operating system files.

- Finally, click on OK button and close the window.
After doing above discussed workarounds, you can now easily view all hidden files and folders easily including system ones as well. We hope this article might helped you to learn how to see hidden files and other objects stored on your computer easily.

