
While going through a lot of forum sites we have concluded that so many users have claimed that when they try to connect to the VPN they lose internet connection. VPNs are used for establishing a secure and encrypted connection between the computer and the internet. That’s why so many users prefer to connect with the VPN as it provides a more private browsing experience.
But as we have earlier discussed a large number of users are frequently reporting that they are facing connection failure while using VPN. And if we talk about the possible reasons for the same hen it includes the following:
#. You are likely to face the above mention issue if you are connected to a server that is not running properly.
#. If you are facing outdated/corrupted VPN Server
#. You may also face the above mention issue if your DNS Setup is not compatible with your VPN client
#. Inappropriate Date and Time Settings on your PC
You may also read: Fix Please reconnect to the internet Office is still installing in Windows 10/11 [Steps]
Table of Contents
When I connect to VPN I lose Internet Windows 11 what to do?
Method 1: Adjust Date and Time Settings
In this method we suggest you to adjust your date and time settings and to do the same follow the below mention guidelines:
Step 1: Firstly double-click Date and Time display on the taskbar> then click Change date and time settings
Step 2: Under the date and Time tab, click Change date and time…

Step 3: Under the Date and Time Settings dialog box, update your time to the current date and time and then tap on OK
Step 4: If you want to change the time zone, click Change time zone…select your current time zone in the droop down list and then OK
Step 5: Now Restart your VPN and connect to a server location
Method 2: Install the latest version of VPN
In this method we suggest you to install the latest version of VPN and to do the same follow the below mention guidelines:
Step 1: Right-click Start and select Run> then type in regedit and press Enter
Step 2: You will now see the User Account Control dialog box>click Yes
Step 3: Under the Registry Editor, under computer, double-click on HKEY_LOCAL_MACHINE
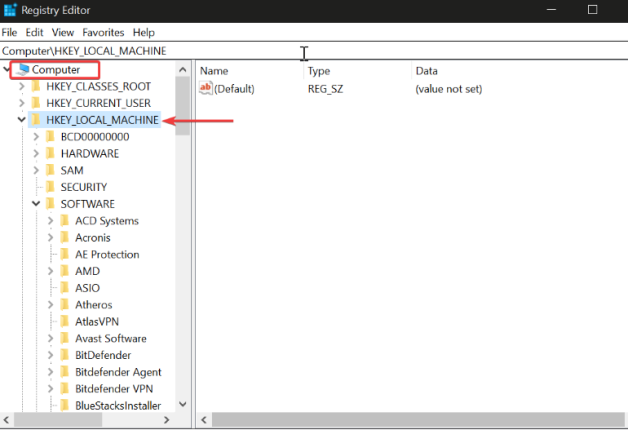
Step 4: Under HKEY_LOCAL_MACHINE, double-click on SOFTWARE and then [your]VPN
Step 5: If you fails to find [your]VPN directly beneath SOFTWARE, go to SOFTWARE>Classes>[your]VPN
Step 6: Now right-click on [your]VPN and then click Delete. After deletion you should no longer see your VPN under Wow6432Node
If you found that VPN is still listed as an available VPN Connection after uninstalling:
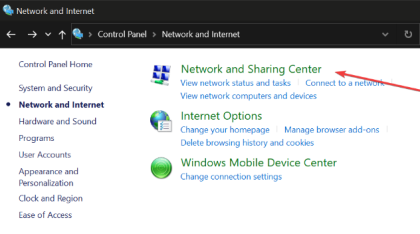
Step 1: First of all type in Control Panel in the taskbar to open Control Panel> Navigate to the Network and Internet and click on Network and Sharing Center
Step 2: On your Network Connections, right-click on the WAN Miniport labeled [your]VPN > click Delete
Method 3: Connect to a different server location
You can also select a different VPN Server location and connect to it. If you can access the internet when connected to a different server location, there may be a temporary issue with the server location your originally selected.
Method 4: Flush DNS Settings
Flushing the DNS Cache may also resolve your issue and to do the same follow the below mention guidelines:
Step 1: On your keyboard press Win + X keys and then from the menu that opens select Command Prompt (Admin)
Step 2: In the Command Prompt window that will open, you need to type the following command and press Enter key:
ipconfig /flushdns
Once done then see if the issue resolved or not.
Method 5: Reinstall your current VPN
Several users have claimed that reinstalling the current VPN can easily resolve your issue. To do the same follow the below mention guidelines:
Step 1: Right-click Start and select Apps and Features

Step 2: Find your VPN from the list of programs and select Uninstall > type control panel in the taskbar and pen Control Panel
Step 3: Now navigate to Network and Internet >Open the Network and Sharing Center
Step 4: Under Network Connections, right-click on the WAN Mini Port labeled with your VPNs name

Step 5: Select Delete
Method 6: Change your VPN Protocol
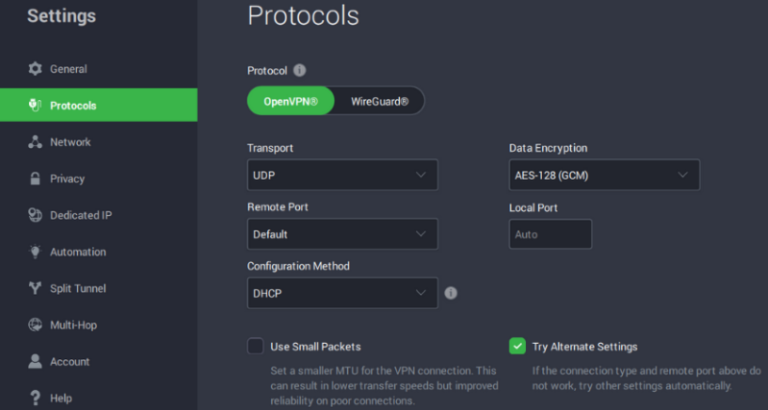
Well if your VPN uses he UDP Protocol by default then this may be blocked in some countries. And it can be a possible reason for facing the above mention issue. For the optimal performance, choose the following protocols:
OpenVPN TCP
L2TP
PPTP
Open your VPN’s options or Settings and then select the Protocol from the list.
Note: PPTP offers only minimal security so only use it when absolutely required
Method 7: Check your underlying connection
We also suggest you to check your network by following the below mention guidelines:
Step 1: Navigate to the Start and then select Settings> Open Network and internet
Step 2: Then select Status from the sidebar
Method 8: Change your VPN
If you are still struggling with the same issue then we highly recommend you to change your VPN. You can go for any of other reliable VPNs available in the market.
Method 9: Change your DNS Server Configuration
In order to configure your Windows, follow the below mention guidelines:
Open Network Connections Settings
Step 1: Right-click Start and select Run> type ncpa.cpl and click on OK
Step 2: In the Network Connections window, find your usual connection, either LAN or Wireless Network Connection
Step 3: Right-click the connection and select Properties
Set the DNS Server Addresses
Step 1: Double-click Internet Protocol Version 4 (IPV4) or just Internet Protocol
Step 2: Select Use the following DNS Server Addresses > then type the following Google DNS Server Addresses:
Preferred DNS server 8.8.8.8 and Alternate DNS server 8.8.4.4
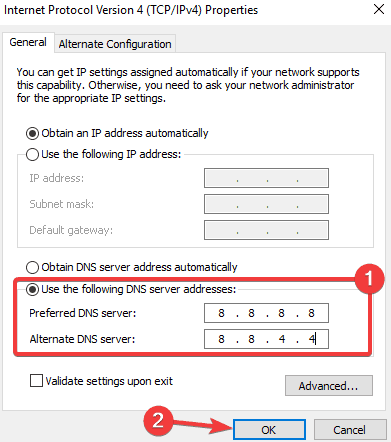
Step 3: If the Google DNS is blocked, try the following:
Neustar DNS Advantage (154.70.1 and 156.154.71.1) enter and press OK; Level3 DNS (4.2.2.1 and 4.2.2.2) enter and press OK.
Once you are done, set your VPN’s Settings and flush old DNS entries and check if the issue resolved or not.
Method 10: Adjust your Proxy Settings
Points to Remember: The following steps will not assist you accessing the online streaming services, so if you are unable to access a service because a VPN or proxy is detected. In such case please contact your VPN’s support team for instant help.
Follow the below mention steps to disable the proxy in Internet Explorer:
Step 1: From the Tools or gear menu, select Internet options> In the Connections tab, click LAN Settings

Step 2: Uncheck all of the displayed options except automatically detect settings > click OK
Step 3: Finally close your browser and then open it again.
Method 11: Use Network Troubleshooter
Several users have claimed that running the network troubleshooter also resolves their issue, so you can also try the same using the following guidelines:
Step 1: On your keyboard press Win + R keys> in the run box, type the following command and press OK
msdt.exe /id NetworkDiagnosticsNetworkAdapter
Step 2: Once the Network Adapter Troubleshooter opens> click Next and follow the on-screen instructions. If any issue related to network adapter is found, the troubleshooter will resolve it.
Once done then Restart your PC and see if the issue resolved or not.
We hope now you won’t say When I connect to VPN I lose Internet Windows 11, as we have tried our best to provide all the related methods to resolve the issue. Thanks for Reading.
