
Are you stuck with Acer Swift WebCam not Detected issue? Don’t get worried, here in this blog we will try to enlist all the possible troubleshooting methods to get past the problem. So without any further delay let’s get started.
Thought the issue is very common and can be resolved with handy methods but still it’s quite annoying if your webcam is not working /responding especially when you need it. As we have earlier mentioned that it’s a common issue and can be randomly encountered by anyone. So we have not pay heed on the reasons because there can be multiple reasons. Considering this, we will only discuss the fixes for resolving the trouble.
Table of Contents
How to fix Acer Swift WebCam not Detected
Method 1: Enable/Disable the Webcam
In this method we suggest you to disable and then enable the webcam and to do so follow the below mention guidelines:
Step 1: Open Device Manager
Step 2: Tap on the Imaging devices option in order to reveal the camera
Step 3: Then Right-click on the webcam’s name to access the prompted list.
Step 4: Select Disable Device
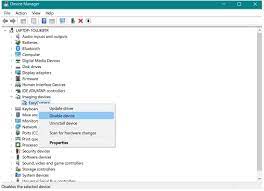
Step 5: Tap on Yes in the pop-up Window to confirm your choice
Step 6: Now restart your computer and then repeat the steps, but now you need to select Enable device from the prompted list.
Method 2: Ensure that you are not using more than one app
Make sure that only one program or app can use your webcam at a time. You need to close all apps and programs that may be using the webcam. If you are not sure that which app is using your webcam then close all the opened apps but before that kindly save your work.
Method 3: Allow the Apps to use your Webcam
In most of the cases we have observed that users face the WebCam not Detected issue just because the apps they want to use are not have sufficient permission to access the webcam.
Follow the guidelines to grant permission to the apps to access webcam:
Step 1: Navigate to Taskbar>tap on Start
Step 2: Then scroll to find Settings and then click to open
Step 3: You need to type in “Webcam” in the search field in the upper right corner
Step 4: Select Webcam Privacy Settings
Step 5: Now check “Let apps use my camera option” is enabled, if not enabled then toggle to ON.
Method 4: Check the Driver
We don’t need to explain the importance of driver in a computer; it establishes communication between the hardware and the operating system. And if it gets corrupted due to any specific reason then it may leads to many issues and the current situation is one of them.
Follow the below mention steps to check the driver:
Step 1: Go to Taskbar and open Device Manager
Step 2: Once you have opened the Device Manager, find Imaging devices in the appeared list on the left and then tap to see your Camera’s name
Step 3: Then double-click on the cam to open details
Step 4: If you notice the driver status saying “This device is working properly” then it is not required to update the driver.
But if the device is not working properly then you need to uninstalling the driver. Follow the below mention steps to proceed:
Step 1: Right-click on the webcam
Step 2: Select Uninstall device from the pop-up list
Step 3: Choose Delete the driver software for this device from the prompted Window>click on Uninstall to confirm
Step 4: Now restart your laptop and wait for the driver to be reinstalled automatically
Step 5: If this was not helpful then install the required driver manually. To do so navigate to Acer Official Website and then browse for the driver you need. After that download and install it on the laptop. But if in case you are unable to get the compatible drivers then the ones made for the earlier versions of Windows will work.
If your webcam has stopped working just after updating g the driver then go back to using the previous driver version.
Step 1: First of all open the Device Manager and right-click on the webcam
Step 2: Choose Properties from the pop-up menu
Step 3: Tap on the Driver tab
Step 4: Select Rollback Driver>click Yes to confirm
Step 5: Finally restart your computer and check if the issue resolved or not if not then you need to scan for hardware modifications to help your system recognize the driver change. You can do this by right-clicking on the cam name and then selecting the discussed option.
Method 5: Reinstall the Apps or Programs
If none of the above mentioned method works for you then we suggest you to uninstall and then reinstall the app or program which is not supporting the webcam, because it seems that your webcam is fine but the apps/programs have corrupted files. So kindly uninstall and then reinstall the app.
Best Solution to Optimize your Windows PC/Laptops
If you are noticing crashing, freezing and lagging issues on your PC on regular intervals of time then it’s time to go for a PC Repair Tool. It is a professional tool which has a potential to tackle several Windows issues like BSOD Errors, DDL Errors, Registry Errors, Gaming Errors, runtime Errors and many more in a single go. It will not only immune your computer from all the commons and critical errors of Windows but will also optimize your machine for maximum performance.
⇓Get PC Repair Tool
Closure!!!
That’s all about Acer Swift WebCam not Detected. Hope you liked the blog and now you can easily get rid of the issue. Thanks for Reading.
