
If you are experiencing issues with your webcam, then it might be possible due to several reasons. Although, the usual troubleshooting can help users to fix those, but while using Windows 10, this operating system offer users with a system-wide options to disable webcam in all applications completely. For more detailed information about how to fix webcam not working issue on your machine, refer to various methods explained below.
Method 1: Checking Windows 10 Camera Options
While using Windows 10, the Settings app also has various switches which helps users to disable webcam in all applications. Means, if you disable the webcam through settings app, then even desktop applications won’t be able to use the cam.
Mostly, this setting is found under app permissions option under Settings > Privacy, and mostly affect Windows 10 new apps from Store. But, the webcam options found under that affects the desktop apps as well.
So, if your webcam isn’t working well, you can take the help of camera options under Settings > Privacy > Camera.
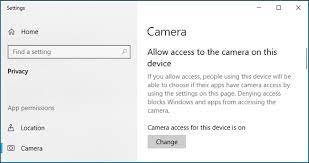
Once the option opens on screen, you can notice “Camera access for this device is on”. In case if it says the camera access is off, click its “Change” button and set it to “On”. The camera access if set to off, means Windows and its applications will not be able to use the cam, even Windows Hello sign-in option will fail.
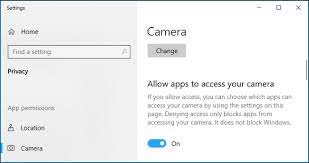
Under that camera option as discussed above, you can see another option as “Allow apps to access your camera”. Do make it sure to set as “On”. If this setting is off, none of the desktop applications will be able to use camera, but the OS can still use the cam for features like Hello sign-in.
The aforementioned option was changed after Windows 10’s April 2018 Update. Before that, it only affected UWP apps and not used to affect traditional desktop applications.
Within “choose which apps can access your camera” check and ensure the app is listed, which you want to access your camera. If it’s not listed there or set to Off, turn it on.
For general, the traditional applications won’t be seen in that list, but only such apps will appear in the list which are installed from Store. It actually means that all traditional applications can always access the webcam for as long as the settings like “Allow access to camera on this device” and “Allow apps to access your camera” options are enabled system-wide.
So, if the above mentioned settings are configured correctly, Windows 10 might not be causing your cam to fail or not working.
Method 2: Install or Update Webcam Drivers
If you are facing webcam not working issue on your machine, then an outdated driver might be a possible reason. Although, Windows 10 tries to install device drivers automatically whenever a device is connected. Also, it usually works. But sometimes, it fails to work properly. In such instances, the users are suggested to download a device driver installation package from the webcam’s manufacturer’s website and run the installer to fix the issue.
While downloading the drivers, make sure to download the latest one to update your old or outdated drivers with new ones. The manufacturer’s website may also offer you some other troubleshooting measures as well, but that depends upon certan webcam brands.
Method 3: Ensure Physical Connections To Webcam Is Correct
In case if none of your apps can see the connected webcam, there might be something happened with physical connections. Do make sure to check if the cam is properly connected.
So, to fix webcam not working issue, you must identify your webcam hardware connectivity. If you have a USB cam, make sure that its cable is connected to computer’s port. You can also do unplugging then plugging it back to ensure if it’s not loosen and properly inserted. In some instances, webcams have inbuilt light as well, which turns on when the USB cable is properly connected. If you have the one, make sure the light is on, if not, you can try pluggin it into other USB ports as well.
However, if you are using a laptop, tehre might be a built-in webcam, so you won’t be able to reseat its cable. But do make sure that you have not covered the cam somehow. In some newer laptops, there’s also being added a cam cover, so make sure if the cam cover is slid off to make your cam accessible.
Method 3: Select Desired Webcam Device
Sometimes, the users might have multiple video capturing devices connected to their machine, so the applications which they are trying to connect to webcam automatically might be the wrong one. In such cases, it’s required to configure webcam settings in the application.
In the application you are using to connect to webcam, navigate to its settings and look for options to select a preferred webcam. Taking an example of a video calling app named Skype, navigate to Menu > Settings > Audio & Video and select the preferred webcam for the camera settings.
However, if you fail to see the desired webcam in the app, it might not support the webcam. Generally, the Windows 10 Store based applications only support newer webcams, but the desktop applications still support older webcam types. So, if your webcam is not appearing in some of the apps, then such apps might not offer support to cam you have.
If all above methods fail to allow you using webcam with your desired application, then your camera might be broken or have some technical issues. To check it, connect the cam to other devices and see if it works. If not, replace the same with a new one. However, if you are using a laptop, you can visit its authorized service center to get the webcam checked or repaired if required.
