
What is ‘Lenovo USB-C Dock Driver’ in Windows 10/11?
If you are looking for Lenovo USB-C Dock Driver on the web, then you are in right-place for this. Here, you are provided with easy steps to download and install Lenovo USB-C Dock Driver in Windows 10/11. Let’s starts the discussion.
Lenovo USB-C Dock Driver: Lenovo USB-C Dock is USB Docking station from Lenovo. It includes 2 ports, Ports: 3x USB 3.1, 2x USB 2.0, 1x Combo Audio Jack, 1x Gigabit Ethernet. (Dock has the ability to support DisplayPort 1.4 and HDMI 2.0 for max 1 x 4K@60Hz, but the real video output would depend on the system’s output. Depending docking Station connected to your Windows computer, driver for docking station must be installed in computer accordingly.
For example, if you have Lenovo USB-C Dock – Docking Station connected to your Windows computer, then you need to have Lenovo USB-C Dock Driver installed in your Windows computer. Missing, corrupted/outdated or incompatible Lenovo USB-C Dock Driver can cause Lenovo USB-C Dock Docking Station not working issue or others in computer. So, driver update for Lenovo USB-C Dock is necessary in computer. Let’s go for the steps to get driver for Lenovo USB-C Dock.
Table of Contents
How to download and install Lenovo USB-C Dock Driver update in Windows PC?
Method 1: Download and install Lenovo USB-C Dock Driver from Lenovo official site
Step 1: Open your browser and visit ‘https://www.lenovo.com/’ page or visit ‘Lenovo Official site’
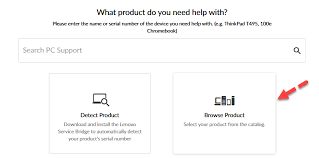
Step 2: Click ‘Support’ in top navigation section, from ‘Select a product family’, choose ‘View PC Support’. You can choose ‘Detect Support’ to make Lenovo do the legwork.

Step 3: Select ‘Browse Product > Accessories’, choose ‘Dock > Thinkpad USB-C Dock’ respectively
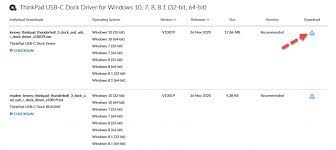
Step 4: Choose the driver corresponding to your Windows version and click ‘Download’ icon. Select the first download for latest release
Step 5: Once downloaded, extract the file and double-click on setup executable, and follow on-screen instructions to finish installation. Once installed, restart your computer and check if it works.
Method 2: Download or reinstall Lenovo USB-C Dock Driver update in Windows PC [Automatically]
You can also try to update all Windows drivers including Lenovo USB-C Dock Driver update using Automatic Driver Update Tool. You can get this tool through button/link below.
⇓ Get Automatic Driver Update Tool
Fix Windows PC issues with ‘PC Repair Tool’:
‘PC Repair Tool’ is easy & quick way to find and fix BSOD errors, DLL errors, EXE errors, problems with programs/applications, malware or viruses infections in computer, system files or registry issues, and other system issues with just few clicks.
⇓ Get PC Repair Tool
Conclusion
I am sure this post helped you on How to download and reinstall Lenovo USB-C Dock Driver update in Windows 10/11 with easy ways. You can read & follow our instructions to do so. That’s all. For any suggestions or queries, please write on comment box below.
