
Tips to disable Driver Signature Enforcement in Windows 11:
In this post, we are going to discuss on How to disable Driver Signature Enforcement in Windows 11. You will be guided with easy steps/methods to do so. Let’s starts the discussion.
Table of Contents
‘Disable Driver Signature Enforcement in Windows 11‘:
Driver Signing is process relating to Digital Signature with a Driver Package. Windows Device Installations use digital signature to verify the integrity of a driver packages and to verify the identity of vendor who provides the driver packages. Usually, device drivers are download & install from Windows Update, original equipment manufacturers, or some third-party driver download software, etc, must be verified digitally by Microsoft via a digital signature.
This Digital Signature is electronic security mark that certifies the publisher for the driver as well as relevant information relating to it. If the driver is not certified by Microsoft, your Microsoft Windows PC won’t run them on either 32-bit or 64-bit OS system and this called ‘Driver Signature Enforcement’. At time, you may see message saying ‘Windows require a Digitally signed driver’. In such case, you can disable Driver Signature Enforcement in Windows 11 in order fix this issue. Let’s go for the steps.
How to disable Driver Signature Enforcement in Windows 11?
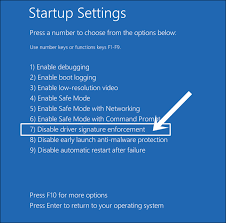
Method 1: How to disable Driver Signature Enforcement in Windows 11 via Advanced Boot Menu?
Step 1: Press & hold ‘SHIFT’ key on keyboard and click ‘Start Menu > Power > Restart’ to restart your computer while holding ‘SHIFT’ key to enter into Windows Recovery Environment.
Step 2: Once you are in WinRE, select ‘Troubleshoot > Advanced Options > Startup Settings’ and select ‘Restart’ button to restart your PC on Startup screen
Step 3: Press ‘F7’ or ‘7’ key on keyboard to select ‘Disable Driver Signature Enforcement’ option. Once done, save the changes and restart your computer, and check if it works for you.
Method 2: Disable Device Driver Signing
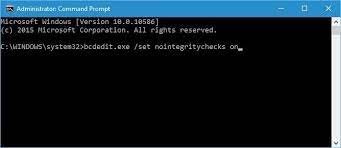
Step 1: Type ‘cmd’ in Windows Search Box and press ‘SHIFT + ENTER’ keys on keyboard to open ‘Command Prompt as Administrator’
Step 2: Type the following command and hit ‘Enter’ key to execute.
bcdedit.exe /set nointegritychecks on
Step 3: This will automatically disable driver signature enforcement on your device. If you want to re-enable this, execute the below command.
bcdedit.exe /set nointegritychecks off
Method 3: Enable Test Signing Mode
Step 1: Open ‘Command Prompt as Administrator’ using above method
Step 2: Type the following command and hit ‘Enter’ key to execute.
bcdedit /set testsigning on
Step 3: If the message is displayed on screen reading ‘The value is protected by Secure Boot Policy’, it means Secure Boot is enabled for your computer’s UEFI firmware.
Step 4: Disable it in your computer’s UEFI’s firmware setting to enable test signing mode via ‘Advanced Startup Options’. Restart your computer to enter test mode. A ‘Test Mode’ watermark should be visible in bottom-right corner of your computer screen.
Fix Windows PC issues with PC Repair Tool:
‘PC Repair Tool’ is easy & quick way to find and fix BSOD errors, EXE errors, DLL errors, problems with programs/applications, malware or viruses issues, system files or registry issues, and other system issues with just few clicks.
⇓ Get PC Repair Tool
Conclusion
I am sure this post helped you on How to disable Driver Signature Enforcement in Windows 11 with several easy steps/methods. You can read & follow our instructions to do so. That’s all. For any suggestions or queries, please write on comment box below.
