What is ‘error_smi_primitive_installer_failed’ error in Windows 10?
If you are experiencing ‘error_smi_primitive_installer_failed’ error in Windows 10, then you are in right place for the solution. Here, you will be guided with easy steps/methods to resolve the issue. Let’s starts the discussion.
‘SMI Primitive Installer or smipi.dll’: smipi.dll file is associated with Microsoft Windows Operating System. This DLL file is designed & developed by Microsoft. It creates new records and folders in the Windows registry.
‘error_smi_primitive_installer_failed’ error: It is common error associated with SMI Primitive Installer error that is occurred possibly due to Windows Update error 0x8007371c. In sort, error_smi_primitive_installer_failed error is occurred in your Windows 10 computer when you encounter Windows Update error 0x8007371c. Let’s take a look at error message.
“ERROR_SMI_PRIMITIVE_INSTALLER_FAILED
The SMI primitive installer failed during setup or servicing.”
This error states SMI Primitive Installer or smipi.dll file fails to load in your computer during setup or servicing that’s why you are facing the error. The possible reason behind this Windows update error can be corruption inside Windows Update components or services. However, it is possible to resolve this error with our instructions. Let’s go for the solution.
Table of Contents
How to Fix error_smi_primitive_installer_failed – Windows Update error 0x8007371c in Windows 10?
Method 1: Fix error_smi_primitive_installer_failed error with ‘PC Repair Tool’
‘PC Repair Tool’ is easy & quick way to find and fix BSOD errors, EXE errors, DLL errors, problems with programs, malware or viruses issue, system files or registry issues, and other system issues with just few clicks. You can get this tool through button/link below.
Method 2: Perform Windows update components reset in Windows 10
Outdated or corrupted Windows update components can cause Windows update error like Windows Update error 0x8007371c. You can fix the issue by resetting Windows update components.
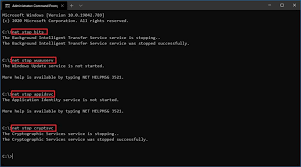
Step 1: Press ‘Windows + X’ keys on keyboard and select ‘Command Prompt as Administrator’
Step 2: Type the following commands one-by-one and hit ‘Enter’ key after each to execute
net stop bits
net stop wuauserv
net stop appidsvc
net stop cryptsvc
Del “%ALLUSERSPROFILE%\Application Data\Microsoft\Network\Downloader\*.*”
rmdir %systemroot%\SoftwareDistribution /S /Q
rmdir %systemroot%\system32\catroot2 /S /Q
sc.exe sdset bits D:(A;;CCLCSWRPWPDTLOCRRC;;;SY)(A;;CCDCLCSWRPWPDTLOCRSDRCWDWO;;;BA)(A;;CCLCSWLOCRRC;;;AU)(A;;CCLCSWRPWPDTLOCRRC;;;PU)
sc.exe sdset wuauserv D:(A;;CCLCSWRPWPDTLOCRRC;;;SY)(A;;CCDCLCSWRPWPDTLOCRSDRCWDWO;;;BA)(A;;CCLCSWLOCRRC;;;AU)(A;;CCLCSWRPWPDTLOCRRC;;;PU)
regsvr32.exe /s atl.dll
regsvr32.exe /s urlmon.dll
regsvr32.exe /s mshtml.dll
regsvr32.exe /s shdocvw.dll
regsvr32.exe /s browseui.dll
regsvr32.exe /s jscript.dll
regsvr32.exe /s vbscript.dll
regsvr32.exe /s scrrun.dll
regsvr32.exe /s msxml.dll
regsvr32.exe /s msxml3.dll
regsvr32.exe /s msxml6.dll
regsvr32.exe /s actxprxy.dll
regsvr32.exe /s softpub.dll
regsvr32.exe /s wintrust.dll
regsvr32.exe /s dssenh.dll
regsvr32.exe /s rsaenh.dll
regsvr32.exe /s gpkcsp.dll
regsvr32.exe /s sccbase.dll
regsvr32.exe /s slbcsp.dll
regsvr32.exe /s cryptdlg.dll
regsvr32.exe /s oleaut32.dll
regsvr32.exe /s ole32.dll
regsvr32.exe /s shell32.dll
regsvr32.exe /s initpki.dll
regsvr32.exe /s wuapi.dll
regsvr32.exe /s wuaueng.dll
regsvr32.exe /s wuaueng1.dll
regsvr32.exe /s wucltui.dll
regsvr32.exe /s wups.dll
regsvr32.exe /s wups2.dll
regsvr32.exe /s wuweb.dll
regsvr32.exe /s qmgr.dll
regsvr32.exe /s qmgrprxy.dll
regsvr32.exe /s wucltux.dll
regsvr32.exe /s muweb.dll
regsvr32.exe /s wuwebv.dll
netsh winsock reset
netsh winsock reset proxy
net start bits
net start wuauserv
net start appidsvc
net start cryptsvc
Step 3: Execute each commands one-by-one and once done, restart your computer to see the changes. After that, try updating Windows 10 and check if the error is resolved.
Method 3: Run ‘Windows Update’ troubleshooter
Windows 10 built-in ‘Windows Update’ troubleshooter can resolve this issue. Let’s try.
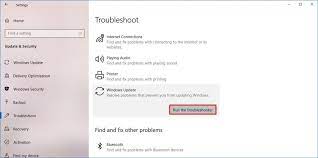
Step 1: In Windows 10, open ‘Settings’ App and go to ‘Update & Security > Troubleshoot’
Step 2: Find and select ‘Windows Update’ troubleshooter, and select ‘Run the troubleshooter’ button
Step 3: Follow on-screen instructions to finish troubleshooting and once done, please check if the error_smi_primitive_installer_failed is resolved.
Method 4: Download Windows Update from Microsoft Update Catalog
If you are unable to update Windows OS using ‘Settings’ App or ‘Control Panel’, then you can manually download Windows update from Microsoft Update Catalog site.
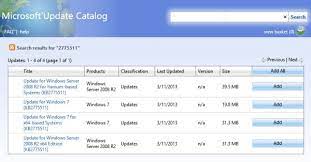
Step 1: Open ‘Settings’ App and go to ‘Update & Security > Windows Update > View Update History’
Step 2: Find and note down the KB number of update that failed to install. And then open your browser, and visit ‘Microsoft Update Catalog’ official site
Step 3: Search for the KB number that you noted down, and download the update file in your computer. After that, install the update in computer and restart your computer to see the changes.
Method 5: Perform Clean Boot in Windows 10
If the problem is still persist, then you can perform Clean Boot in your computer in order to fix the issue. This process will start windows by using minimal set of drivers and startup programs.
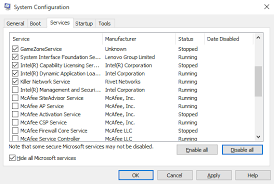
Step 1: Press ‘Windows + R’ keys on keyboard, type ‘msconfig’ in the opened ‘Run’ dialog box and hit ‘OK’ button to open ‘System Configuration’ window
Step 2: In the opened window, click on ‘Services’ tab, and check ‘Hide all Microsoft services’ checkbox, and then hit ‘Disable All’ button
Step 3: Finally, click ‘Apply’ and ‘Ok’ to save the changes and restart your computer. After restart, try updating Windows and check if the error is resolved.
Conclusion
I hope this post helped you on How to fix error_smi_primitive_installer_failed – Windows Update error 0x8007371c in Windows 10 with several easy steps/methods. You can read & follow our instructions to do so. That’s all. For any suggestions or queries, please write on comment box below.


