
What is ‘Java Virtual Machine Launcher error’ in Windows 10/11?
If you are experiencing ‘Java Virtual Machine Launcher error’ or ‘Could not create the Java Virtual machine’ error while trying to open application that is build around Java in your Windows 10/11 computer, then you are in right place for the solution. Here, you will be guided with easy steps/methods to resolve the error. Let’s starts the discussion.
‘Java Virtual Machine’: Java is one of the most popular programming languages that can run on variety of different operating systems and devices. This programming language is used for web development, mobile applications, desktop applications and server-side programming. Java programming language generates JVM (Java Virtual Machine) that executes codes written in Java.
However, several users reported that they faced ‘Java Virtual Machine Launcher error’ issue on their Windows 10 computer while they tried to launch the application based on Java or that is build around Java. This error is occurred usually if something goes wrong with data or code that is being processed by JVM (Java Virtual Machine). This issue indicates your Windows computer is unable to read or understand the code. One possible reason behind this error is outdated Windows OS or current Windows OS version is not compatible with Java installed in your computer. Let’s take a look at error message.
“Error: Could not create Java Virtual Machine
Error: A fatal expectation has occurred. Program will exit”
‘Java Virtual Machine Launcher error’ issue is occurred possibly when you trying to open application like Minecraft or other apps based of Java programming language in your computer, that hasn’t enabled Java to run as Administrator. You should make sure you are running the app with administrator permission or you have enabled Java to run as Administrator. You can configure your Java program to run as Administrator in order to fix the issue.
This issue can be occurred if there is some issue with Java program installation. Corruption in files or component relating to Java program could be reason behind the issue. You can uninstall and then reinstall Java program in order to fix the issue. Also, this error is occurred when Java Virtual Machine (JVM) needs more RAM than its current allocation. You can increase the allocation in order to fix the issue. Let’s go for the solution.
Table of Contents
How to fix Java Virtual Machine Launcher error in Windows 10/11?
Method 1: Fix Java Virtual Machine Launcher error with ‘PC Repair Tool’
‘PC Repair Tool’ is easy & quick way to find and fix BSOD errors, DLL errors, EXE errors, problems with programs/applications, malware or viruses issues, system files or registry issues and other system issues with just few clicks. You can get this tool through button/link below.
⇓ Get PC Repair Tool
Method 2: Configure or set Java program to run with Administrator permission

One possible way to fix the issue is to allow Java program to run with administrator permission. This way, you can fix the issue with all Java based application that was causing ‘Java Virtual Machine Launcher error’.
Step 1: Type ‘Java’ in ‘Windows Search Box’ or ‘Cortana’ and right-click on ‘Configure Java’ from results appear, select ‘Open File Location’
Step 2: Once you are inside the correct folder location, find and right-click on Java executable, and select ‘Properties’
Step 3: In ‘Properties’ window, click on ‘Compatibility’ tab, tick ‘Run this program as an administrator’ checkbox under ‘settings’ section and then hit ‘Apply’ and ‘OK’ button to save the changes
Step 4: Once done, retry opening the application based on Java that was causing error and check if the issue is resolved.
Method 3: Uninstall Java program and then reinstall it

This issue can also be occurred due to corrupted files and components relating to Java Program in your computer. You can uninstall and then reinstall Java in your computer in order to fix the issue.
Step 1: Open ‘Control Panel’ in Windows 10 and go to ‘Uninstall a Program > Programs & Features’
Step 2: Find and select ‘Java’ program, and select ‘Uninstall’ option. Follow on-screen instructions to finish uninstall process and after that, restart your computer.
Step 3: After restart, open your browser and visit ‘Java Official page’ or visit ‘https://www.java.com/en/download/manual.jsp’ page and download latest version of Java according to your Windows OS version like Windows 32-bit or 64-bit. You can download both 32-bit and 64-bit version of Java if you don’t know which one you need
Step 4: Once downloaded, find and double-click on ‘Downloaded Java Setup file’ file and follow on-screen instructions to finish installation.
Step 5: Once installed, retry running the application based on Java and check if the error is resolved.
Method 4: Expand the allocated RAM for Java in Windows 10
You can increase RAM allocation for Java in your computer in order to fix the issue.
Step 1: Press ‘Windows +R’ keys on keyboard, type ‘sysdm.cpl’ in the opened ‘Run’ dialog box and hit ‘Ok’ button to open ‘System Properties’ window
Step 2: In the opened ‘System Properties’ window, click on ‘Advanced’ tab and click on ‘Environment Variables…’ button at bottom
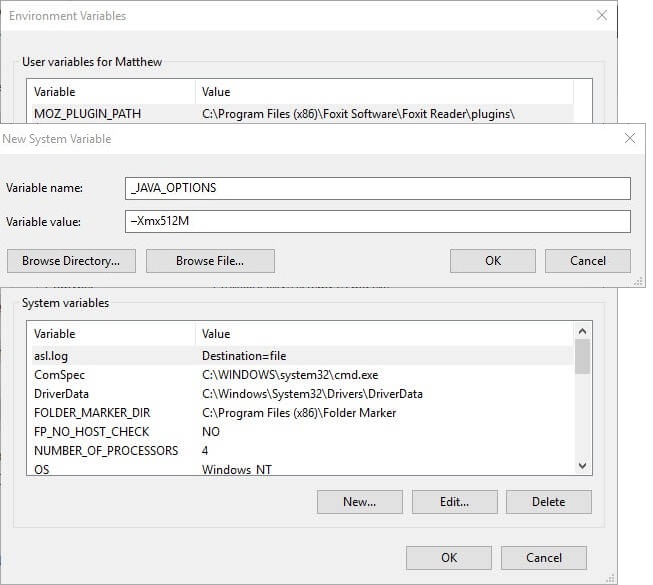
Step 3: Go to ‘System Variables’ section and click on ‘New’. Fill the available field in following way.
‘Variable Name – _JAVA_OPTIONS
Variable Value – –Xmx512M’
Step 4: Finally, hit ‘Ok’ and then hit ‘Apply’ and ‘OK’ on ‘System Properties’ window to save the changes.
Step 5: Once done, restart your computer to see the changes and retry opening the application based on Java and check if the issue is resolved.
Method 4: Run System scan for malware or viruses with some powerful antivirus
Sometimes, this type of error is occurred due to malware or viruses attack in computer. You can run system scan with Windows 10 build-in Windows Defender antivirus in computer in order to remove all threats in computer. You can also try some powerful third-party antivirus software for this purpose. Check if malware removal step resolves the issue.
Method 5: Edit Startup programs in Windows 10
You can also try to fix the issue by editing your Windows Startup programs. Let’s try.
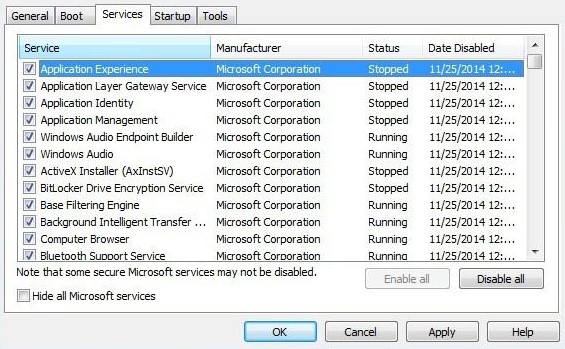
Step 1: Press ‘Windows + R’ keys on keyboard, type ‘msconfig’ in the opened ‘Run’ dialog box and hit ‘OK’ button to open ‘System Configuration’ window
Step 2: In ‘System Configuration’ window, click on ‘Startup’ tab, find ‘WJView.exe’ and ‘Javaw.exe’ startup item from lists, and deselect their checkboxes if checked
Step 3: Finally, hit ‘Apply’ and ‘OK’ to save the changes and restart your computer. After restart, retry opening the program/application based on Java and check if the issue is resolved.
Conclusion
I am sure this post helped you on How to fix Java Virtual Machine Launcher error in Windows 10 with several easy steps/methods. You can read & follow our instructions to do so. That’s all. For any suggestions or queries, please write on comment box below.

