
What is ‘Oculus Link connection test was not able to start error’ in Windows 10/11?
If you are facing Oculus Link not working or Oculus Link black screen issue in your Windows 10/11 computer when you try to launch or use Oculus Link app, then you are in right place for the solution. Here, you will be guided with easy steps/methods to resolve the issue. Let’s starts the discussion.
‘Oculus Link’: Oculus Link is software allows you to play Oculus Rift content on Quest 2. This app is designed & developed to manage your Oculus VR device, explore over 1000 apps in Oculus Store, discover live VR events and so much more. Oculus Link software manages and monitors your Oculus devices, accounts and notifications.
However, several Windows users reported they faced Oculus Link not working issue on their Windows 10/11 computer when they tried to launch Oculus Link app or VR game. This issue indicates you are unable to launch/run Oculus Link app or Oculus VR game in your Windows computer for some reasons. The possible reasons behind the issue can be the issue with graphics card driver, USB and other device drivers in your Windows computer, issue with Oculus Link app or VR game itself, enabled Public Test Channel feature in Oculus and others.
Another possible reason behind the issue can be enabled in-game Overlay feature in your graphics settings. Corruption in system files or hard disk system image could be another possible reason behind the issue. It is possible to fix the issue with our instructions. Let’s go for the solution.
Table of Contents
How to fix Oculus Link not working in Windows 10/11?
Method 1: Fix ‘Oculus Link not working’ with ‘PC Repair Tool’
‘PC Repair Tool’ is easy & quick way to find and fix BSOD errors, DLL errors, EXE errors, problems with programs/applications, malware or viruses issues, system files or registry issues and other system issues with just few clicks.
⇓ Get PC Repair Tool
Method 2: Update Device drivers in Windows PC
Updating all necessary device drivers to latest & compatible driver version can resolve the issue.
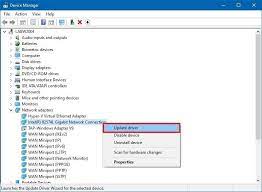
Step 1: Open ‘Device Manager’ in Windows PC via Windows Search Box and expand each device category to check which device driver is requiring update for
Step 2: Right-click on device driver you want to update, and select ‘Update Driver’ and follow on-screen instructions to finish update process. Repeat the same step to update all other device drivers and once done, restart your computer and check if the error is resolved.
Download or reinstall Device drivers update in Windows 10/11 [Automatically]
You can also try to update all Windows drivers including graphics card driver and others using Automatic Driver Update Tool. You can get this tool through button/link below.
⇓ Get Automatic Driver Update Tool
Method 3: Lower the resolution of Windows PC
You can try to fix the issue by lowering your PC’s resolution.
Step 1: Unplug your Oculus Quest or Rift from your computer. Now, open ‘File Explorer’ and navigate to following path
C:\Program Files\Oculus
Step 2: Open ‘Support > Oculus -diagnostics’ folder and then double-click on ‘OculusDebugTool.exe’ file to run it
Step 3: After that, lower ‘Encode Resolution Width’ setting. You can enter a value as per recommendations by Oculus. Once done, restart your computer and restart your Oculus headset, plug headset, and check if it works for you.
Method 4: Disable in-game overlay in graphics settings
Another possible way to fix the issue is to disable in-game overlay in graphics settings in computer.
Step 1: Open ‘NVIDIA GeForce Experience’ app in Windows PC and click ‘Cogwheel’ icon at top-right corner to open ‘Settings’
Step 2: In the opened page, click ‘General’ tab, and disable toggle relating to ‘in-game overlay’ function. Once done, restart Oculus Link app and check if the Oculus Link connection test was not able to start error is resolved.
Method 5: Opt out of Public Test Channel
Another possible way to fix the issue is to disable Public Test Channel mode in Oculus Link app.
Step 1: Open ‘Oculus Link’ app in Windows PC and if you are manage to go to settings section in left panel, go to ‘Beta’ tab
Step 2: Now, disable toggle relating to Public Test Channel option and once done, re-launch Oculus Link app and check if it works.
Method 6: Run SFC scan in Windows PC

You can run SFC scan in Windows PC in order repair the corruption in system files and fix this error.
Step 1: Type ‘cmd’ in Windows Search Box and press ‘SHIFT + ENTER’ keys on keyboard to open ‘Command Prompt as Administrator’
Step 2: Type ‘sfc /scannow’ command and hit ‘Enter’ key to execute. Once executed, restart your computer and check if it works for you.
Conclusion
I am sure this post helped you on How to fix Oculus Link not working in Windows 10/11 with several easy steps/methods. You can read & follow our instructions to do so. That’s all. For any suggestions or queries, please write on comment box below.

