
Tips to install Oracle Linux on VMware Workstation:
In this article, we are going to discuss on How to install Oracle Linux on VMware Workstation. You will be guided with easy steps/methods to do so. Let’s starts the discussion.
Table of Contents
Install Oracle Linux on VMware Workstation:
Oracle Linux: Oracle Linux is Linux distribution packaged and freely distributed by Oracle, available partially under GNU (General Public License) since late 2006. It is compiled from Red Hat Enterprise Linux (RHEL) source code, replacing Red Hat branding with Oracle’s. Potential users can freely download Oracle Linux through Oracle’s E-Delivery Service or Oracle Software Delivery Cloud or from variety of mirror sites.
VMware WorkStation: WMware Workstation is hosted hypervisor that runs on x86 versions of Windows and Linux OS. It enables you to set up VMs (Virtual Machines) on single physical machine and use them simultaneously along with host machine. Each virtual machine can execute its own OS, including Windows OS, Linux, BSD, and MS-DOS. VMware WorkStation supports bridging existing host network adapters and sharing physical disk drives and USB drives with a virtual machine.
If you are not aware, VMware supports virtualization of Oracle Linux with both Red Hat Compatible Kernel (RHCK) and unbreakable Enterprise Kernel (UEK) in collaboration with Oracle in following conditions:
- Oracle supports the particular combination of kernel version and Oracle Linux release. This includes kernels shipped with Oracle Linux releases and maintenance errata kernels published by Oracle for that Oracle Linux release.
- The Oracle Linux release is published as a supported guest OS by the VMware product release in the VMware Compatibility Guide.
- Unbreakable Enterprise Kernel (UEK) 2 (2.6.39) or later.
- The configuration of Oracle Linux follows all Oracle and VMware recommendations.
Here, you are provided with easy ways to install Oracle Linux on VMWare WorkStation to install Oracle Linux on a Virtual Machine in your computer. Before beginning, you need to download Oracle Linux Full ISO file from official source and then download & install VMWare WorkStation software as well in your device.
How to install Oracle Linux on VMware Workstation?
Step 1: Download Oracle Linux through Oracle’s E-Delivery Service
At first, you need to download Oracle Linux ISO file from Oracle’s E-Delivery Service or visit ‘https://yum.oracle.com/oracle-linux-isos.html’ page and download & save the Oracle Linux ISO file in your device.
Step 2: Download & install VMWare WorkStation Software:
Now, you need to download and install VMware WorkStation software in your computer from official site or visit ‘https://www.vmware.com/products/workstation-player/workstation-player-evaluation.html’ page for this.
Use VMWare WorkStation Software to install Oracle Linux on virtual machine
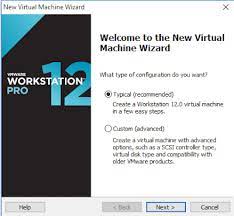
Step 3: Open ‘VMWare Workstation’ software in computer and go to ‘File > New Virtual Machine > Typical’ and click ‘Next’
Step 4: Select ‘Installer Disc Image file’ and browse the path to ‘Oracle Linux 7 .ISO’ and click ‘Next’
Step 5: Enter the name for your Virtual machine and browse the location where you want to save the virtual machine and hit ‘Next’
Step 6: Set the maximum disk size and you can choose either split the virtual disk to store as single file and click ‘Next > Finish’
Step 7: Click ‘Edit Virtual Machine Settings’, set the memory to 2GB, processors as per your hardware recommendations and network to bridged.
Step 8: Power ON the virtual machine, select ‘Install Oracle Linux 7.1’ and hit ‘Enter’, select you proffered language and hit ‘Continue’
Step 9: Set your date & time zone, set ‘Installation media or local media’, click ‘Software Selection’, select server with GUI and select Java Platform, KDE and compatibility libraries add-ons for selected environment.
Step 10: Click ‘Installation Destination > I will configure partitioning’ and click ‘Done’
Step 11: Select ‘Standard Partition’ and click ‘+’ button to dd mount point. I am going to set Mount Point with capacity 37500 click Add mount point
Step 12: Set the File System to ‘ext4’, add Swap Mount Point for rest of disk space and click ‘Done’, accept the changes and click ‘Begin Installation’
Step 13: Set the root password and proceed, create a user by clicking ‘User Creation’ and then hit ‘Done’. It will take few time to finish and click ‘Reboot’ to finish the installation
Step 14: Accept the licensing and hit ‘Done’ and click ‘Finish Configuration’, select No, I prefer to register at a later time, click ‘Forward’ and click ‘No Thanks, I’ll connect later’ and click ‘Forward’, enter your password to sign-in and hit ‘Sign-in’
Step 15: Click ‘Next > Next > Start using Oracle Linux Server’, enable Network Wired. You will see internet is working if you’re connect to a rite bridged network on your physical machine.
Conclusion
I am sure this post helped you on How to install Oracle Linux on VMware Workstation with several easy steps/methods to do so. You can read & follow our instructions to do so. That’s all. For any suggestions or queries, please write on comment box below.
