
“HP Camera Driver” is essential software to communicate your HP webcam/camera device with Operating System version installed in your device. For example, if you have Windows 10 64-bit OS installed in your HP laptop/device, then you must have HP Camera Driver for Windows 10 64 bit installed. You should also check if the HP camera driver is up-to-date because outdated driver can cause several issues like “HP camera not working Windows 10” issue and/or similar issues.
Some HP Notebook and All-In-One computers come with built-in cameras/webcams that can be used to capture video motion or still images. Webcam is a video output device similar to scanner or camera that requires webcam driver and software to function. This software helps you to use your HP webcam on your Windows device for various purposes like for making video calls over internet, video editing software and/or for creating and sharing video files.
If your HP laptop or computer came with a built-in webcam, then you can use the “Camera App” to record and share webcam video and even capturing photos. This “Camera App” can easily be downloaded from “Windows Store” for Windows 10 64-bit and/or other supported OS version you have.
In case if your HP webcam/camera hardware (Either Internal or External) is in good condition and HP Camera Driver for Windows 10 64 bit is also properly installed in your device, but still you are facing some problem while trying to accessing your camera on some application like Skype, then one reason behind this problem is “Camera Privacy Settings” that doesn’t allowing specific app like “Skype” to access your camera/webcam. In this case, you need to enable or turn “ON” to allow your camera accessibility in “Settings” App.
However, if camera privacy setting is allowing the specific app to access your camera, but still the problem is persists, then you should check if HP Camera Driver for Windows 10 is installed or not. Sometimes, missing, corrupted or outdated HP Camera Driver can cause several issues like “HP Camera not working”, “HP laptop webcam not showing in Device Manager”, “HP laptop camera driver missing” and/or other similar issues. These problems can be solved by updating or reinstalling HP Camera Driver for Windows 10. Let’s go for the solution.
Table of Contents
How to reinstall HP Camera Driver for Windows 10 64 bit?
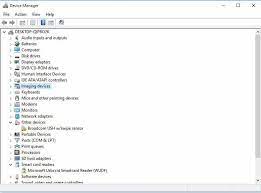
Step 1: Press “Windows + X” keys together from keyboard and select “Device Manager”
Step 2: In the opened “Device Manager” window, locate and expand “Imaging Devices” category
Step 3: Right-click on your HP camera/webcam and select “Uninstall”
Step 4: Follow on-screen instructions to finish the uninstall process and then restart your computer
Step 5: After restart, open “Device Manager” again and click on “Action > Scan for hardware changes”. This will reinstall HP Camera Driver in your HP device.
How to update HP Camera Driver Windows 10?
Step 1: Press “Windows + X” keys together from keyboard and select “Device Manager”
Step 2: Locate and expand “Imaging Devices” category
Step 3: Right-click on your HP camera driver or integrated webcam driver and select “Update Driver Software”
Step 4: In the next window, choose “Search automatically for updated driver software” and follow on-screen instructions to finish update. If there is an available driver in your computer, then select “Browse my computer for driver software” and then select “Let me pick from a list of device drivers on my computer”
Step 5: Select “USB Video Device” and click on “Next”
Step 6: Follow on-screen instructions to complete update process. Once done, restart your computer to see the changes.
How to download and install HP Camera Driver for Windows 10 64 bit?
You can clean download and install HP Camera Driver in your machine to fix HP camera not working problem. You can also check for compatibility issue and if your camera driver is incompatible with Windows OS version installed in your device, then you can choose to install driver in compatibility mode.
Step 1: At first, you need to download the latest HP Camera Driver for Windows 10 64 bit from manufacturer’s official website
Step 2: Save the downloaded file in your computer hard drive
Step 3: Now, right-click on “setup file” or “Driver Downloaded File” and select “Properties”
Step 4: In the “Properties” window, click on “Compatibility” tab and check the box “Run this program in Compatibility mode”, and select your Operating System version from drop-down list and then hit “Ok” button.
Step 5: After that, double-click on “setup file” and follow on-screen instructions to finish driver installation
Step 6: Finally, restart your computer and check if the trouble is resolved.
Download or reinstall HP camera driver update in Windows 10/11 [Automatically]
You can also try to update all Windows drivers including HP camera driver update using Automatic Driver Update Tool. You can get this tool through button/link below.
⇓ Get Automatic Driver Update Tool
How to change camera privacy settings to fix HP camera not working issue?
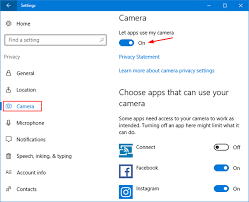
Step 1: Press “Windows +I” keys together from keyboard to open “Settings” App
Step 2: In the opened “Settings” App, click on “Privacy > Camera”
Step 3: Toggle “ON” under “Allow apps to access your camera”
Step 4: Scroll down to “Choose which apps can access your camera” section and toggle “ON” on the apps you want access to camera. Once done, please check “HP Camera not working problem” is resolved.
Conclusion
I am sure this post helped you to know about HP Camera Driver for Windows 10 64 bit and how to fix “HP camera not working Windows 10” problem by updating or reinstalling HP camera driver. You can read & follow our instructions to do so. If this post really helped you, then you can share this post with others to help them. For any suggestions or queries, please write on comment box below.
People also asked for:
Q: How do I find my HP Camera Driver in Windows 10?
A: It is quite simple to find HP Camera Driver in your Windows 10 computer using Device Manager. To do so, you need to open ‘Device Manager’ in Windows PC via Windows Search Box and expand ‘Imaging Devices’ or ‘Cameras’ category, right-click on your camera device and select ‘Properties’ to see detailed information about HP Camera Driver.
Q: Why is my HP Windows 10 camera not working?
A: If you are facing HP Windows 10 camera not working issue, then chances camera driver is outdated/corrupted in your computer. You should make sure camera driver is properly installed and is up-to-date in computer. Another possible reason behind the issue can be the Camera Privacy Settings that is not allowing your Windows 10 Camera or HP Camera to access in Windows PC. You can change Camera Privacy Settings in Windows in order to allow your device to access camera and fix the issue.
Q: How do I turn on my built in camera on my HP laptop Windows 10?
A: It is quite simple to turn ON built-in camera on HP Laptop Windows 10. To do so, you need to just type “camera” into the Windows search bar and find “Settings.” Alternatively, press the Windows button and “I” to open Windows Settings, then select “Privacy” and find “Camera” on the left sidebar.
Q: Why is HP camera not showing in Device Manager?
A: If you are experiencing your HP camera is not showing in Device Manager in your Windows computer, chances your Camera access is disabled in Windows PC’s Camera Privacy Settings. You can fix the issue by enabling/turn ON camera access in Camera Privacy Settings.
To do so, you need to Select Camera privacy settings. Make sure the option Camera access for this device is turned on. If you don’t see it’s on, you can click the Change button to turn it on. Then you may want to go back to Device Manager, and check if the camera is there.
