“MSI Camera Driver” acts as mediator between your camera devices (Hardware) and Operating System version installed in your MSI laptop/notebook. For example, if you have integrated 720p webcam/camera in your Windows 10 based MSI GX60 notebook, then you need to download/install MSI Camera Driver according to your camera model and Operating System version.
MSI Camera/webcam allows you to capture impressive photographs and videos in your MSI device, you can use also on various applications including Skype, Windows Movie Maker, Cyberlink Youcam 5 and other apps. But if you are facing trouble while trying to open camera on specific app like Skype, then one major reason behind this problem is problematic MSI Camera Driver.
Before troubleshooting the “MSI camera not working” problem, at first you need to check if webcam/camera is enabled or not. To do so, press “Fn + F6” keys from keyboard together to enable webcam in your MSI devices. After that, you can check if webcam/camera is allowed to access by specific app like Skype.
If your MSI camera (Hardware) is in good condition but still you are facing problem while trying to access camera by specific app like ‘Skype’, then you should make sure MSI Camera Driver is up-to-date. Sometimes, camera not working issue occurs due to missing, corrupted, or outdated camera driver.
To check if MSI camera/webcam driver is properly installed or not, open “Device Manager”, expand “Imaging Devices” and click on camera device in your MSI notebook/laptop, and check if it shows “Yellow Exclamation Mark” on your camera device. If yes, then you need to update or reinstall camera driver to fix this issue. Let’s go for solution.
How to turn ON webcam/camera in MSI laptop/notebook?

Sometimes, camera not working on MSI laptop/notebook occurs if camera is disabled. So, you need to turn ON your camera/webcam. To do so, press “F6” or “Fn + F6” keys together on keyboard. After that, please check if it works.
Add Legacy hardware to fix “MSI camera not working”

Step 1: Open “Device Manager” and click on “Action > Add Legacy Hardware”
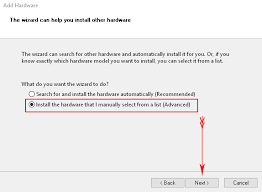
Step 2: Click “Next” and choose “Install the hardware that i manually select from the list” and then click “Next”
Step 3: Scroll down to select “Imaging Devices” and click “Next”
Step 4: Now, locate the missing camera device through manufacturer’s tab and add it. Once done, please check if the problem is resolved.
How to update MSI Camera Driver on Windows?

Step 1: Press “Windows + X” keys together from keyboard and select “Device Manager”
Step 2: In the opened “Device Manager”, locate and expand “Imaging Devices” category
Step 3: Right-click on your camera device and select “Update Driver Software…”
Step 4: Select “Browse my computer for driver software” and follow on-screen instructions to finish updating process
Step 5: After that, restart your computer and check if the trouble is resolved.
Conclusion
I hope this post helped you to know about “MSI Camera Driver” and how to fix camera/webcam not working issue by updating camera driver on MSI laptop/notebook. You can read & follow our instructions to do so. If this post really helped you, then you can share this post with others to help them.

