
In our previous bog we have been discussed about the overheating of the laptop and here in this article we will talk about how to control Acer laptop fan speed. Its known thing that laptops uses a fan to cool down the temperature of the central processing unit which prevents the laptop from overheating.
And every CPU has a particular speed, measures with RPM (Rounds Per Minute), and it is set by the manufacturer.
From the above explanation, it’s quite understood that fans are one of the mandatory components but the sometimes users need to control the laptop fan speed due to certain reasons, here we will not discuss on the reasons, so without wasting the time we will discuss the methods to do so. So let’s get started.
Note: You can follow the below mention methods for any Acer laptops.
Things to do to control Acer Laptop Fan Speed
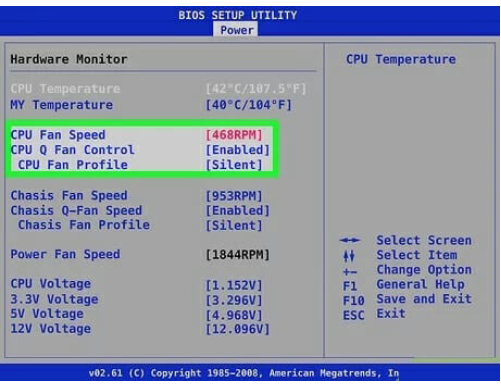
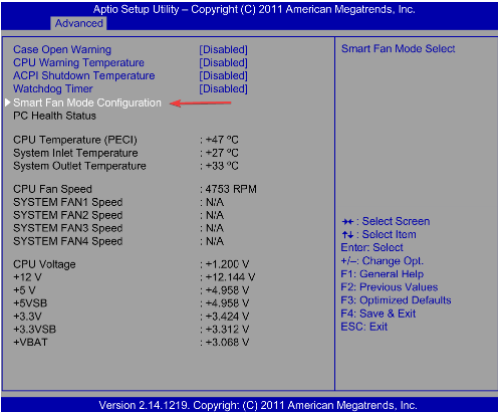
Method 1: Change BIOS Settings
In the very first method we suggest you to change the BIOS Settings and to do so follow the below mention steps:
Step 1: Start/Restart the Acer Laptop
Step 2: On the basis of your motherboard manufacturer, you need to constantly press Del, F2, F10 and F12 keys to load the BIOS menu
Step 3: Use the Arrows keys, head over to Monitor or Status Option
Step 4: Now open Fan Speed Control then choose Fan Control Settings
Step 5: Then choose the fan you need to change the speed and after that select your required speed from the list. Press Enter & Save the Settings
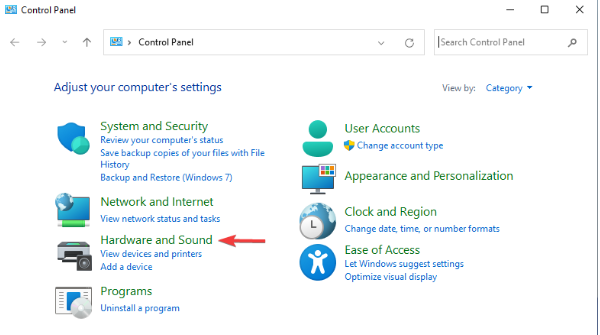
Method 2: Change System Cooling Policy
Step 1: Tap on the Start Menu, search for Control Panel and tap on Open
Step 2: Tap on Hardware and Sound and then Power Options
Step 3: Click on Change Plan Settings
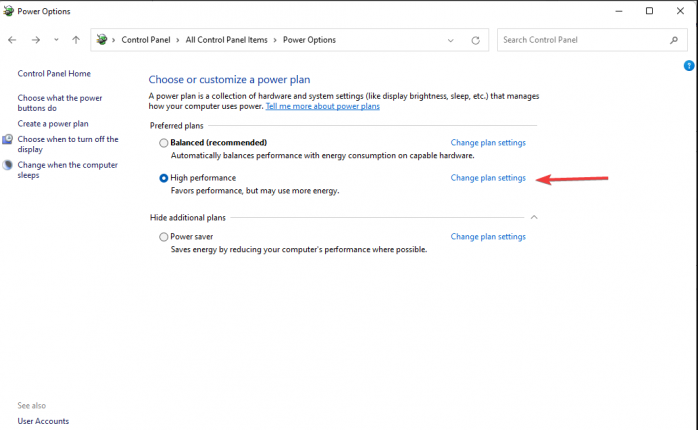
Step 4: Tap on Change Advanced Power Settings
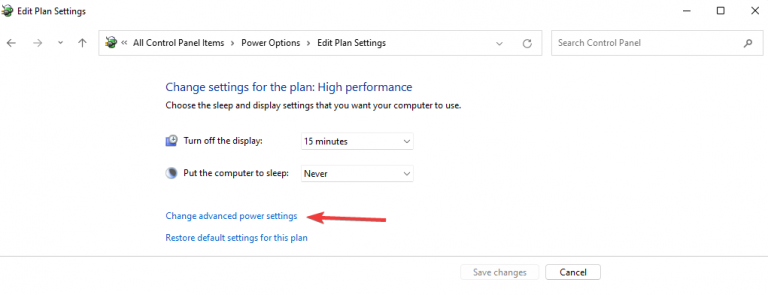
Step 5: Under the Advanced Settings tab, click on the plus symbol under Processor Power Management
Step 6: Then choose System Cooling Policy from the menu. Tap on the down arrows in the System Cooling Policy
Step 7: Select Active from the menu to increase the fan speed of the CPU fan. And click on the OK button.
Method 3: Use Acer fan Control Software
In this section, we suggest you to use Acer fan Control Software to control fan speed in an Acer Aspire 7 laptop and the name of the software is Acer Quick Access. This software tool has been developed by Acer that allows the user to control different settings like laptop fan speed, from within Windows environment.
Frequently asked Queries…
How to Set the CPU fan to run all the time?
Step 1: First Start/ Restart Acer Laptop
Step 2: On the basis of the motherboard manufacturer, you will need to constantly press Del, F2, F10 and F12 keys to load the BIOS menu
Step 3: Then find the Fan Settings Option, it most probably is in the Hardware Monitor or H/W Monitor menu
Step 4: Then choose the Smart Fan option and then change it to disabled. It will make your fan run at full speed all the time. In order to lower the speed, you need to lower the voltage by using the CPU Fan Voltage Settings.
Step 5: Finally Choose the Save Settings and Exit. It will restart the laptop and your fan will run all the time afterwards.
Best Solution to Make your PC Error Free
If you are looking for the best and easy way to enhance your PC health, then we highly recommend you PC Repair Tool. It will help you in all the possible ways to maintain the performance of the computer.
This is an expert tool which will scan the system to detect and fix the Windows Errors/issues like BSOD Error, DDL Error, Registry Error, Game Errors and keeps the system secure from the viruses , repairs corrupted system files and many more.
⇓Get PC Repair Tool from Here⇑
Final Verdict!!!
That’s all about How to control Acer laptop fan speed. If you liked the blog then keep the visiting the site for more useful and interesting blogs. Thanks for Reading.
