
What is ‘dxgi_error_device_removed’ error in Windows 10?
If you facing ‘dxgi_error_device_removed Windows 10’ or ‘dxgi_error_device_removed’ error in Windows 10 computer while trying to play games like Battlefield, Grand Theft Auto, Crysis, Arma 3 and a few others, then you are in right place for the solution. Here, you will be guided with easy steps/methods to resolve the issue. Let’s starts the discussion.
‘dxgi_error_device_removed’ error in Windows 10: dxgi_error_device_removed error is common Windows Problem considered as DirectX error and Graphics card issue. This issue indicates that your graphics card is not running properly in your Windows 10 computer that’s why you are experiencing graphics and gaming related issue in computer. This error is usually appeared when you try to run certain applications or games like Battlefield, Grand Theft Auto, Crysis, Arma 3 and a few others.
dxgi_error_device_removed error also indicates that graphics card failed to establish the connection with your Windows computer. This error can also be appeared if you are using Overclocked GPU/Graphics Card. Overclocking GPU might help you to improve graphics and gaming performances but Overclocking can sometime causes error like dxgi_error_device_removed error and prevents you from playing your favorite game on PC.
Another possible reason behind this issue can be outdated or corrupted graphics card drivers or the installed graphics card driver version is not compatible with current Windows OS version installed. You should make sure graphics card driver is properly installed in computer and is up-to-date. Updating graphics card driver to latest available version can resolve the issue. Let’s starts the discussion.
How to fix dxgi_error_device_removed Windows 10?
Method 1: Fix ‘dxgi_error_device_removed’ error with ‘PC Repair Tool’
‘PC Repair Tool’ is easy & quick way to find and fix BSOD errors, DLL errors, EXE errors, problems with programs/applications, malware or viruses issues, system files or registry issues, and other system issues with just few clicks. You can get this tool through button/link below.
⇓ Get PC Repair Tool
Method 2: Update Graphics Card Drivers in Windows 10
Updating graphics card driver to latest available version can resolve the issue.
Step 1: If you don’t know your graphics card name and model integrated/attached into computer, press ‘Windows + R’ keys on keyboard, type ‘dxdiag.exe’ in the opened ‘Run’ window to open ‘DirectX Diagnostic Tool’. In the opened window, click on ‘Display’ tab, and now you can see the name and model of your graphics card.
Step 2: Open your browser and visit your graphics card manufacturer official site, and download the latest graphics card driver according to your graphics card model and operating system version like Windows 32-bit or 64-bit.
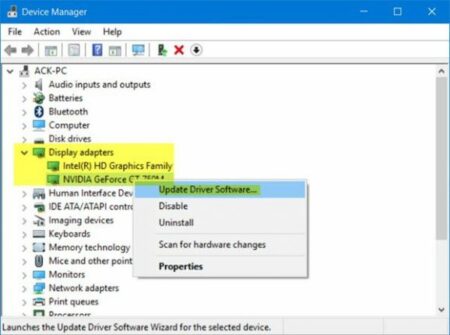
Step 3: Once downloaded, press ‘Windows + X’ keys on keyboard and select ‘Device Manager’
Step 4: In ‘Device Manager’, expand ‘Display Adapters’ category, right-click on your graphics card driver and select ‘Update Driver’. Follow on-screen instructions to update the driver or install the downloaded driver. Once done, restart your computer to see the changes. Check if it works for you.
Download or reinstall Graphics card driver update in Windows 10 [Automatically]
You can also try to update your all Windows 10 drivers including graphics card driver using ‘Automatic Driver Update Tool’. You can get this software through button/link below.
⇓ Get Automatic Driver Update Tool
Method 3: Rollback graphics card driver in Windows 10
You can rollback your graphics card driver to previous version in order to fix the issue.
Step 1: Open ‘Device Manager’ using above method and expand ‘Display Adapters’ category
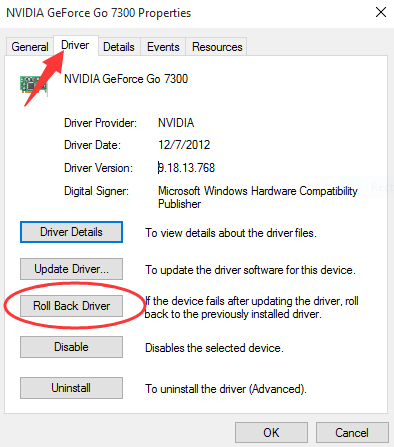
Step 2: Find and double-click on your graphics card driver to open its ‘Properties’
Step 3: In the ‘Properties’ window, click on ‘Driver’ tab and click ‘Rollback Driver’ button. Follow on-screen instructions to finish rolling back process. Once done, restart your computer and check if the error is resolved.
Method 4: Download and install latest version of DirectX
This issue can be occurred due to some issue with DirectX version installed in computer. You can try downloading/installing latest version of DirectX software in computer in order to fix the issue. To do so, you need to open your browser and visit Microsoft official site, and download and install DirectX of latest version. Once installed, try launching game that was causing error, and check if the error is resolved.
Method 5: Disable Anti-Aliasing feature in NVIDIA Control Panel [For NVIDIA Graphics card]
Anti-Aliasing is mode used to improve the quality of graphics display of the game. However, this feature can cause sometime error like dxgi_error_device_removed error while gaming on Windows 10. So, you can disable this feature in order to fix the error.
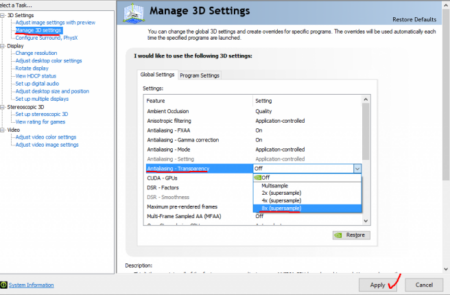
Step 1: Open ‘NVIDIA Control Panel’ app via Windows Search and go to ‘Manage 3D Settings’
Step 2: Under ‘Global Settings’, make sure all ‘Anti-Aliasing’ settings are set to ‘OFF’. Once done, apply the changes and restart the game that was triggering error, and check if the error is resolved.
Method 6: Fix dxgi_error_device_removed Windows 10 using Registry Editor
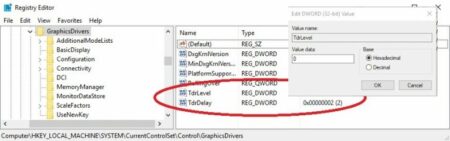
Step 1: Press ‘Windows + R’ keys on keyboard, type ‘regedit’ in the opened ‘Run’ window and hit ‘Ok’ button to open ‘Registry Editor’
Step 2: In the opened window, navigate to following path in left pane
Computer\HKEY_LOCAL_MACHINE\SYSTEM\CurrentControlSet\Control\GraphicsDrivers
Step 3: Once you are in correct path, in right pane, right-click on empty space and select ‘New > DWORD (32-bit) Value’ and name the key to ‘TdrLevel’. Double-click on created key to edit, set its value to ‘0’ and hit ‘OK’ button to save the changes
Step 4: Once done, restart your computer and check if the error is resolved.
Method 7: Disable Shadow Play Feature in your graphics card settings

This method is for NVIDIA graphics’ user. You can disable Shadow Play feature in order to fix the issue.
Step 1: Open ‘GeForce Experience’ software via Windows Search
Step 2: In the opened window, under ‘General’ tab, deselect ‘In-Over Overlay’ settings option and close GeForce Experience software and check if you can play the game without any issue.
Method 8: Disable Overclocking GPU in your Windows computer
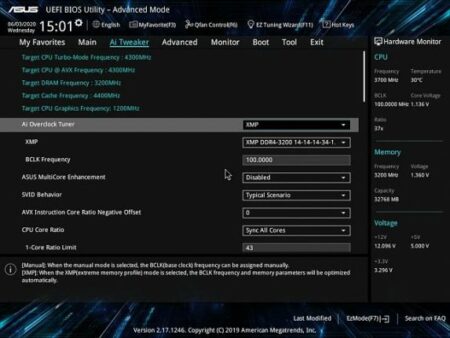
Overclocking your GPU/CPU might help you to improve your graphics and gaming performances. However, overclocking GPU sometimes causes ‘dxgi_error_device_removed’ error and prevents you from playing your favorite games in Windows 10 computer. You can disable overclocking feature in your computer in order to resolve the issue. You can try disabling Overclocking GPU via BIOS setting mode in Windows computer and check if it works for you.
Conclusion
I am sure this post helped you on How to fix dxgi_error_device_removed Windows 10 with several easy steps/methods. You can read & follow our instructions to do so. That’s all. For any suggestions or queries, please write on comment box below.

