
ere in this article we are going to discuss about one of the MS Teams errors named MS Teams.exe bad image error 0xc0000020, so without any further delay let’s get started with the discussion.
Table of Contents
What is Bad image error and reasons for occurrence
Bad image error is one of the infamous errors of Microsoft Teams that occurs on Windows PC. Users get stuck in this situation when their Windows Operating System fails to run the programs they are attempting to run on their device. Usually the error occurs when the file is not assigned to run on Windows or the file is corrupted due to an inappropriate update or any other reasons.
Well different users have claimed the same at different instances. Some have reported the trouble while opening MS Teams and some have claimed the same while clicking the chat icon on the taskbar.
The full error message is:
msteams.exe – Bad Image
C:\ProgramFiles\WindowsApps\MicrosoftTeams_21239.300.960.1678_x64_8wekyb3d8bbwe WebView2Loader.dll is either not designed to run on Windows or it contains an error. Try installing the program again using the original installation media or contact your system administrator or the software vendor for support. Error status 0xc0000020.
What causes MS Teams.exe bad image error?
#1.Corrupted Installation of Microsoft Teams: You are likely to face the above mention error if the installation process of the Microsoft Teams were interrupted.
#2. Corrupted Cache: Accumulation of corrupted cache data can be a major reason for getting the above mention error.
#3. Glitch in the App: The app will also throw errors it has generic glitch in it.
#4. Corrupted User Account
#5. Confliction with the recent Windows Update
Try these fixes for MS Teams.exe bad image error 0xc0000020?
Method 1: Uninstall the Recent Windows Update
Experts always recommend updating your Windows to the latest version but all the Windows updates are not favorable and may conflict with another app. So if you are too facing the above mention error just after updating your Windows then in such case we suggest you to uninstall the recent Windows Update.
To do the same follow the below mention guidelines:
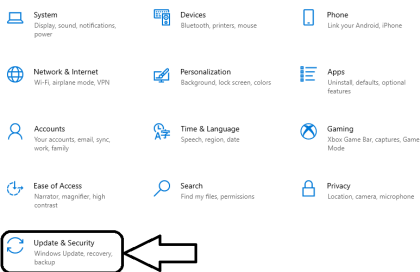
Step 1: Open Windows Settings using Windows + I keys> select Update and Security
.
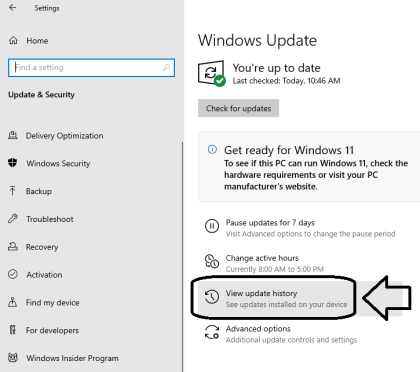
Step 2: Under Windows Update page you need to choose View Update History
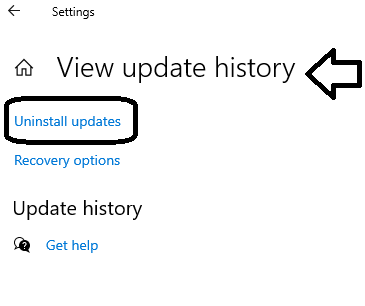
Step 3: In the View Update History, click on Uninstall Updates
Step 4: After clicking on Uninstall Updates, you will get a list of all installed updates> in to order to remove the latest update right-click on it and select Uninstall > after clicking on Uninstall click Yes if prompted.
Once done then reboot your PC and see if the issue resolve or not.
Method 2: Run SFC and DISM Scans
As we have earlier discussed system corruption is one of the prime reasons to get prompted with the current error. So in order to tackle the system corruption Windows offers utility tools like SFC, this is an built-in tool which repairs and replace all the system corrupted files. To use this tool follow the below mention guidelines:
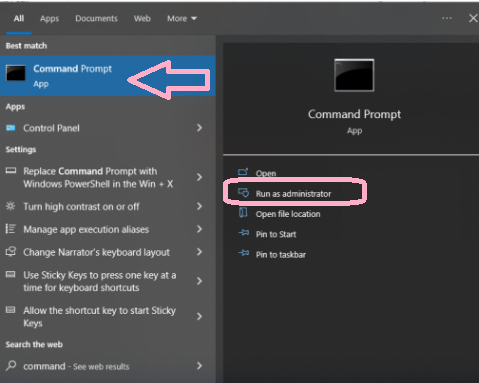
Step 1: Navigate to the Windows Search and type in Command Prompt then select “Run as Administrator”
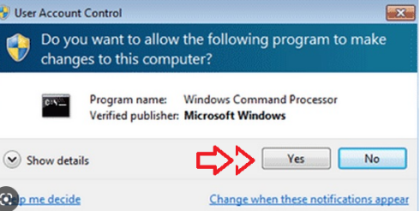
Step 2: Click Yes if promoted by UAC
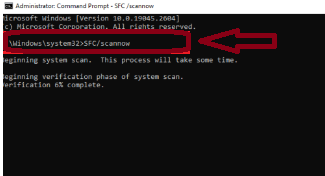
Step 3: Under the “Administrator Command Prompt” type in “sfc/scannow” and then press Enter
If in case the error is not tackled by the SFC Scan then use another utility tool called DISM Scan. To proceed with the method, use the following steps:
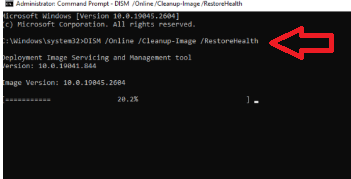
Step 1: Under Administrator Command Prompt type in the following commands one by one and press Enter key after each command.
DISM /Online /Cleanup-Image /RestoreHealth
DISM /Online /Cleanup-Image /CheckHealth
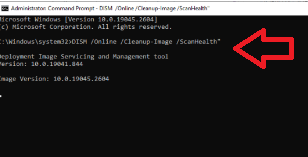
DISM /Online /Cleanup-Image /ScanHealth”
Once done then check if the issue resolved or not.
Method 3: Reset the Taskbar
Some users have mentioned that they were facing the above mention error when they click on the Chat icon on the Taskbar, so in such scenario resetting the taskbar chat to its factory defaults can resolve the issue.
To do so follow the below mention steps:
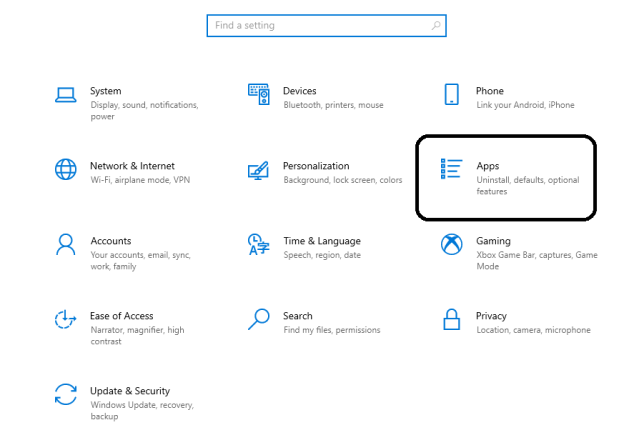
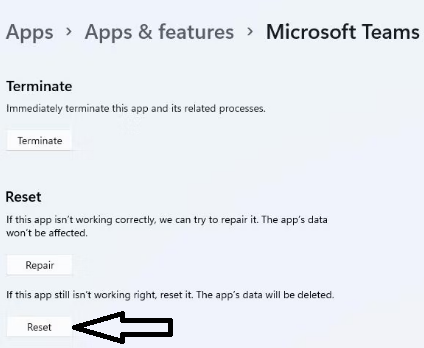
Step 1: Open Settings using Windows + I keys>Under the Windows Settings >choose Apps from the left side and tap on Apps & Features
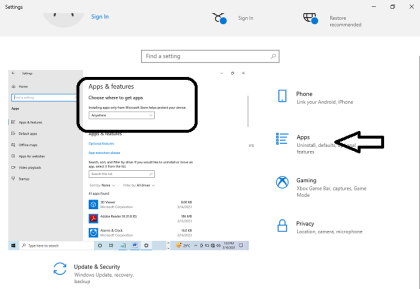
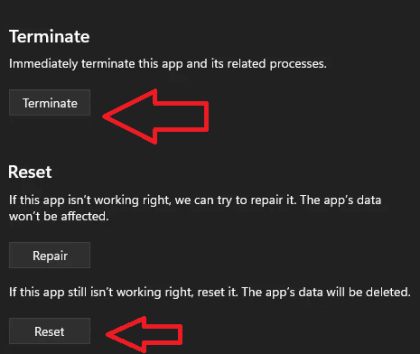
Step 2: Now locate Microsoft Teams under the next Window and tap on the three dots against it>Choose Advanced Options> tap on Terminate button
Step 3: After that click Reset button and confirm it
Step 4: Now navigate to Taskbar, open Chat and then sigh in with another option
Method 4: Rename MS Teams Folder
In Windows Operating System there is a folder called WindowsApp which holds delicate date and users are not permitted to access it if they have lack of permissions. This folder also contains a MS Teams folder, so basically renaming this folder can resolve your issue.
To do so:
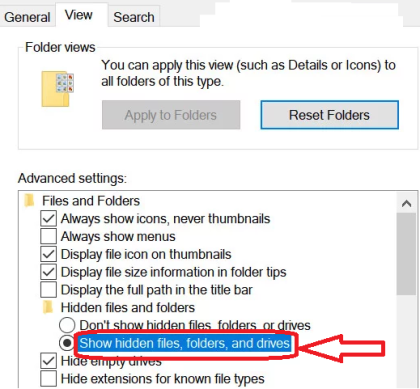
Step 1: Open File Explorer & tap on three dots to select Options > Go to View and checkmark the box against Show hidden files, folders and drives. Then click Apply to save the changes.
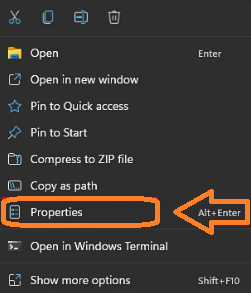
Step 2: Now navigate to C:\Program Files\WindowsApps >right-click on the WindowsApp folder and select Properties
Step 3: Go to Security> Advanced > Tap on Change and then enter a user name> tap OK to save proceed
Step 4: Click Apply followed by OK again > once WindowsApp folder is launched, locate two folders starting with MicrsoftTeams
Step 5: Now Rename these folders by adding .old at the end of the folder name> once done then restart your PC.
Method 5: Use Different User Account
If you have glitches or bug within your user account then the chances for getting the MS Teams.exe bad image error is quite higher. In order to tackle this situation we suggest you to use different User Account.
To do so follow the below mention steps:
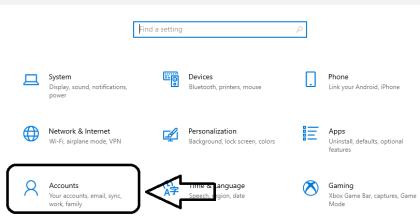
Step 1: Open Settings app using Windows + I keys> tap on Accounts
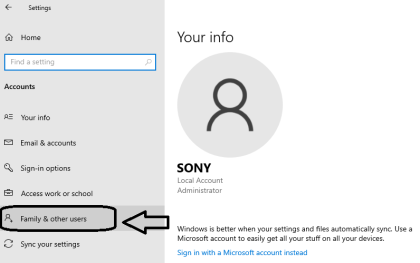
Step 2: Then click on Family & Other Users in the left hand side menu
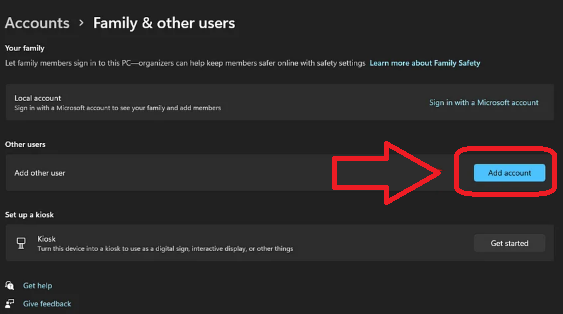
Step 3: Under the Family & Other Users tab, go to the Other Users section and tap on the Add Account button
Step 4: Tap on I don’t have this person’s sign-in information hyperlink in the first pop-up> in the next step, tap on Add a User without a Microsoft account and then wait for the next screen to appear.
Step 5: Under Create a User for this PC page, enter a Local Account Username and add a password
Step 6: Once you have named the local account and added the password. Press Next and wait until it has been initialized> click Next one more time to finish the local account creation. After creating a local account, it will appear in the Other Users
Method 6: Repair the Microsoft Edge WebView2 Runtime App
Repairing the Microsoft Edge WebView2 Runtime App is also an effective trick to resolve the error, if you are still struggling with the same then give a try to this method.
Here’s how:
Step 1: Use Windows keys and type in Installed Apps and press Enter key it will open list of installed apps on your PC

Step 2: On the Installed Page, look for Microsoft Edge WebView2 Runtime typing in the search bar> then click three horizontal dots of the Microsoft Edge WebView2 Runtime and click Modify
Step 3: It will open up the Repair window and starts repairing after clicking on Repair
Step 4: Lastly it will start downloading and then installing Microsoft Edge WebView2 Runtime.
Method 7: Turn Off MS Teams from the Startup Apps
Disabling the MS Teams from the Startup Apps may also resolve your issue, to do the same follow the below mention steps:
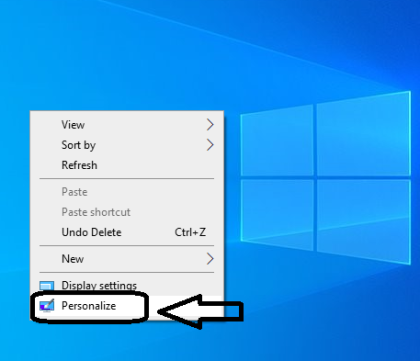
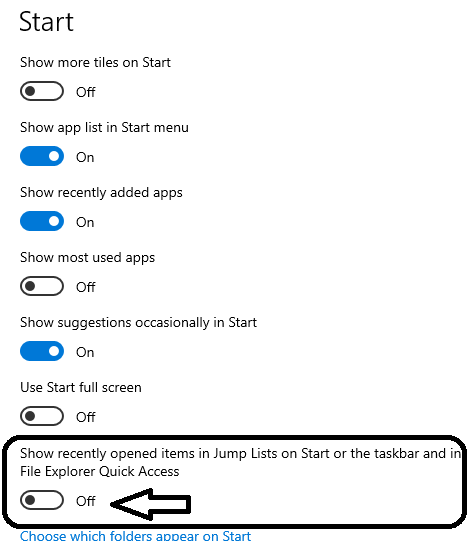
Step 1: Use Windows + D keys to go to the Desktop>right-click somewhere on the empty space and tap Personalize from its context menu
Step 2: Scroll down the Personalization page and tap Start

Step 3: On the Start Page, tap on the Show recently opened items in Start, Jump Lists and File Explorer toggle button to turn it Off
Step 4: Then close the Start Page> in order to disable MS Teams from Startup, use Ctrl + Shift + Esc to open Task Manager > tap on Startup apps tab and search for MS Teams from the list.
Step 5: Right-click on it and Disable from the context menu> it will disable MS Teams from launching at the System Startup> once done then close the Task Manager window
Method 8: Use Windows Restore
Windows offers a feature called Windows Restore using which you can go back in time to a point where the error was not there. But before proceeding with this method note that if you apply this feature it will remove software installed after it was setup. And note that you might lose some data.
We have used Windows 11 for demonstrations of the steps:
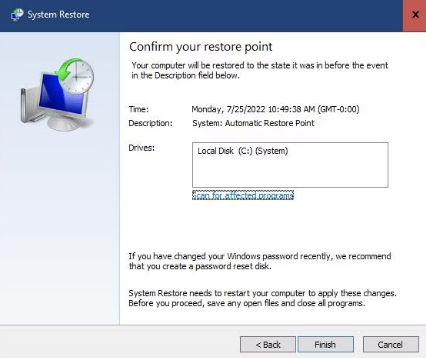
Step 1: Open Run dialog box to open Windows System Restore> then type in restrui Run command and click OK button
Step 2: System Restore might include a Choose a different Restore Point radio button> then select that option if it does and click Next to continue
Step 3: Now click Show More Restore Points box if System Restore doesn’t list all available restoration dates
Step 4: Select a Restore Point that will likely restore Windows to a time when you could open Microsoft Teams without issue. You can also select the oldest restoration data available.
Step 5: Then press Next>Finish to start the process
Method 9: Reset Microsoft Teams App
You may also get stuck with the above mention error if tour app has generic glitch. But you can resolve this issue simply by resetting Microsoft Teams App.
To do so follow the below mention steps:
Step 1: Open the settings app using Windows + I Keys> then click on Apps tab
Step 2: Then click Apps & Features and scroll down to MS Teams form there
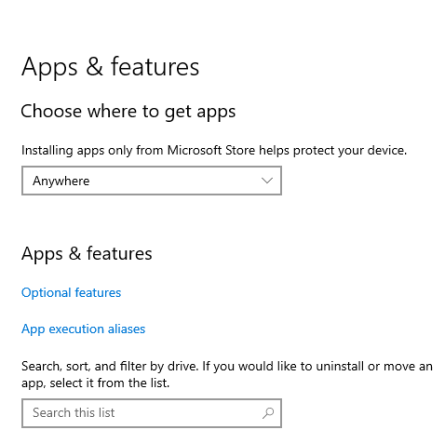
Step 3: Then press MS Teams three dot menu button and select Advanced options > to make sure there are not any MS Teams background processes running, you need to press the Terminate button> select the Reset option there
Step 4: Tap Reset a second time to remove app data from Microsoft Teams> you can select a Repair option for MS Teams as well> then click Repair if resetting was not enough to solve your issue.
Method 10: Reinstall the Microsoft Teams App
Reinstallation is also an effective method to gets past the current issue. This method will remove all the glitch form the app and will also refresh the app.
To do so follow the below mention guidelines:
Step 1: Navigate to the Control Panel and tap on Uninstall a Program >select Microsoft Windows and press the Uninstall button
Step 2: Then Restart your PC and reinstall Teams> after that tap on the Chat icon on your taskbar
If you are still facing the same error then delete MS Teams again, after that go to Program Files/Windows Applications/ Microsoft Teams and remove Teams folder. Finally restart your PC, reinstall Teams and press the Chat icon again and check if the issue resolve or not.
Method 11: Reinstall Windows
If none of the above mentioned methods works for you then in such case you can try to reinstall Windows. Reinstalling the Windows will give a fresh start to your System. It is quite possible that you are facing the above mention error just because of corrupted Windows installation.
However if you don’t want to perform such a lengthy process due to time constraints or any other reason then in such scenario we highly recommend you an advanced PC Repair Tool to deal with the system corruption. This professional tool will repair and replace all your corrupted files in a single go without any hassle.
⇑⇑Get PC Repair Tool from Here⇓⇓
Conclusion
That’s all folks! Apps like MS Teams are prone to errors but thankfully these troubles are quite manageable. And we really hope the above mention guide was helpful for you in getting past MS Teams.exe bad image error 0xc0000020. Thanks for Reading.
