
Here in this blog we are going to discuss about Werfault.exe high CPU Usage. Windows Error Reporting (Werfault.exe) is a built-in Windows Services that automatically gathers and sends error reports to Microsoft. This service’s are quite mandatory as its aim is to help Microsoft in enhancing its products and providing better support to Windows users.
But as per the reports some Windows users have claimed this service leads to excessive CPU Usage which gradually affects the PC performance and other annoying issues.
Table of Contents
Consequences of High CPU Usage
High CPU Usage for a long period of time is quite harmful for your PC health as it may lead system to overheat and may also lead to hardware failure. Sometimes users also face frequent crashing or freezing issues which eventually leads to data corruption or data loss.
And if we talk about the reasons for facing this issue then there could be several reasons for getting stuck in this situation such as corrupted or missing system files and registry and another major reason for suffering is when your CPU is under a lot of pressure and in such situation your system will obviously start to function slower. And this can get to a point where it’s quite hard to perform even the most basic activities.
This issue is quite serious and can’t be ignored so it’s imperative to tackle the situation as soon as possible. And if you are too one of those thousands of users who are struggling with same then follow our suggested guidelines to get past the issue.
Try these fixes for Werfault.exe high CPU Usage
Method 1: Perform a Disk Cleanup
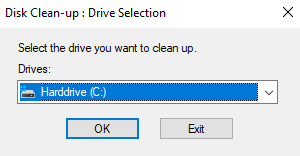
In this method we suggest you to perform a disk cleanup to clear temporary files and junk from the PC using the Disk Cleanup Utility. To proceed you can follow the below mention guidelines:
Step 1: Use the search function (available from your taskbar or just use Windows + S keys on your keyboard) to search for Disk Clean-up
Step 2: Now open the Disk Clean-Up utility from the matching search results> if prompted, select the drive you want to clear and then press OK. This should be the drive where Windows 10 is installed.
Step 3: Then wait for the scan to complete, it may take some time depending on the specs of your PC and the number of file you have
Step 4: Now select the type of files you want to delete under the “Files to delete” section > Press OK and then wait for the Disk Cleanup to finish, Kindly note that don’t turn off the computer during the process.
Method 2: Kill the Werfault.exe Process
After cleaning your PC we suggest you to end the Werfault.exe Process and to do the same follow the below mention guidelines:
Step 1: First of all open Task Manager using Ctrl + Shift + Esc keys or by right-clicking the Windows Start Menu and selecting Task Manager from the context menu
Step 2: When the Task Manager opens, find the Werfault.exe process in the list of running processes> right-click on the Werfault.exe process
Step 3: Under the context menu that appears, select End Task in order to terminate the process> if prompted with a confirmation dialog box, tap End process to confirm that you want to terminate the process.
Method 3: Run SFC Scan
Several users have claimed that running the SFC Scan resolved their issue and to proceed you can follow the below mention steps:
Step 1: First of all open the Command Prompt as Administrator> then use the following command and press Enter key:
sfc /scannow
Step 2: Now Reboot your PC and if you are still struggling with the same issue then use the following commands and press Enter key:
DISM /Online /Cleanup-Image /CheckHealth
DISM /Online /Cleanup-Image /ScanHealth
DISM /Online /Cleanup-Image /RestoreHealth
Method 4: Perform a Windows Defender Scan
You can also use the Windows Defender to scan your system and to proceed you can follow the below mention guidelines:
Step 1: First of all click on the Windows Start Menu or just press Windows key> then type in Microsoft Defender in the search bar and click on Microsoft Defender Antivirus in order to open the application
Step 2: Tap on the Virus & threat protection option in the left-hand menu
Step 3: Now click on the Quick Scan or Full Scan option depending on your preference

Step 4: Once you choose Quick Scan, Microsoft Defender Antivirus will scan the most vulnerable and commonly infected areas of your PC
Step 5: If you choose Full Scan, Microsoft Defender Antivirus will scan your entire PC including all files, folders and programs
Step 6: Now tap on the Scan now button to start the selected scan type and wait for the scan to complete> the time it takes will depend on the size of your hard drive and the number of files being scanned.
Step 7: Once done you will be informed of any detected threats, and you can choose to quarantine or remove them
Step 8: And if no threats are found, MS Defender Antivirus will inform that your device is secure.
Method 5: Turn Off Windows Error Reporting Services
Several users have claimed that disabling the Windows Error Reporting Services resolved their issue so you can also try the same.
Here’s how:
Step 1: Tap on the Windows Start Menu or just press Windows keys> then type in Services in the search bar and click on Services to open the application
Step 2: In the Services Window, scroll down and locate Windows Error Reporting Services in the list> now double-click on Windows Error Reporting Service to open its Properties
Step 3: In the Properties window, locate the Startup Type option and click on the drop down menu
Step 4: Now from the drop-down menu, select Disabled to disable the service> click on the Apply button to save the changes
Step 5: If the services is currently running, tap on the Stop button to stop it
Step 6: Now click on the OK button to close the properties window> close the Services Window
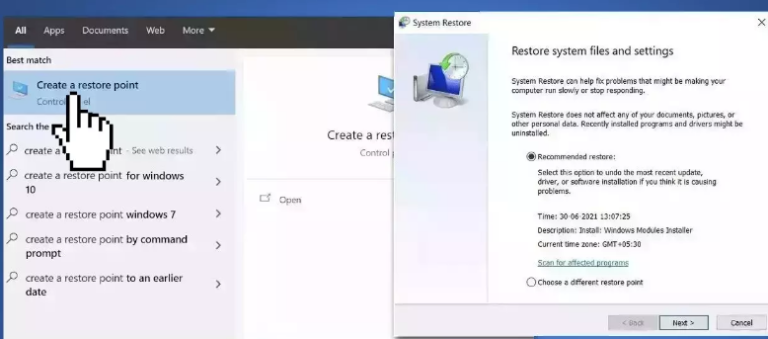
Method 6: Use System Restore
If you are still struggling with Werfault.exe high CPU Usage, then we suggest you to use the System Restore.
Here’s how:
Step 1: Navigate to Start Menu and type restore and click on Create a restore point> click System Restore, then follow the prompts until you can select a restore point.
Step 2: Now select the one you want and proceed with the process
Best Recommended Solution for Windows Problems
Though all the above mentioned methods are quite effective and can be easily resolve the issue but sometimes you need an expert to tackle some type of issues and the current situation is one of them. So considering the issue, we strongly recommend you a PC Repair Tool. This is a professional tool and will resolve all the issues in just a single go.
⇑Get PC Repair Tool from Here⇓
That’s all about Werfault.exe high CPU Usage we assume you liked the blog. Thanks for Reading
