
What is ‘Windows Upgrade error 0xc1900204’ in Windows 10?
If you are experiencing ‘Windows Upgrade error 0xc1900204’ while trying to update Windows 10 operating system, then you are in right place for the solution. Here, you will be guided with easy automatic and manual methods to resolve this issue. Let’s starts the discussion.
Windows 10 OS Update: Microsoft releases regular updates as security patches, feature updates, or cumulative updates for Microsoft Windows 10 OS based devices. Updating Windows 10 OS can resolve any issue in your Windows 10 computer associated with Operating system, system files, device drivers, and other issues, and improves performances by adding several new features.
In Windows 10, it is quite simple to update your Windows 10 Operating System via ‘Settings’ App. To do so, you can go to ‘Settings App > Update & Security > Windows Update’ and click on ‘Check for updates’ button. This will automatically download and install the latest available Windows update in your computer. Also, once update finished, you need to restart your computer to see the changes.
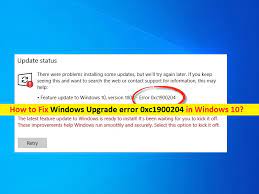
However, several users reported that they faced ‘Windows Upgrade error 0xc1900204’ while they tried to install latest Windows update in their Windows 10 computer. This error code indicates that your Windows 10 computer can’t finish Windows update process and updating setup failed for some reasons. This error prevents you from updating your Windows 10 to latest version.
The possible reason behind this Windows update error can be misconfigurated system files or corrupted System files or registry, corrupted Windows update components, if you performed installation or uninstallation of some software improperly, deleted essential OS files that are vital for your computer to function, and other reasons. Let’s go for the solution.
Table of Contents
Some common issue related to ‘Windows Upgrade error 0xc1900204’:
- Windows 10 Update Assistant 0xc1900204 error
- Windows Setup failed with hexadecimal exit code 0xc1900204
- 0xc1900204 Upgrade error code
How to fix Windows Upgrade error 0xc1900204 in Windows 10?
Method 1: Fix ‘Windows Update error 0xc1900204’ with ‘PC Repair Tool’
You can fix your Windows PC problems with ‘PC Repair Tool’ in order to fix this Windows update error. This software offers you to find and fix BSOD errors, EXE errors, DLL errors, malware or viruses issues, system files or registry issues, problems with programs and other issues with just few clicks. You can get this tool through button/link below.
⇓ Get PC Repair Tool
Method 2: Run Windows Update Troubleshooter
Windows 10 built-in ‘Windows Update’ troubleshooter can fix this issue. Let’s try.
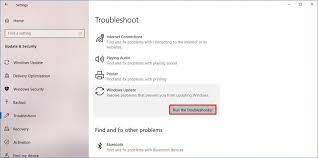
Step 1: Press ‘Windows + I’ keys on keyboard to open ‘Settings’ App in Windows 10
Step 2: Go to ‘Update & Security > Troubleshoot’, select ‘Windows Update’ troubleshooter and click on ‘Run the troubleshooter’ button
Step 3: Follow on-screen instructions to finish troubleshooting process. Once done, please check if the problem is resolved.
Method 3: Run SFC Scan and DISM Scan
As mentioned, corruption in system files can cause this type of error. You can run SFC scan to repair system files and run DISM scan to repair hard disk image issue, in order to fix this Windows update error.
Step 1: Press ‘Windows + X’ keys on keyboard and select ‘Command Prompt as Administrator’
Step 2: Now, run SFC scan. Type ‘sfc /scannow’ command and hit ‘Enter’ key to execute
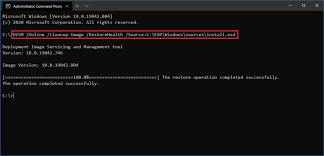
Step 3: Once executed, run DISM scan. Type the following command and hit ‘Enter’ key to execute
DISM /Online /Cleanup-Image /RestoreHealth
Method 4: Wait for the completion. Once done, reboot your computer and check if the issue is resolved.
Method 4: Fix Windows Update error 0xc1900204 via Registry Editor
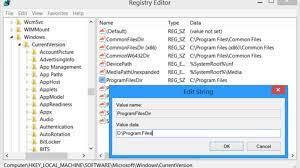
Step 1: Press ‘Windows + R’ keys on keyboard, type ‘regedit’ in the opened ‘Run’ dialog box and hit ‘Ok’ button to open ‘Registry Editor’
Step 2: Navigate to ‘HKEY_LOCAL_MACHINE\\SOFTWARE\\Microsoft\\Windows\\CurrentVersion’ path
Step 3: Now, locate and right-click on ‘ProgramFilesDir’ value and change the default value of C:Program Files to the path where you want to install your programs.
Step 4: After that, restart your computer and check if the issue is resolved.
Method 5: Reset Windows update components via Command Prompt
Resetting Windows update components can fix this issue. Let’s try.
Step 1: Open ‘Command Prompt as Administrator’
Step 2: Type the following command one-by-one and hit ‘Enter’ key on keyboard after each to execute
net stop bits
net stop cryptSvc
net stop msiserver
net stop wuauserv
ren C:\\Windows\\SoftwareDistribution SoftwareDistribution.old
ren C:\\Windows\\System32\\catroot2 Catroot2.old
net start bits
net start cryptSvc
net start msiserver
net start wuauserv
Step 3: Wait to finish the process. Once done, reboot your computer and check if the problem is resolved.
Method 6: Install Windows 10 update manually
You can also try to update Windows update manually in computer.
Step 1: Open ‘Settings’ App and go to ‘Update & Security > Windows Update > View Update History > Uninstall Updates’ and note down the ‘KB’ number of recently installed Windows update. Or note down the KB number of Windows update that was causing error while tried to install in computer.
Step 2: Now, open your browser and visit ‘Microsoft Update Catalog’ official page and search for that KB number
Step 3: Download the updates according to your Windows OS architecture and then install it into your computer. Once done, reboot your computer and check if the error is resolved.
Method 7: Perform in-place upgrade
If the error is still persist, then you can try to fix the issue by performing in-place upgrade.
Step 1: Download ‘Media Creation Tool’ from Microsoft Official site and run the downloaded tool
Step 2: Select ‘Upgrade this PC now’ option
Step 3: Now, click ‘Download and install updates (recommended)’ and follow on-screen instructions until you get to ‘Ready to Install’ section
Step 4: Now, click on ‘Choose what to keep’ and make sure ‘Keep personal files and apps’ is selected
Step 5: Follow on-screen instructions to finish the process and once done, restart your computer to see the changes.
Method 8: Setting your default display language to ‘English’
Step 1: Open ‘Registry Editor’ via ‘step 1 of method 4’
Step 2: Navigate to ‘HKEY_LOCAL_MACHINE\SYSTEM\CurrentControlSet\Control\Nls\Language’ path
Step 3: Right-click on ‘InstallLanguage’ key and check if it is set to ’0409’. Here, ‘0404’ is EN-US.
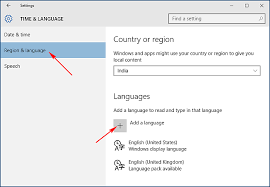
Step 4: After that, open ‘Settings’ App and go to ‘Time & Language > Region & Language’ and make sure ‘English (United)’ is available, and set as default display language.
Step 5: If not, click on ‘Add a language’ and install US English as default display language.
Conclusion
I am sure this post helped you on How to fix Windows Upgrade error 0xc1900204 in Windows 10 with several easy steps. You can read & follow our instructions to do so. That’s all. For any suggestions or queries, please write on comment box below.
