It is not hard task to connect iphone with computer to transferring files like images, audios, videos and other files. You can simply connect these two devices via USB cables or wireless medium to share your personal data from one device to another. But report says, many users are facing some problem while they are trying to connect iPhone with computer.
This article will help you to fix iPhone not showing in my computer trouble with easy methods. You can read this article for learning or educational purpose also. If your computer is not recognizing your iPhone, then you can follow the instruction given below.
Several Reasons: Why iPhone not recognized by Windows 10/8/7/XP
- It might possible USB cable or USB port not working properly that can one of the common causes your iphone can’t connect to your computer.
- If your System has troubles with running software or USB driver software, then you might get PC not recognizing iPhone issue.
How to fix Computer not recognizing iPhone problem
Procedure 1: At first you should check the basic tips, if you have detect your computer will not recognize iPhone.
- You need to check USB cable and USB port: it might possible some problem with USB cable which you are using to connect both device. So, in this case, you can try to connect another USB cable in place of old one and check if the trouble is resolved.
- You need to restart your computer and iPhone: At fist, disconnect your iPhone from computer, and then restarts both iPhone and computer. After reboots, connect again these devices and check if the problem is resolved.
- You need to select “Trust” your computer always: When you trying to connect iPhone with computer, then you might get prompt where choose is given that Trust or Don’t Trust. You should always go for “Trust” option.
Procedure 2: You should keep device driver updates
Step 1: Search or go for “Device Manager” and then extends “Portable devices” and “Universal Serial Bus controls”
Step 2: Now, Right click on “Apple iPhone” click on “Update”. Similarly, right click on “Apple Mobile Device USB driver” and click on “update”
Step 3: Wait to complete the process. After restart your computer and try to connect again both device.
Procedure 3: You need to check the Apple Device Support and service
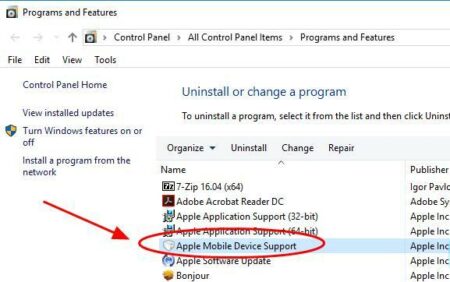
Step 1: At first, make sure Apple Mobile Device Support is installed. Press “Windows + R” key from keyboard and type “appwiz.cpl” and then click on OK or press enter key.
Step 2: Check in the Program list, If you see Apple Mobile Device Support is installed. If not, you should re-install iTunes in order to install Apple Mobile Device Support

Step 3: After that, make sure Apple Mobile Device Service is running. Press “Windows + R” key from keyboard and type “services.msc” and they press enter key
Step 4: Find Apple Mobile Device Service and double click on it
Step 5: Ensure that Startup type is selected Automatic as well as “service status” is Running
Procedure 4: You can re-install iTunes on your computer
Step 1: At first, disconnect your iPhone from your computer and unplug USB cable as well
Step 2: Uninstall iTunes from your computer.
Step 3: Now, you can download and re-install iTune from Apple
Step 4: After that, launch iTunes on your computer
Step 5: Finally, you can connect again your computer with iPhone and check if the problem is resolved.
Conclusion
I am sure this article helped you to fix iPhone not recognized by Windows 10 issue with easy methods. You can select either one or all procedure as System requirements. If your System has malware related issue, then you need to scan your computer with powerful antimalware tools which is capable to fix this type of troubles and delete all junk files from System.
Is Your PC Behaving Abnormal & Needs Instant Optimzation?
We recommend you to choose Reimage PC Repair Suite which is dedicated to offer complete options to optimize a PC, fix any Windows error, and remove malware threats in easy. The software is award winning and suggested as the best malware fix application supporting all Windows versions including XP/Vista/7/8/8.1/10. Just 3 steps to avail error free PC.
- Download Advanced PC Repair and install on your PC. (Follow all on screen instructions when installer is executed)
- Click “Scan Your PC” button to scan all present issues, errors, junk files, and malware threats.
- Finally, click “Start Repair” to fix all detected problems in next few minutes.


