
Cache memory is a small sized type of volatile computer memory that provides high speed data access to a processor & stores frequently used computer programs, applications and data. It’s a temporary storage of memory that makes data retrieving easier and more efficient. It is the fastest memory in computer. But sometimes these stored caches may create several issues if they somehow get corrupted. And one of the major consequences of such cache is they slow down the PC which eventually ruins the user’s experience. So it’s better to remove it before it slows down the machine.
Here in this article we will teach you how to Clear RAM Cache Windows 11. So without any further delay let’s get started with the discussion.
Try the following methods toClear RAM Cache Windows 10/11
Method 1: Flush RAM Cache
In the very first method we suggest you to flush the RAM Cache. To do so follow the below mention guidelines:
Step 1: Navigate to your desktop and right-click on any empty space> under the pop-up menu, select New> Shortcut
Step 2: In pop window, type %windir%\system32\rundll32.exe advapi32.dll,ProcessIdleTasks in the field and click on Next
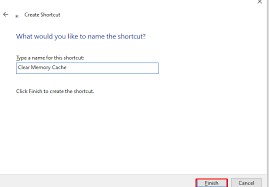
Step 3: Give a new name for the shortcut, such as Clear Memory Cache, and click on Finish. After that, you can double-click the shortcut at any time you want to flush the memory cache.
Method 2: Clear Page File when Shutting Down
In this method we suggest you to clear page files, to do the same follow the below mention steps:
Step 1: On your keyboard press Win + R keys to open Run dialog box and the type in regedit in it and press Enter key
Step 2: Navigate to the following Registry keys via the left navigation bar:
HKEY_LOCAL_MACHINE/SYSTEM/CurrentControlSet/Control/Session Manager/ Memory Management
Step 3: Now with the Memory Management folder selected in the left panel, double click the ClearPageFileAtShutdown DWORD and set it Value data to 1 and click on OK
Method 3: Disable Some Visual Effects
In this method we suggest you to reduce the visual effects and in order to proceed with the method follow the suggested instructions:
Step 1: On your keyboard press Win + E keys to open the File Explorer and then right-click This PC entry and select the Properties
Step 2: Select About from the left window and then scroll down the right sidebar and click on the Advanced System Settings
Step 3: Navigate to the Advanced tab and click on the Settings button under the Performance section
Step 4: Now tick the checkbox next to Adjust for the best performance to disable to disable all the animated visual effects.
Step 5: Finally Click on Apply and then on OK to save the change
Method 4: Close the Unnecessary Tasks
Several users have also claimed that they managed to get past the situation by closing the unnecessary tasks. To do so follow the below mention instructions:
Step 1: On your keyboard press Ctrl + Shift + Esc shortcut to open Task Manager Window and click on More details to access the full view
Step 2: Under the Processes tab, tap on the Memory header to sort from most to least RAM Usage
Step 3: Right-Click the progress that takes up much RAM, and select End Task and then repeat the same process for the tasks.
Method 5: Reduce the Startup Programs
So many programs and apps running in the background may contribute too much cached memory. So it is recommended to reduce the startup programs. In order to do so open the Task Manager and then navigate to Startup tab, right-click the program and select Disabled.
Method 6: Check your device driver
You are likely to face the above mention issue if you are using an outdated device driver, so in order to avoid this issue we suggest you to update your device drivers.
To do so follow the below mention steps:
Step 1: On your keyboard press Win + R keys to open Run dialog box and then type in devmgmt.msc and press Enter key to open the device manager
Step 2: Now expand each category inside the Device Manager and look for the driver marked with a yellow exclamation mark icon. It indicates a driver malfunctioning.
Step 3: Right-Click the device driver and select Update Driver and follow the On-Screen guideline to install the latest version of the device driver
Alternatively, you can also use an automatic driver tool to update your driver because sometimes the built-in tool fails to detect the updated driver. So you can go for our suggested driver tool. It will fulfill all the driver related requirements of your PC.
⇑Get Driver Tool form Here⇓
Method 7: Add More RAM
If none of the above mentioned methods works for you then it is highly recommended to add more RAM. And to do the same you can upgrade your RAM to larger one.
Well that’s all about Clear RAM Cache Windows 11. We have tried our best to provide all the possible methods to get past the issue. Hope you liked the blog.
