
The Snipping Tool is a Windows feature which is available on Windows 7/8/10/11. Using this feature one can take a screenshot of the entire screen, Window, or a rectangular area of the screen & save that screenshot as an image file. For instance if the user wants to send a recipe to a friend but didn’t want to send the whole web page, you could use this tool to capture only the recipe.
But there was an issue as when the user takes a new snip with snipping tool and closes it without saving the snipped image the unsaved snip gets lost. This was extremely annoying but then Windows 10/11 introduced the new Clipboard feature, users can now find the old snips from shipping tool via the Clipboard manager. But while going through Reddit we concluded that so many users have reported that they are unable to find snipping tool history, so here in this blog we will teach you How to find Snipping Tool History. So without any further delay let’s get started with the discussion.
How to get Snipping Tool History in Windows 10/11?
Every Snip created by the user gets saved to the Windows Clipboard. One can quickly test this by creating a new sip without saving it, and paste it (ctrl +v) in any software that support image pasting like Microsoft Word and Paint.
It simply means that since the snips made by the user using Snipping tool will be captured by the clipboard, if you want you can also find and view the earlier unsaved snip via the Clipboard History in Windows 11/10. You can access the Windows Clipboard manager just by pressing the Win + V keys.
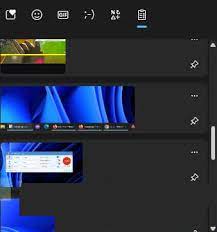
Now try to take a few quick snips using Snipping tool and you should then be able to view those unsaved snips appear in the Clipboard History.
In order to re-copy an earlier snipped content, left-click to choose it from the clipboard history and paste the image to anywhere you want. You can also paste the image to Paint if you would like to save it as a file.
Related Queries
How to take Screenshots using Snipping Tool?
Using App
Well you can find the snipping tool under the list of apps on your Windows PC. To proceed follow the below mention guidelines:
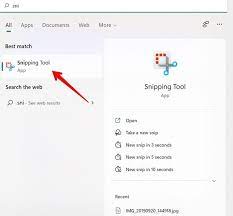
Step 1: Firstly open Search and type Snip>Once the Snipping tool appear> click to open it> you can pin it to the Taskbar for faster access.
In case you can’t find the Snipping tool in Windows 11 and install it from the Microsoft Store.
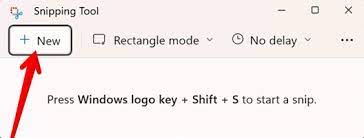
Step 2: Once the Snipping tool appear on the screen you need to open the app or Window that you want to capture. Now click on the New button under the Shipping tool.
Step 3: The screen will darken & the snipping screen will open with four screenshots modes at the top. These allow you t define the area that you want to capture.

Rectangle Mode: This is the first one and is chosen by default. It lets you manually define the area to be captured in a rectangular form. Tap on the screen and then drag the mouse to capture the required area.
Freeform Snip: This mode allows you to define the area in a free form manner. It doesn’t put any restrictions on the selection area can be of any or no shape.
Window: This mode allows you to take a screenshot of any Window on the screen. You only need to click on the Window once and it will capture he screenshot with just the Window in it.
Full Screen Mode: Tap anywhere on the screen to capture a full screen screenshot using this mode.
Tips: Use the Tab key to go between these modes and press Enter to select a Mode. So press the Esc key or click on the X icon just next to the modes to get out of the Snipping screen.
Step 4: Once you are done with capturing a screenshot, it will automatically open in the Snipping Tool editing mode.
Why are my Screenshots not going to the Screenshot folder?
Your screenshots will be saved in the Screenshot folder only if you are using the keys Win + PrntSc. If you are pressing the PrntSc button, the screenshot will be copied to your clipboard. You then need to paste it into MS Paint and then saved it in your preferred location.
How do you save a screenshot on a PC?
If you are using the Snipping Tool or PrntSc button to take your screenshots, you can save them in a location of your choice. But if you are using Win + PrntSc option, all your screenshots will automatically be saved in the folder Screenshots viz. this PC> Picture> Screenshots.
How to disable Screenshot Auto-save in Snipping Tool?
Follow the below mention steps to turn off screenshot auto-save in Snipping Tool:
Step 1: Launch the Snipping Tool> click on the three dot menu button and select Settings
Step 2: On the Settings page, find the Automatically Save Screenshots option and disable it
Step 3: The app will no longer save captures automatically> Once done. It is quite simple to restore the screenshots auto saving by re-enabling the option in app’s settings at any moment later.
That’s all about How to find Snipping Tool History. We have also discussed other queries related to this topic. Hope you liked the blog.
