
Update Errors are quite common while updating Windows to the latest version and here in this tutorial we are going to discuss about one of the most infamous update errors namely 22H2 Windows 11 update fails with error 0x8007001F-0x3000D.
Several users have claimed that this error while updating their Windows to the latest version. As per the verified sources this error simply means that there is something wrong with the user profile migration on the computer. And the exact cause in the technical term is:
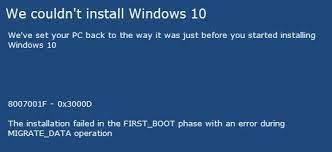
“The installation failed in the FIRST_BOOT phase with an error during MIGRATE_DATA operation”.
You might know that during installation, Windows goes through multiple phases during boot up, and this failure happens in the first boot phase.
Try these fixes for 22H2 Windows 11 update fails with error 0x8007001F-0x3000D
Method 1: Run Windows Update Troubleshooter
Before proceeding with any complex methods we suggest you to run the Windows Update Troubleshooter and to do the same follow the below mention instructions:
Step 1: To launch the Settings app press Win + I keys together>then type in “Troubleshoot” in the search field and press Enter
Step 2: Then tap on expand the first result i.e. Troubleshoot Settings> Click Other Troubleshooters on the succeeding page
Step 3: Under Most Frequent, you may find the Run button besides Windows Update you need to click on it
Step 4: Once the troubleshooting window opens up, press Next and follow the on-screen instructions> then let this tool find and resolve any issues on your system automatically
Step 5: Once done, Restart Windows and check if the issue resolved or not
Method 2: Update BIOS
Several users have claimed that updating the BIOS worked for them so we suggest you to do the same by following the below mention instructions:
Step 1: On your keyboard press Windows + X keys and select Command Prompt (Admin)> then type in wmic bios get smbiosbiosversion and press Enter key
Step 2: Then you will see SMBIOSBIOSVersion and the BIOS Version of your computer> Navigate to System tab of the DxDiag tool and look for the BIOS section.
Step 3: Navigate to the Website of your BIOS Manufacturer> then hover over the Support option and the website will display a drop down menu
Step 4: Tap on Support Home > then scroll down to find the BIOS category drivers and expand it> after that type System Information in the Start Menu and open it
Step 5: Compare the BIOS Version/Date in the System Information with the version number specified on the official website
Step 6: Begin the downloading> once done then double-click on the downloaded file>After opening the file, the system will warn you that updating the BIOS process will restart your computer. Now tap on the OK button
Step 7: Then the System will show you another information dialog which indicates the current version of the BIOS and the version you are installing. Tap on the OK button again
Step 8: The System will start the BIOS updating process> when the progress bar goes to 100%, you will see a black screen followed by the following screen
Step 9: After the updating procedure, the system will reboot in a normal way> once done you can ensure that the latest BIOS Version is installed.
Method 3: Use Windows 11 Installation Assistant
You can also use Windows 11 Installation Assistant and to do the same follow the below mention steps:
Step 1: Go to the Official Microsoft Website to download the Installation Assistant> double-click on the setup file
Step 2: Then click on the Refresh button if you have not downloaded the PC Health Check app earlier> then tap the Accept and Install
Step 3: Let it download and verify everything from the official resource> then click the Restart Now > Continue with the installation
Method 4: Delete Invalid Users from Registry
We have earlier mentioned that you are likely to face the above mention error because of Invalid Users. So we suggest you to delete Invalid Users from Registry by following the below mention instructions:
Step 1: On your keyboard press Win + R keys to open Run dialog box > then type in regedit and press Enter key
Step 2: Once the Registry Editor opens, go to
HKLM\SOFTWARE\Microsoft\Windows NT\CurrentVersion\ProfileList
Step 3: Lastly find out the list of profiles that are invalid and delete them.
Method 5: Delete Invalid User Folders
You can also resolve the above mention error by deleting Invalid User Folders. To do the same follow the below mention instructions:
Step 1: Navigate to the drive where Windows is Installed > then find invalid profiles that should not be there> Then Delete them and empty the Recycle Bin
Method 6: Check Disk
If you are still struggling with 22H2 Windows 11 update fails with error 0x8007001F-0x3000D the check your Disk.
Here’s how:
Step 1: First of all open the Command Prompt and tap on the Run as an Administrator > then type this command and press Enter
chkdsk C: /f /r /x
Method 7: Fix Corrupted System Files
We have earlier discussed that you corrupted system files are one of the major reasons for facing the current error. So it is imperative to repair the corrupted system files.
To do so follow the below mention steps:
Step 1: Open Command Prompt as an Administrator > then use the following command and press Enter:
sfc /scannow
Step 2: Then Reboot the system and if the SFC returned the error then use the following command lines and don’t forget to press Enter after each:
DISM /Online /Cleanup-Image /CheckHealth
DISM /Online /Cleanup-Image /ScanHealth
DISM /Online /Cleanup-Image /RestoreHealth
Alternatively, you can also use an automatic PC Repair Tool to repair your corrupted system files because sometimes the above mention trick to repair system fails to do so. So you can totally rely on this tool.
⇑Get PC Repair Tool⇓
Method 8: Update Device Drivers
You can also get past the above mention error just by updating your device drivers. To do so follow the below mention steps:
Step 1: Open Settings> tap on Update & Security> then click on Windows Update
Step 2: After that click on Check for Updates button > click on View Optional Updates option
Step 3: Now click the Driver Updates tab> then select the driver you want to update>lastly click Download and Install button
You can also update your device drivers by using an automatic driver tool. This tool will fulfil all the driver related requirements of your PC.
⇑Get Driver Tool from Here⇓
Well that’s all about 22H2 Windows 11 update fails with error 0x8007001F-0x3000D. We assume that you liked the blog.
