
Update Errors are quite common and it’s not a big deal to face update error while installing a new update. Well here in this blog will guide you on how to tackle update errors. We will discuss about two update errors one by one. As we have earlier mentioned that update errors and use faces different update errors with different error codes. Depending on the integrity of files and other settings of Windows users get prompted with error codes. So, basically different users may get different update errors while installing new updates.
Since the reasons are different for every user for getting stuck with update errors, as discussed earlier we will talk about two different update errors. So let’s get started with the discussion.
Table of Contents
What is Error code 0x8007000d installing Windows 11 from USB?
As per the reports users have reported this error while installing Windows 10 from a bootable USB Drive. This error simply indicates Windows is unable to find a requisite file in the installation package. And one of the major reasons for getting stuck with this error is corrupted and damaged system files.
While installing new updates it is very important that you files are intact and if it’s not then you are likely to face the above mention error. But don’t worry we have shortlisted some tried and tested methods to resolve the issue.
You may also read: windows update error 0x800704bd, Windows apps update error 0x800706d9
Method 1: Run Windows Troubleshooter
In the very first method we suggest you to run the built-in tool to get past the situation. To do the same follow the below mention guidelines:
Step 1: On your keyboard press Windows + I keys to open Settings > Navigate to the Update & Security
Step 2: Now open the Troubleshoot tab from the left pane> Select Additional troubleshooters
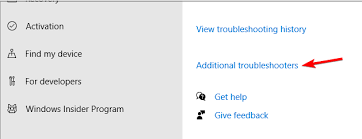
Step 3: Select Windows Update and click on Run the Troubleshooter button. This will scan the system for issues that may be preventing Windows updates from installing
Step 4: Follow the on-screen instructions and apply any or all the recommended fixes> once done then reboot your PC
Method 2: Uninstall Mixed Reality Portal App
One of the reasons for facing the issue is Mixed Reality Portal App so it is suggested to uninstall the app. Here’s how:
Step 1: Press Windows + I keys to open Settings > Navigate to Apps
Step 2: Under the Apps & features tab search Mixed Reality Portal >choose the app and click on Uninstall button
Step 3: Tap Uninstall once more to confirm the action> once done then reboot the PC and try to update PC
Method 3: Create a New bootable USB flash drive
Well if you have encountered an error similar to G:/Sources/install.wim (error code : 0x8007000d, it could be because of corrupted installation media. In such case, you have to create a new Windows 10 bootable flash drive.
Ensure to reformat your USB Drive before creating a bootable flash drive. Also download the fresh Windows 10 ISO file from the Microsoft website or using Media Creation Tool to get rid of any chances of corruption during Windows Installation.
Method 4: Upgrade Using Media Creation Tool
If you are still struggling with Error code 0x8007000d installing Windows 11 from USB we suggest you to upgrade using Media Creation Tool.
Before proceeding with the method, make sure you have to create a backup.
To do the same follow the below mention guidelines:
Step 1: First of all Download the Media Creation Tool from the Microsoft Download Centar> Run the Setup file and click the Agree button. Wait for the tool to scan your system.
Step 2: Select Upgrade this PC Now option under what do you want to do
Step 3: Click Next windows will start downloading the latest version of OS available for your PC> Once done then proceed to upgrade your OS. You may have to restart your PC a few times during the upgrade.
Method 5: Run DISM
Several users have claimed that running the DISM command resolved their issue. So to do the same follow the below mention steps;
Step 1: Press Windows key, type in cmd and tap on Run as an Administrators for Command Prompt> Under the Command Prompt Window, type the following command and press Enter key:
dism.exe /online /cleanup-image /scanhealth
Step 2: It may take some time to scan the system for potential issues that are preventing your PC from installing Windows Updates
Step 3: Once the scan is finished enter the following command and press Enter key:
dism.exe /online /cleanup-image /restorehealth
Step 4: This command will clean up the system files and may resolve the issue> once done then close the command prompt & reboot your PC.
Method 6: Reset Windows Update Components
If none of the above mentioned methods works for you it is suggested to reset the Windows Update Components. Here’s how:
Step 1: Press Windows key and type cmd> click on Run as an Administrators for command prompt
Step 2: Under the Command Prompt Windows, copy and paste the following command and pres Enter to execute
net stop bits
net stop wuauserv
net stop appidsvc
net stop cryptSvc
Step 3: Then delete the qmgr*.dat file. Enter the following command to delete the file.
Del “%ALLUSERSPROFILE%Application DataMicrosoftNetworkDownloaderqmgr*.dat
Step 4: After that enter the following command to go to the System32 folder:
cd /d %windir%system32
Step 5: When you are in the System32 folder, enter the following command to register the BITS files and Windows Update files. Ensure to enter all the command one by one followed by an enter to execute:
regsvr32.exe atl.dll
regsvr32.exe urlmon.dll
regsvr32.exe mshtml.dll
regsvr32.exe shdocvw.dll
regsvr32.exe browseui.dll
regsvr32.exe jscript.dll
regsvr32.exe vbscript.dll
regsvr32.exe scrrun.dll
regsvr32.exe msxml.dll
regsvr32.exe qmgrprxy.dll
regsvr32.exe wucltux.dll
regsvr32.exe muweb.dll
regsvr32.exe wuwebv.dll
regsvr32.exe msxml3.dll
regsvr32.exe msxml6.dll
regsvr32.exe actxprxy.dll
regsvr32.exe softpub.dll
regsvr32.exe wintrust.dll
regsvr32.exe dssenh.dll
regsvr32.exe rsaenh.dll
regsvr32.exe gpkcsp.dll
regsvr32.exe sccbase.dll
regsvr32.exe slbcsp.dll
regsvr32.exe cryptdlg.dll
regsvr32.exe oleaut32.dll
regsvr32.exe ole32.dll
regsvr32.exe shell32.dll
regsvr32.exe initpki.dll
regsvr32.exe wuapi.dll
regsvr32.exe wuaueng.dll|
regsvr32.exe wuaueng1.dll
regsvr32.exe wucltui.dll
regsvr32.exe wups.dl
regsvr32.exe wups2.dll
regsvr32.exe wuweb.dll
regsvr32.exe qmgr.dll
Step 6: Then type the following command one by one and press Enter
netsh Winsock reset
Netsh winhttp reset proxy
Step 7: The two commands above will reset Winsock and reset proxy respectively.
Step 8: Now you need to reboot Windows Update component services. Enter the following command one by one and press Enter to execute.
net start bits
net start wuauserv
net start appidsvc
net start cryptSvc
Step 9: Close the Command Prompt and reboot your PC
Related queries!!
How to fix error 0x80d02002 Windows 10 Update 20h2
It is one of the most frequently reported update errors if you are too struggling with the same, then follow the below mention guidelines.
Method 1: Correct the Regional and Language Settings
You are likely to face the above mention error if you have incorrect regional and language settings. So follow the below mention steps to correct the regional and language settings:
Step 1: Click on the Start button and then navigate to the Control Panel> Click on the Clock, Language and Region > and then Region
Step 2: Now browse the Format tab> Format dropdown menu > Select the English (United Kingdom)
Step 3: In this step, we will add your language, to do this click on the Language Preferences then Add a language and add a language. After adding the language, click on it and Move Up to set it as your first language. Finally exit from the language window
Step 4: Go back to the Region window and then click Additional Settings. Here you should check if the values are the same.
Step 5: Here we will set the location and open the Region window & click on Location select your country as the Home Location and then OK.
Method 2: Disable all the Third Party Services
You are likely to face error 0x80d02002 Windows 10 Update 20h2 if any third party services are interfering while installing the update.
Here’s how:
Step 1: Open the Run dialog box and type msconfig and press Enter. A system configuration window will appear.
Step 2: Now go to the Services tab> here you have to check to Hide all Microsoft Services. This will present at the bottom of the Window
Step 3: Click on the Disable all and click on Apply>OK
Step 4: Lastly Reboot your PC.
If you are still struggling with error 0x80d02002 Windows 10 Update 20h2. Then try to run the Windows Update Troubleshooter or install the update manually.
Best Recommended Solution for Windows Problems
Though all the above mentioned methods are quite effective but sometimes you need an expert to resolve your troubles. So considering the situation we highly recommend a PC Repair Tool to repair all the corrupted system files. This tool will resolve any kind of update errors, gaming errors Registry errors and so on. So must give a try to this tool.
⇑Get PC Repair Tool from Here⇓
That’s all about Error code 0x8007000d installing Windows 11 from USB & error 0x80d02002 Windows 10 Update 20h2. We assume you liked the blog.
