
If you are facing any problem, with your Wi-Fi connection and looking for the solution to fix Wi-Fi not working Windows 10 problem, then you are in right place. Here, we are discussing about “WiFi Driver for Windows 10” in details and providing easy & recommended steps to reinstall the WiFi Drivers for Windows 10. Let’s starts the discussion.
Table of Contents
About WiFi Driver
If you want to connect your PC/Laptops with any Wi-Fi Network, then you need to download/install the WiFi Driver for Windows 10. This driver software helps you to connect your PC to other Wi-Fi networks. Fining the correct Wi-Fi driver for your device can be easier. To get this, you need to go to your Wi-Fi’s manufacturer website and download the driver as per your System configuration.
Wi-Fi Drivers helps you to connect your computer or computer to the internet. Laptops are associated with the web world in various ways including Wi-Fi. So, this driver is essential nowadays to run the PC properly. As we know that, “Wi-Fi” is source of medium of exchange that helps the individuals or group of peoples to associate with the web.
Now comes to matter “Wi-Fi not working Windows 10”, many users reported about this problem on various popular online platforms and asked for the solution. Users explained that they are facing Wi-Fi not recognized issue on machine while try to connect their PC to internet, and Wi-Fi section in notification shows the error similar to this.
[Tips & Tricks] How to fix Wi-Fi not working Windows 10?
Step 1: Make sure Airplane Mode is turned OFF
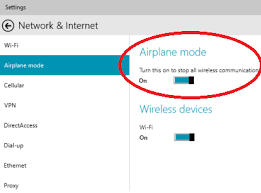
Step 1: Click on “Start” button and type “Action Center” in Windows Search
Step 2: Click on “Action Center” from searched result
Step 3: Now, click on “Expand” to expand it
Step 4: If “Airplane Mode” is grey, it is turned OFF. If it is blue, click it to “Turn it OFF”
Procedure 2: Make sure Wi-Fi is turned ON
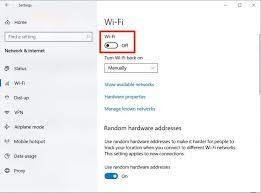
Step 1: Press “Windows + I” keys together from keyboard to open “Settings” App
Step 2: Click on “Network & Internet”
Step 3: Click on “Wi-Fi” in left panel and turn ON the toggle under “Wi-Fi” section
Procedure 3: Make sure your wireless router or ISP (Internet Service Provider) is not problematic
Step 1: Use another device to connect to the same Wi-Fi network and check if it can connect to the internet. If it fails to connect, then wireless router or ISP is problematic
Step 2: Press “Windows + R” keys together from keyboard to open “Run Dialog Box”
Step 3: In the opened “Run Dialog Box”, type “CMD” and press “CTRL + SHIFT + ENTER” keys together to open “Command prompt as Administrator”
Step 4: In the opened “Command Prompt” window, type “ipconfig” command and hit “Enter” key to execute
Step 5: Locate wireless LAN adapter Wi-Fi and write down its default Gateway for later use
Step 6: Now, type “ping <Default Gateway>” and hit “Enter” key
Procedure 4: Run Network Troubleshooter or Internet Connections Troubleshooter
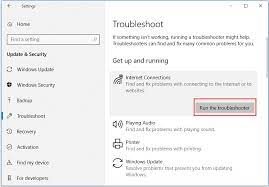
Step 1: Press “Windows + I” keys together from keyboard to open “Settings” App
Step 2: In the opened “Settings” App, go to “Update & Security > Troubleshoot”
Step 3: Click on “Run the troubleshooter” button under “Internet Connections” option
Step 4: Follow on-screen instructions to finish troubleshooting process
Step 5: Once done, restart your computer and please check if WiFi not working problem is resolved.
Procedure 5: Reinstall WiFi Driver for Windows 10
Step 1: Go to your network adapter manufacturer’s website and search for your network adapter
Step 2: Download the suitable Wi-Fi drivers in your computer
Step 3: Once downloaded, double-click on downloaded file and follow on-screen instructions to finish the installation
Step 4: After that, restart your computer and please check if trouble is resolved.
Procedure 6: Reset TCP/IP Stack using Command Prompt
Step 1: Press “Windows + X” keys together from keyboard and select “Command Prompt as Administrator”
Step 2: Type the following command one-by-one in command Prompt and hit “Enter” key after each
“netsh int ip reset”
“netsh int tcp set heuristics disabled”
“netsh int tcp set global autotuninglevel=disabled”
“netsh int tcp set global rss=enabled”
Step 3: After execution, reboot your computer and please check if the Wi-Fi not recognized problem is resolved.
Procedure 7: Perform a registry tweak with Command Prompt
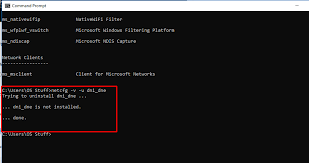
Step 1: Pres “Windows + X” key from keyboard and select “Command Prompt as Administrator”
Step 2: Type the following command one-by-one in command line and press “Enter” key after each command
“netcfg –s n”
“reg delete HKCRCLSID\{988248f3-a1ad-49bf-9170-676cbbc36ba3} /fnetcfg -v -u dni_dne”
Step 3: Once done, close command prompt window and check if the problem is resolved
Procedure 8: Disable Internet Protocol Version 6 (TCP/IPv6)
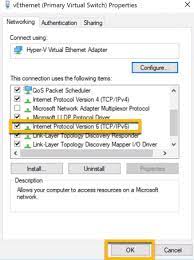
Step 1: Go to “Properties” of the Network Adapter and look for Wireless adapter that is currently running
Step 2: Search for the “Internet Protocol Version 6 (TCP/IPv6)” under the options “This connection uses the following items” and uncheck this checkbox
Step 3: Finally, click on “OK” and restart your computer to save the changes
Procedure 9: Reinstall Network Adapter manually
Step 1: Press “Windows + X” keys together from keyboard and select “Device Manager”
Step 2: Find your network adapter in the list
Step 3: Right-click on your network adapter and select “Uninstall”
Step 4: Follow on-screen instructions to finish the uninstall process
Step 5: Restart your computer and install the network adapter using ‘Procedure 5’
Procedure 10: Switch the maximum performance mode
Step 1: Click on “Start” button and type “Power Management” in Windows search
Step 2: Select “Power & Sleep” from searched result
Step 3: In the opened “Power Options” window, locate your current plan and click on “Change Plan settings”
Step 4: Go to “Change advanced power settings”
Step 5: Locate “Wireless Adapter Settings” and set “Power Saving Mode” to “Maximum Performance”
Step 6: Finally, click on “Apply” and “OK” to save the changes
You may also read: How to install a Driver for your Network Adapter?
Conclusion
I am sure this article helped you to “How to Fix Wi-Fi not working Windows 10“, “Reinstall WiFi Driver for Windows 10” with several easy methods/procedures. You can choose/follow either one or all procedures to fix this issue.
If you are unable to How to Fix Wi-Fi not working Windows 10 Problem with the solutions mentioned above, then it might possible that your System has infected with malware or viruses. According to security researchers, malware or viruses cause several damages in your computer.
In this case, you can scan your computer with powerful antivirus software that has the ability to delete all types of malware or viruses from System.
You can also try another possible solution to fix this issue. We recommended you to Repair your PCs/laptops with powerful PC Repair Tools/Software that has the ability to remove all the faculty software, clean System registry, remove all types of malware or viruses, fix all types of bugs or errors and improves System performance as well. You can download powerful PC Repair Tool/Software via “Download” link below.
Is Your PC Behaving Abnormal & Needs Instant Optimization?
We recommend you to choose Advanced System Repair Suite which is dedicated to offer complete options to optimize a PC, fix any Windows error, and remove malware threats in easy. The software is award winning and suggested as the best malware fix application supporting all Windows versions including XP/Vista/7/8/8.1/10. Just 3 steps to avail error free PC.
![]()
- Download Advanced System Repair and install on your PC. (Follow all on screen instructions when installer is executed)
- Click “Scan Your PC” button to scan all present issues, errors, junk files, and malware threats.
- Finally, click “Start Repair” to fix all detected problems in next few minutes.
