
Here, we are discussing on “How to Download and Install STM32 Virtual COM Port Driver on Windows” in details and providing some recommended steps/procedures to do this. Let’s starts the discussion.
Table of Contents
What is STM32 Virtual COM Port Driver?
STM or STMicroelectronics is multinational electronics and semiconductor manufacturer. This company is manufacturer of “STM32 Chips” that is belongs to family of 32-bit microcontroller circuits. STM32 chips are grouped into relate series that are based around the same 32-bit ARM processor core like Cortex-M7F, Cortex-M4F, Cortex-M33F, cortext-M3, Cortex-M0+ or cotex-M0.
Each microcontroller have processor core, static RAM, flash memory, debugging interface and various peripherals. When we talk about “STM32 Virtual COM Port Driver”, it is software program developed by STMicroelectronics. This software is designed to connect to the internet and adds a Windows Firewall exception in order to do so without being interfaced with.
The setup package generally consists of 8 files and memory size is usually about 3.31MB. Overall usage of users who have this installed on their computer, most of them are using Windows 7 and Windows 10 Operating System. On other hand, about 25% of users of this software is belongs to United States and it is also famous in France and Germany.
If you have already installed this Virtual COM Port Driver in your computer, then you can see its path in main drive of your computer i.e., “C:\Program files\STMicroelectronics\Software\ STM32 Virtual COM Port Driver\” with the estimated size of 3.31MB. However, the memory size can be vary according to version of Virtual COM Port Driver software.
[Tips & Tricks] How to Download and Install STM32 Virtual COM Port Driver on Windows 10?
Step 1: At first, you need to visit “STMicroelectronics Official website” and download the driver
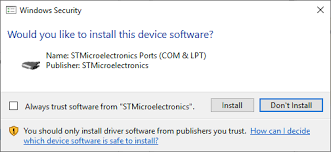
Step 2: Once downloaded, double-click on “Virtual COM Port Driver Installation Package” or “Setup package”
Step 3: Follow on-screen instructions to finish the installation process
Step 4: Once done, restart your computer to save the changes.
Update or reinstall Virtual COM Port Driver [Manually]
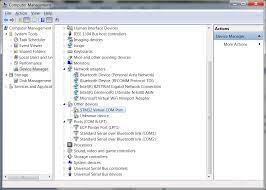
Step 1: Open “Device Manager” and expand “Universal Serial Bus” and Ports (COM) category
Step 2: Right-click on problematic driver which shows “Yellow Exclamation Mark” on it and select “Update for Driver Software..”
Step 3: In next window, select “Search automatically for updated driver software”
Step 4: This process will install the latest driver software in your computer. Once done, restart your computer to save the changes
Update & reinstall STM32 Virtual COM Port Driver [Automatically]
Download software for drivers update
If you don’t have enough computer knowledge to update the driver manually, then you can go for automatic solution. You can use “Automatic Drivers Update Software” to update your drivers with just few clicks. This software will automatically recognize your System and find the latest drivers for it. To get this software, click on above link.
Conclusion
I am sure this article helped you to “How to download and Install STM32 Virtual COM Port Driver on Windows 10” with easy steps. If you have already downloaded, but facing problem with Virtual COM Port Driver, then you can update or reinstall it with the steps mentioned above. If you have any suggestions or queries regarding this, please write on comment box given below.
Is Your PC Behaving Abnormal & Needs Instant Optimzation?
We recommend you to choose Advanced System Repair Suite which is dedicated to offer complete options to optimize a PC, fix any Windows error, and remove malware threats in easy. The software is award winning and suggested as the best malware fix application supporting all Windows versions including XP/Vista/7/8/8.1/10. Just 3 steps to avail error free PC.
![]()
- Download Advanced System Repair and install on your PC. (Follow all on screen instructions when installer is executed)
- Click “Scan Your PC” button to scan all present issues, errors, junk files, and malware threats.
- Finally, click “Start Repair” to fix all detected problems in next few minutes.
